• Murals
  • Paper Crafts
  • Cricut + SVG files
  • Sewing
  • doodled coloring pages
    • Facebook
    • Instagram
    • Pinterest
    • Twitter

oh yay studio - Making + baking + everyday celebrating

Celebrating Holidays + everydays through making + DIYs + Murals + costumes + a creative monthly subscription

  • Home
  • About
  • Categories
    • DIYs
      • Painting
      • Cricut + SVG files
      • Paper Crafts
      • Sewing
      • Yarn + Fibers
      • Tie Dye
    • Printables
    • Murals
    • Recipes
    • Holiday
    • Costumes
    • Life
    • Uncategorized
  • Contact
  • SHOP!

All DIYs Tie Dye

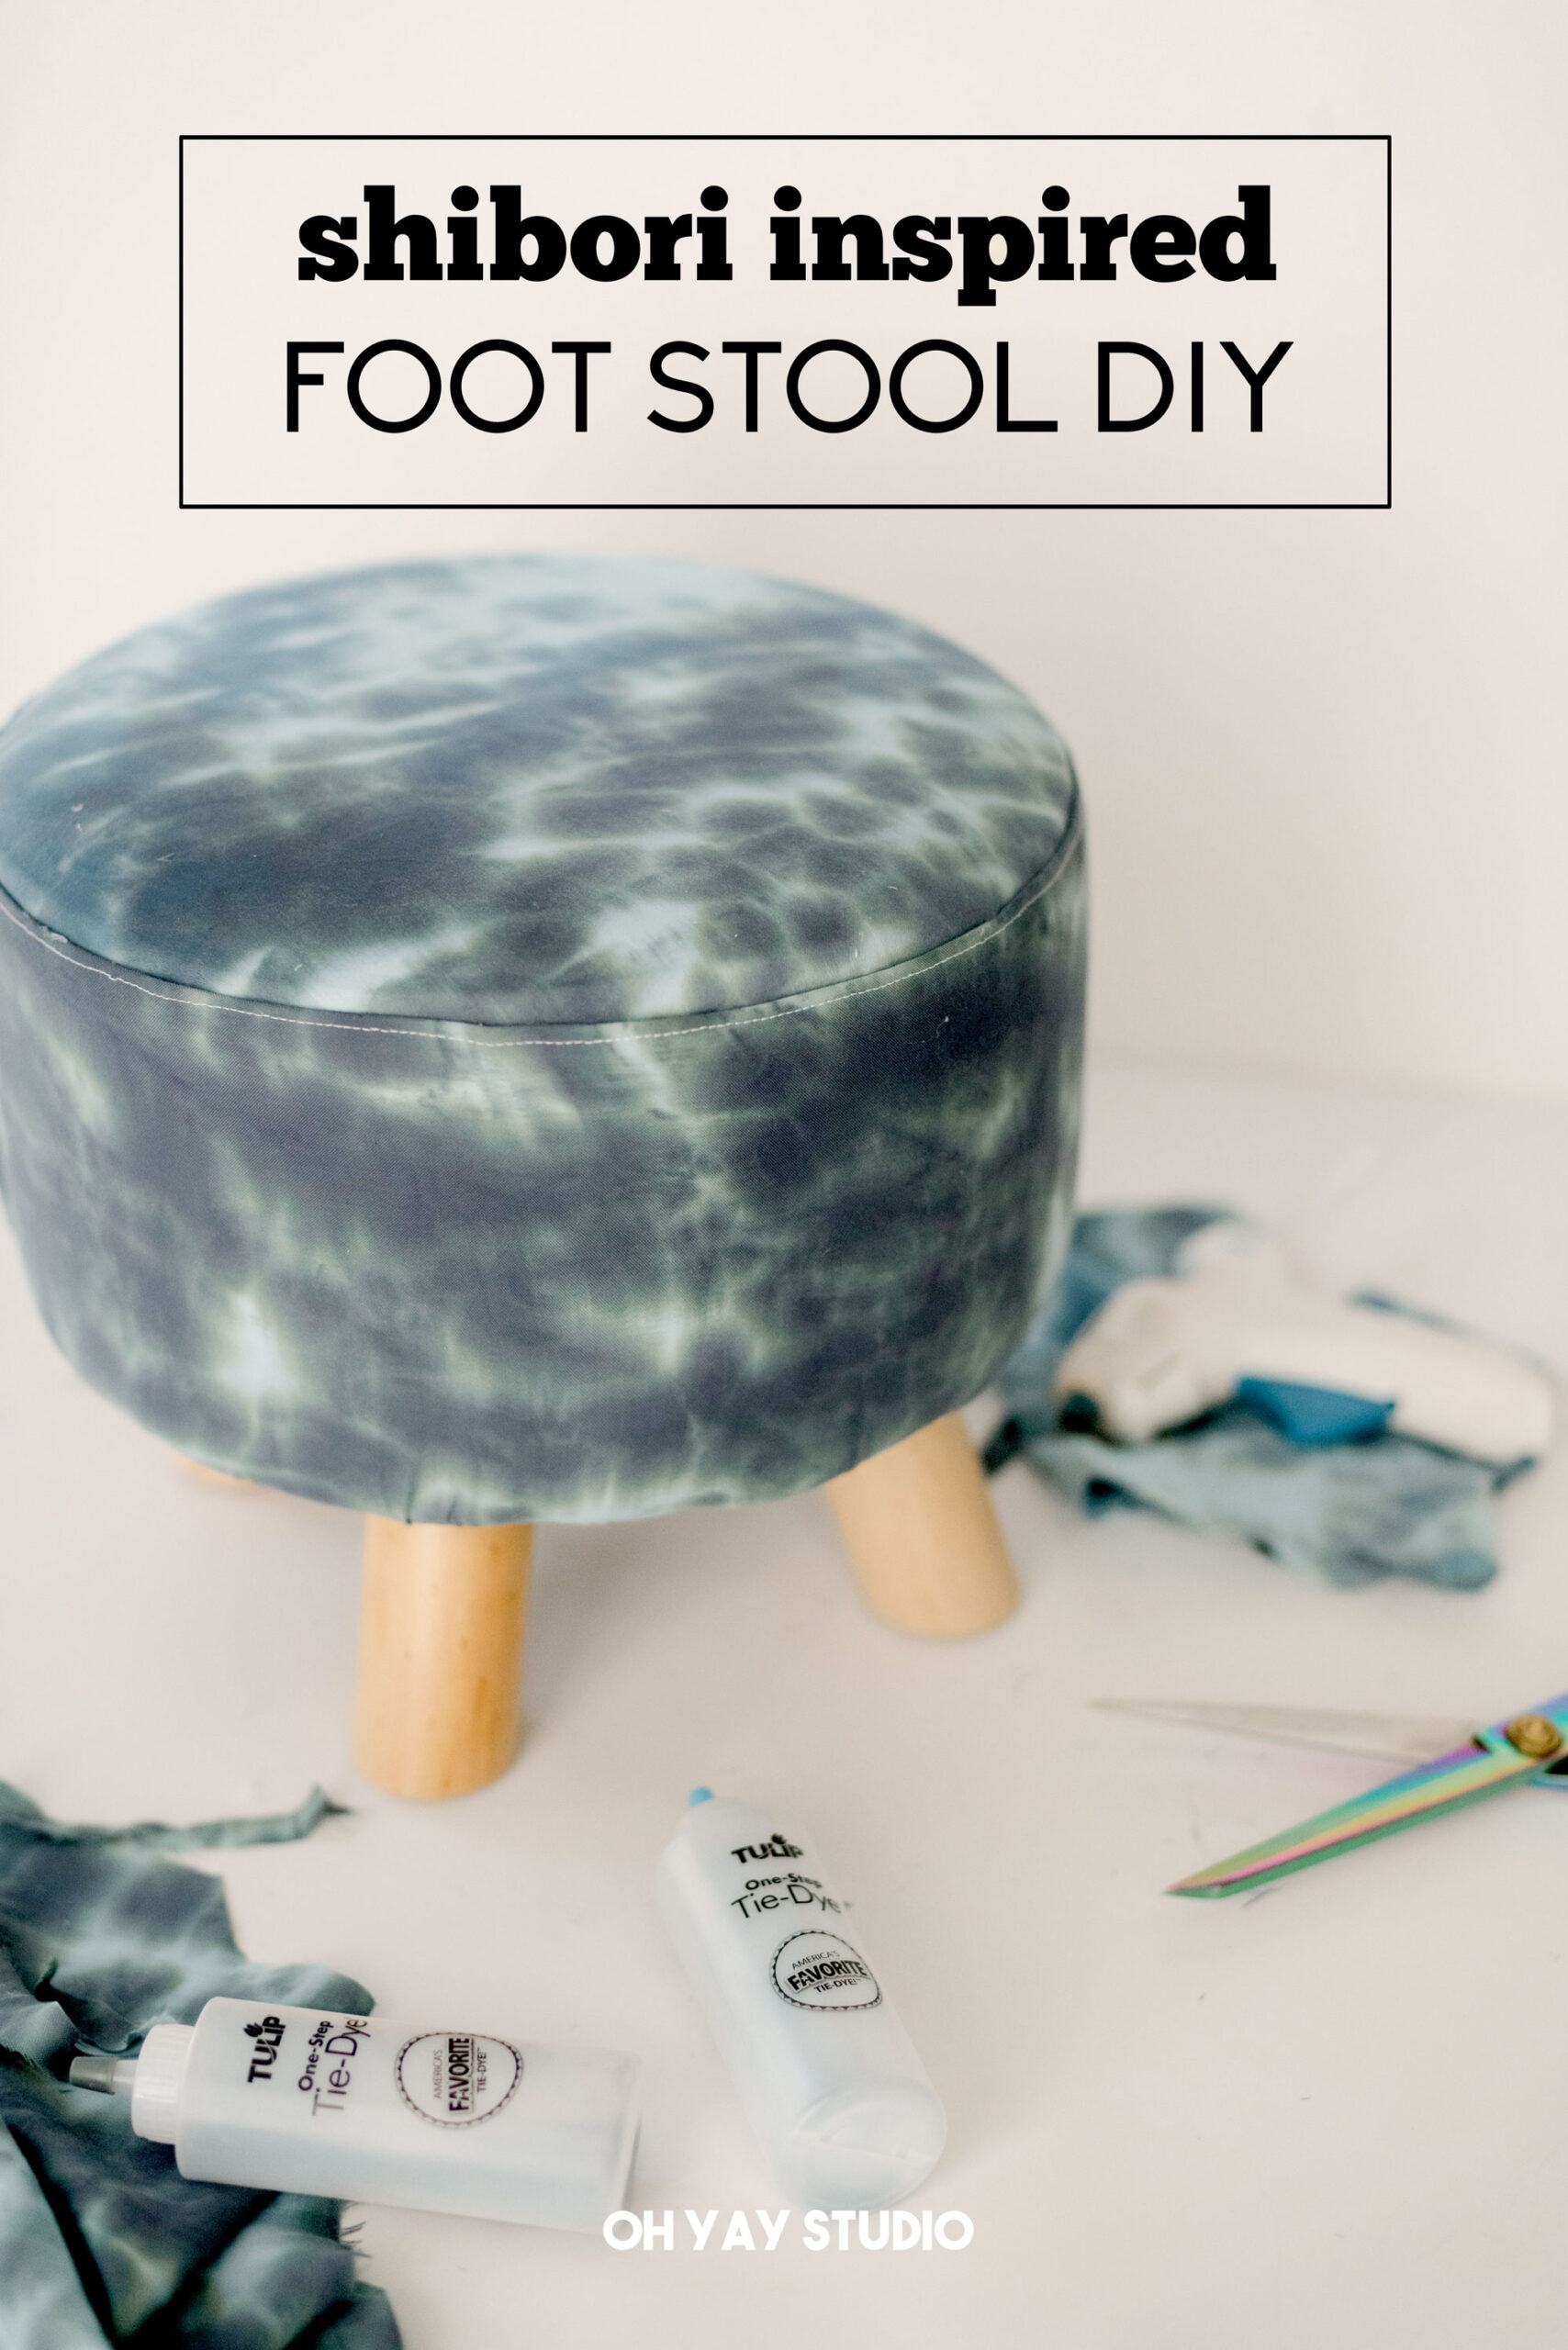
Shibori inspired footstool DIY

*this project is in partnership with Tulip and their amazing one step Tie-Dye’s

If you’re a fan of tie-dye then you are likely familiar with the term Shibori! It is a Japanese term for the way that you wrap your fabrics and squeeze and press them in various shapes (it usually involves wooden squares or triangles to wrap fabric into shapes around them…..today I am using a round tube)! If you’ve seen Shibori done before, it’s typically with a deep blue colored dye called indigo dye…..wellllll, our fine friends at Tulip have made a one-step kit that is sure to spark your intrigue into the world of Shibori-like folding to make some amazing dyed EVERYTHING!

Shibori inspired footstool recovering, how to recover a footstool, shibori inspired tie dye DIY, Shibori inspired dye, how to shibori dye a footstool

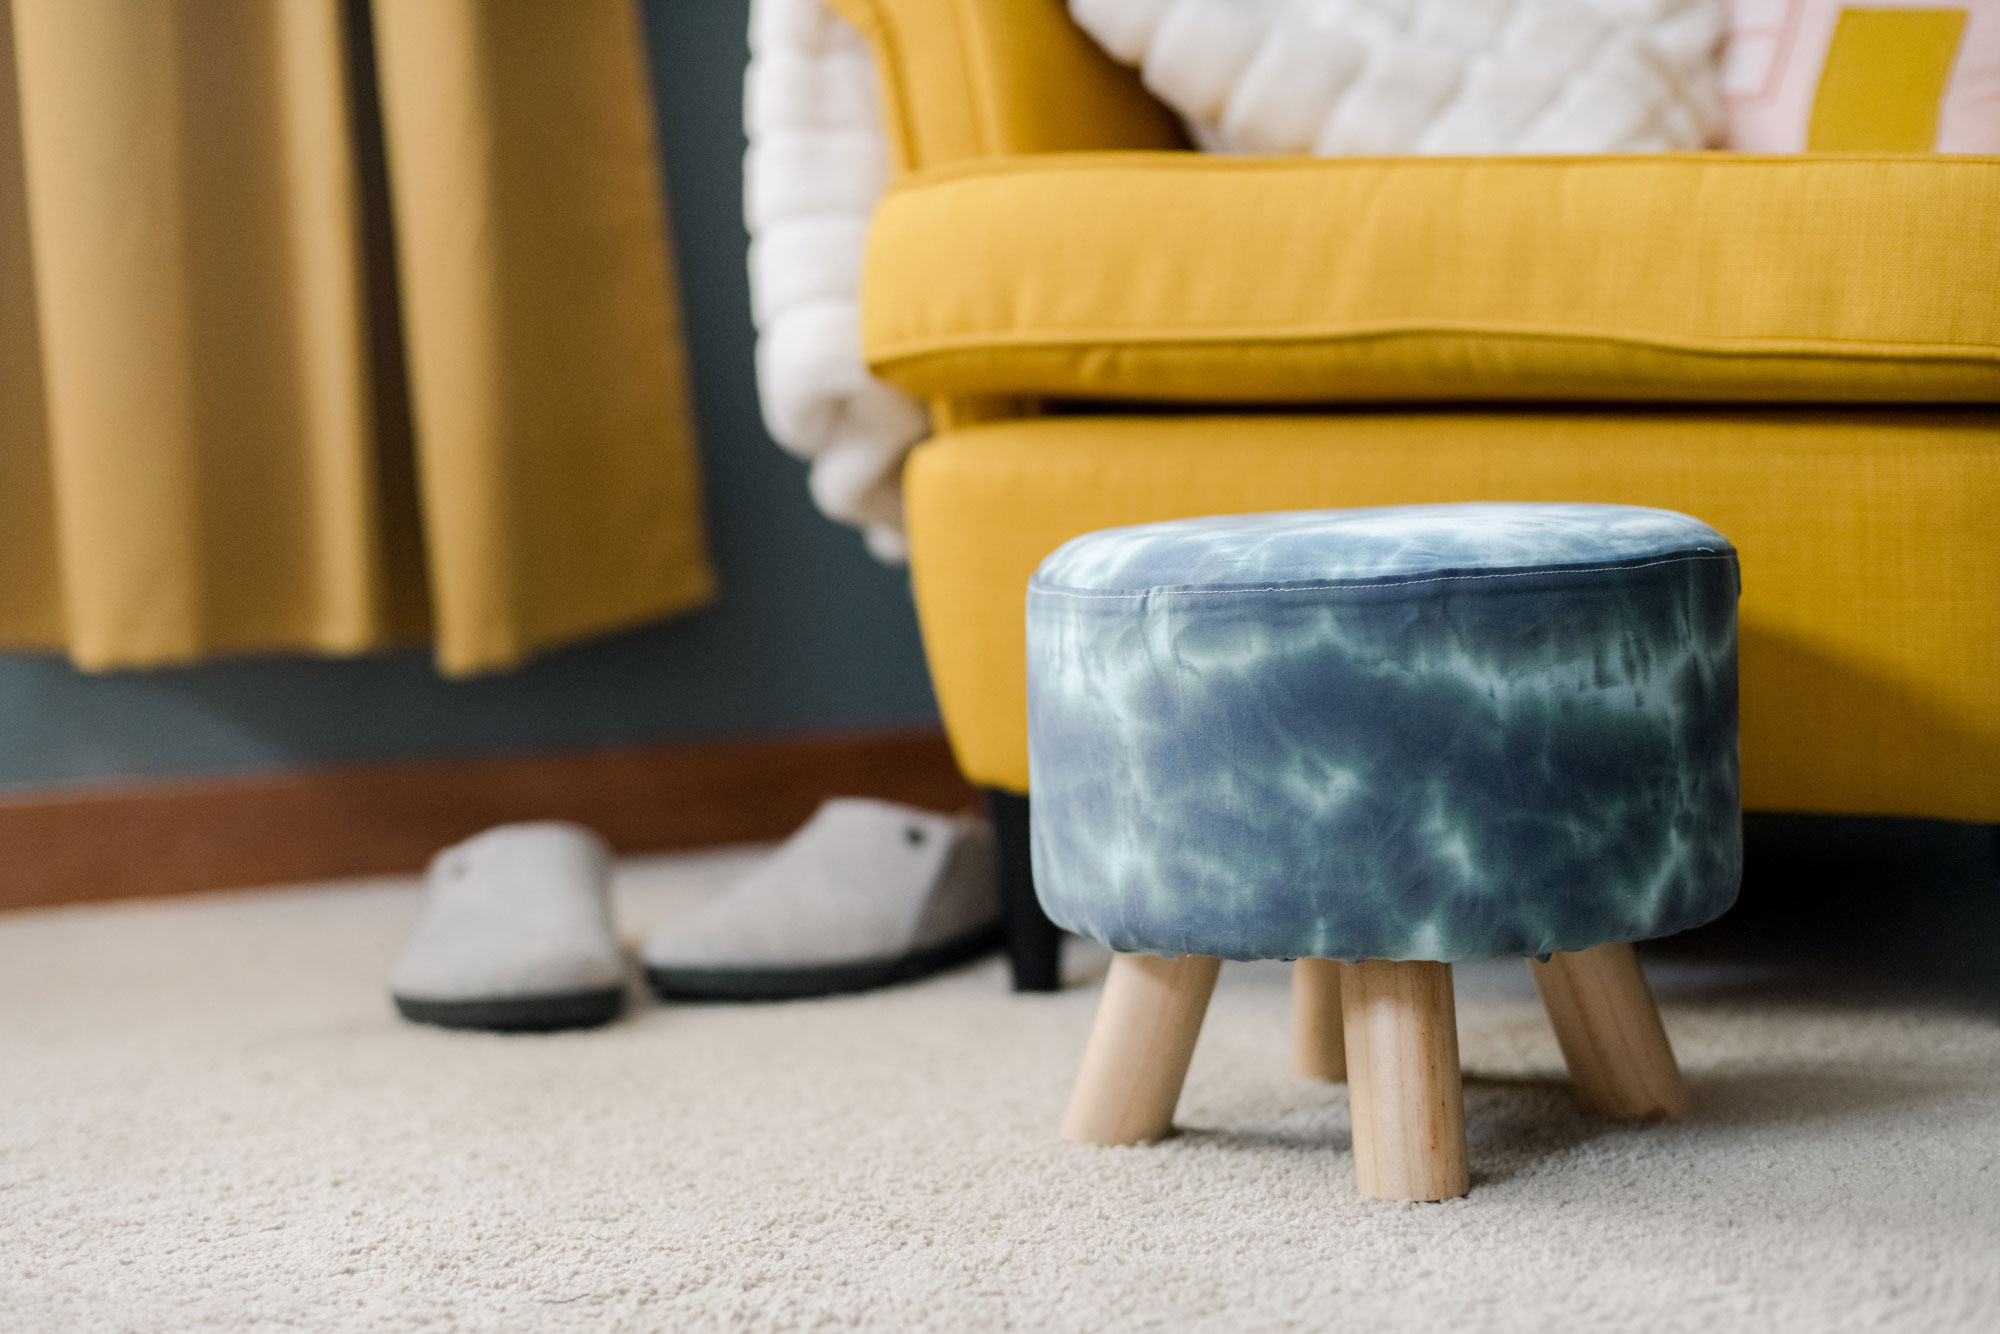
We have an old footstool that I’ve tried dying plain blue from it’s dirty white that it originated from (you can tell from the photos its kinda icky and didn’t turn out as deep in color as I’d like…..I think it was from the fabric that the footstool is originally covered in)! SOOOO! When one DIY doesn’t go right, you just keep going and keep trying (that’s my motto anyway)! To fix of “spruce up” this footstool that is ever-so-loved in our house, I am going to take an old piece of white bedsheet (that’s already been cut into a million things from my daughter making bedding for her dolls), dye the sheet and recover the footstool to give it new life! 🙂 And of course I am going to use the Tulip Shibori tie-dye kit because I am SUCHHHH a fan of tie-dying heavily used items (it hides the stain factor SUPER well……hello #momhack)! 🙂 

Shibori inspired footstool recovering, how to recover a footstool, shibori inspired tie dye DIY, Shibori inspired dye, how to shibori dye a footstool

MATERIALS:

  • Any piece of white fabric (100% cotton, silk or linen will work best) – an old t-shirt, bedsheet or even a piece of remnant fabric will do
  • A Tulip one-step Shibori style Tie-Dye kit and alllll of it’s enclosed materials (there’s many included materials for multiple methods)
  • A pair of scissors
  • A glue gun/staple gun for adhering the new fabric to the footstool
  • A pan + cookie sheet/drying rack for catching your excess dye
  • optional iron for creases 🙂 

INSTRUCTIONS: 

1. Pre-wash your fabric! A *must do* step!

Shibori inspired footstool recovering, how to recover a footstool, shibori inspired tie dye DIY, Shibori inspired dye, how to shibori dye a footstool

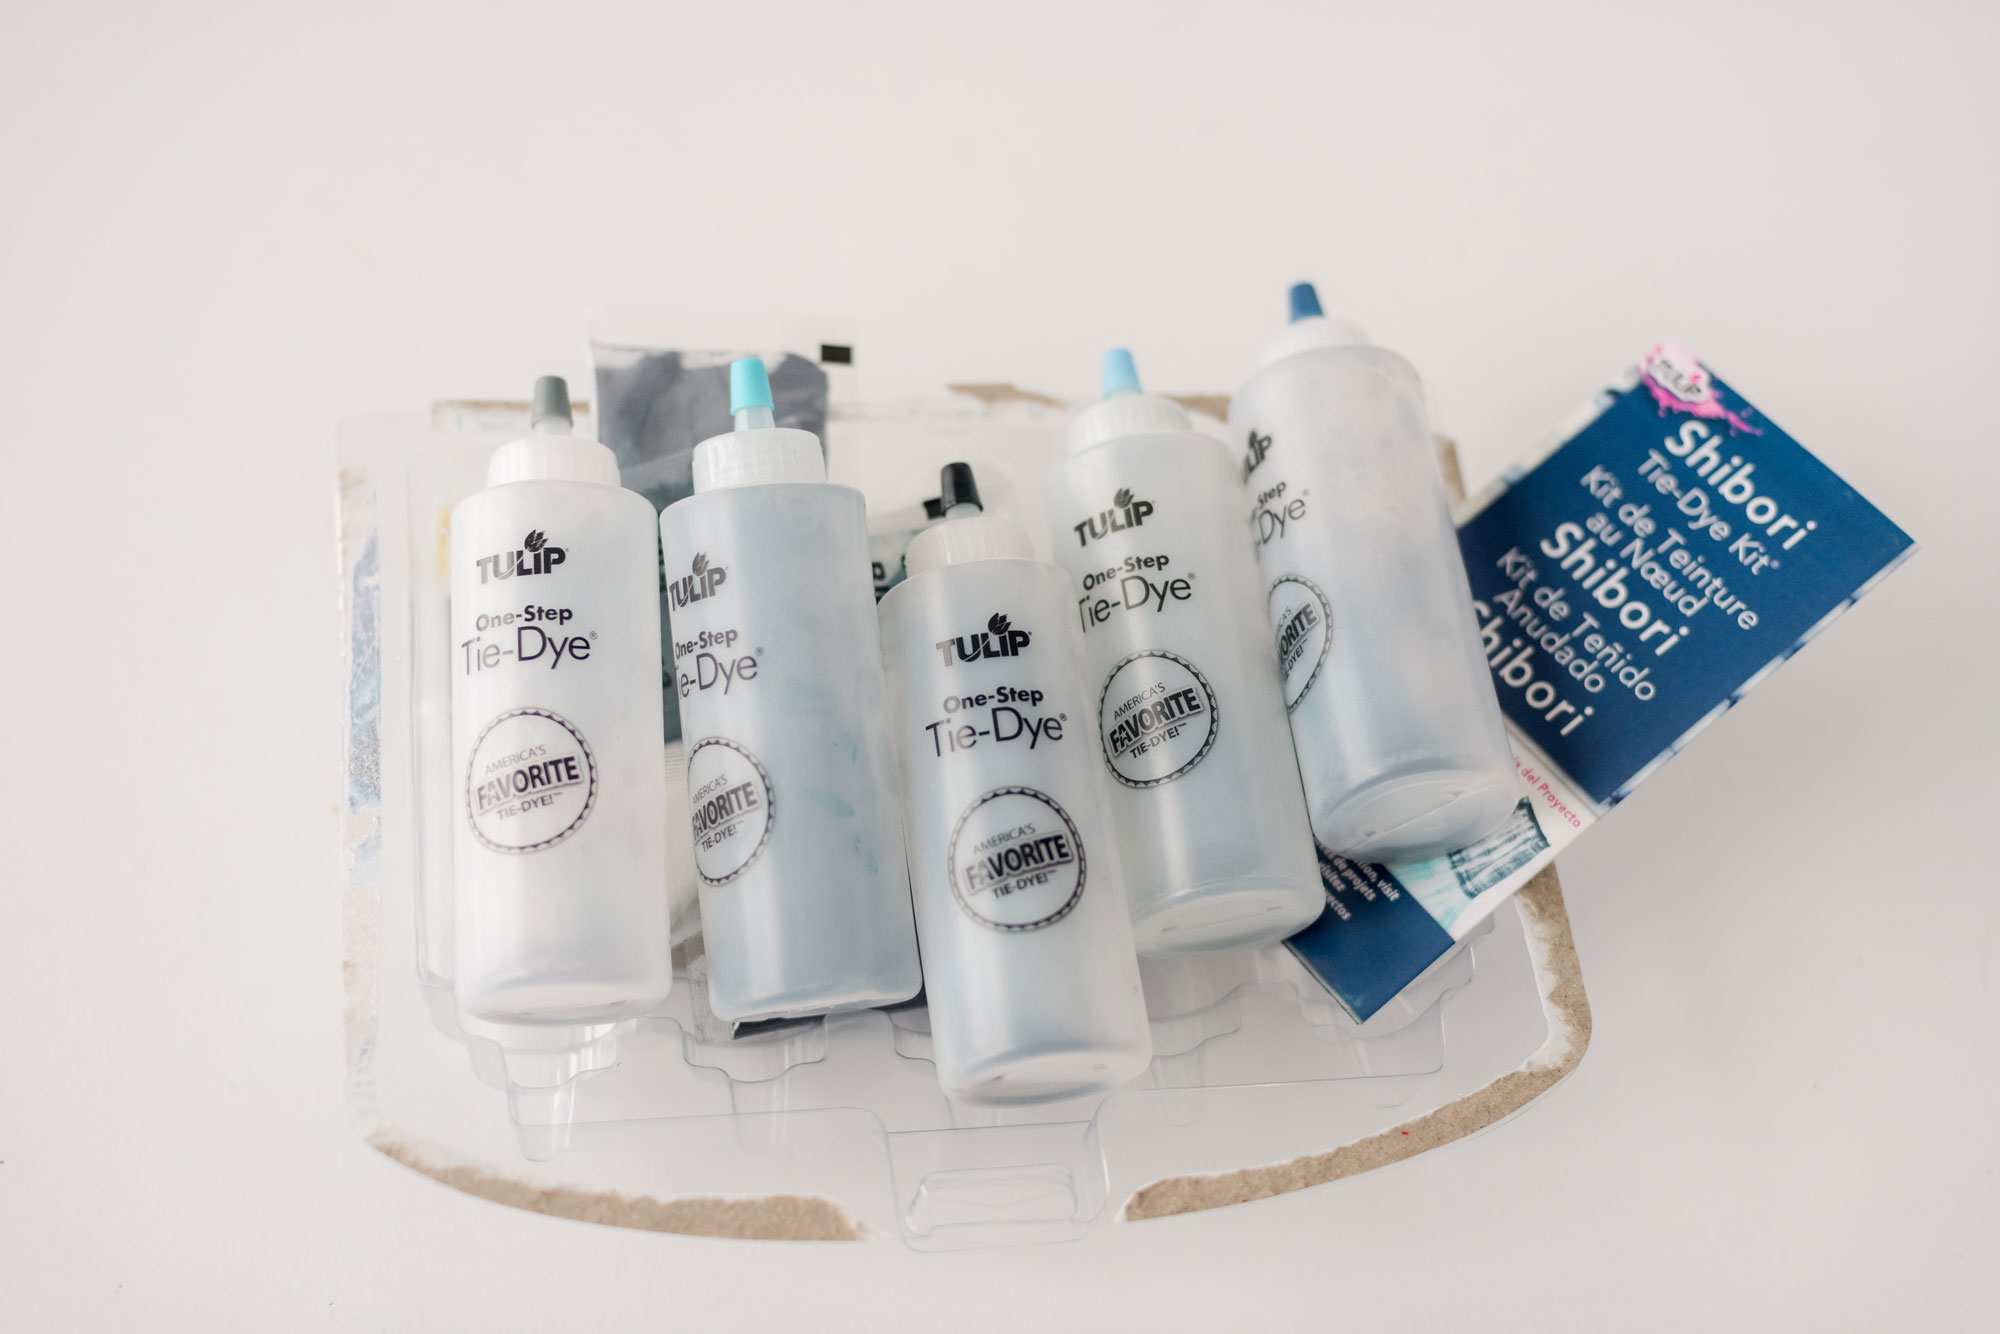
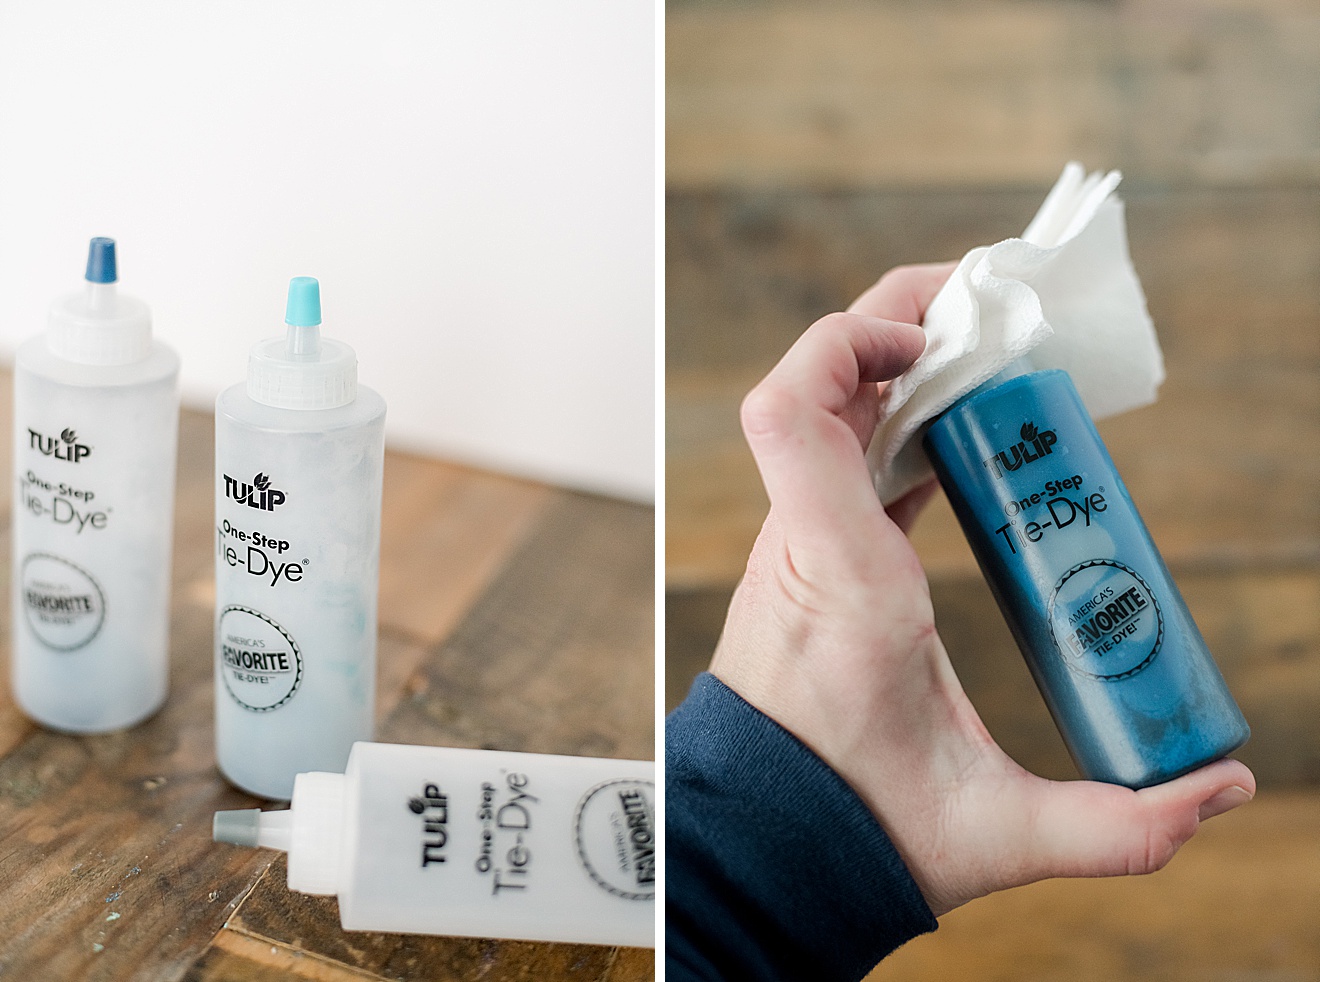
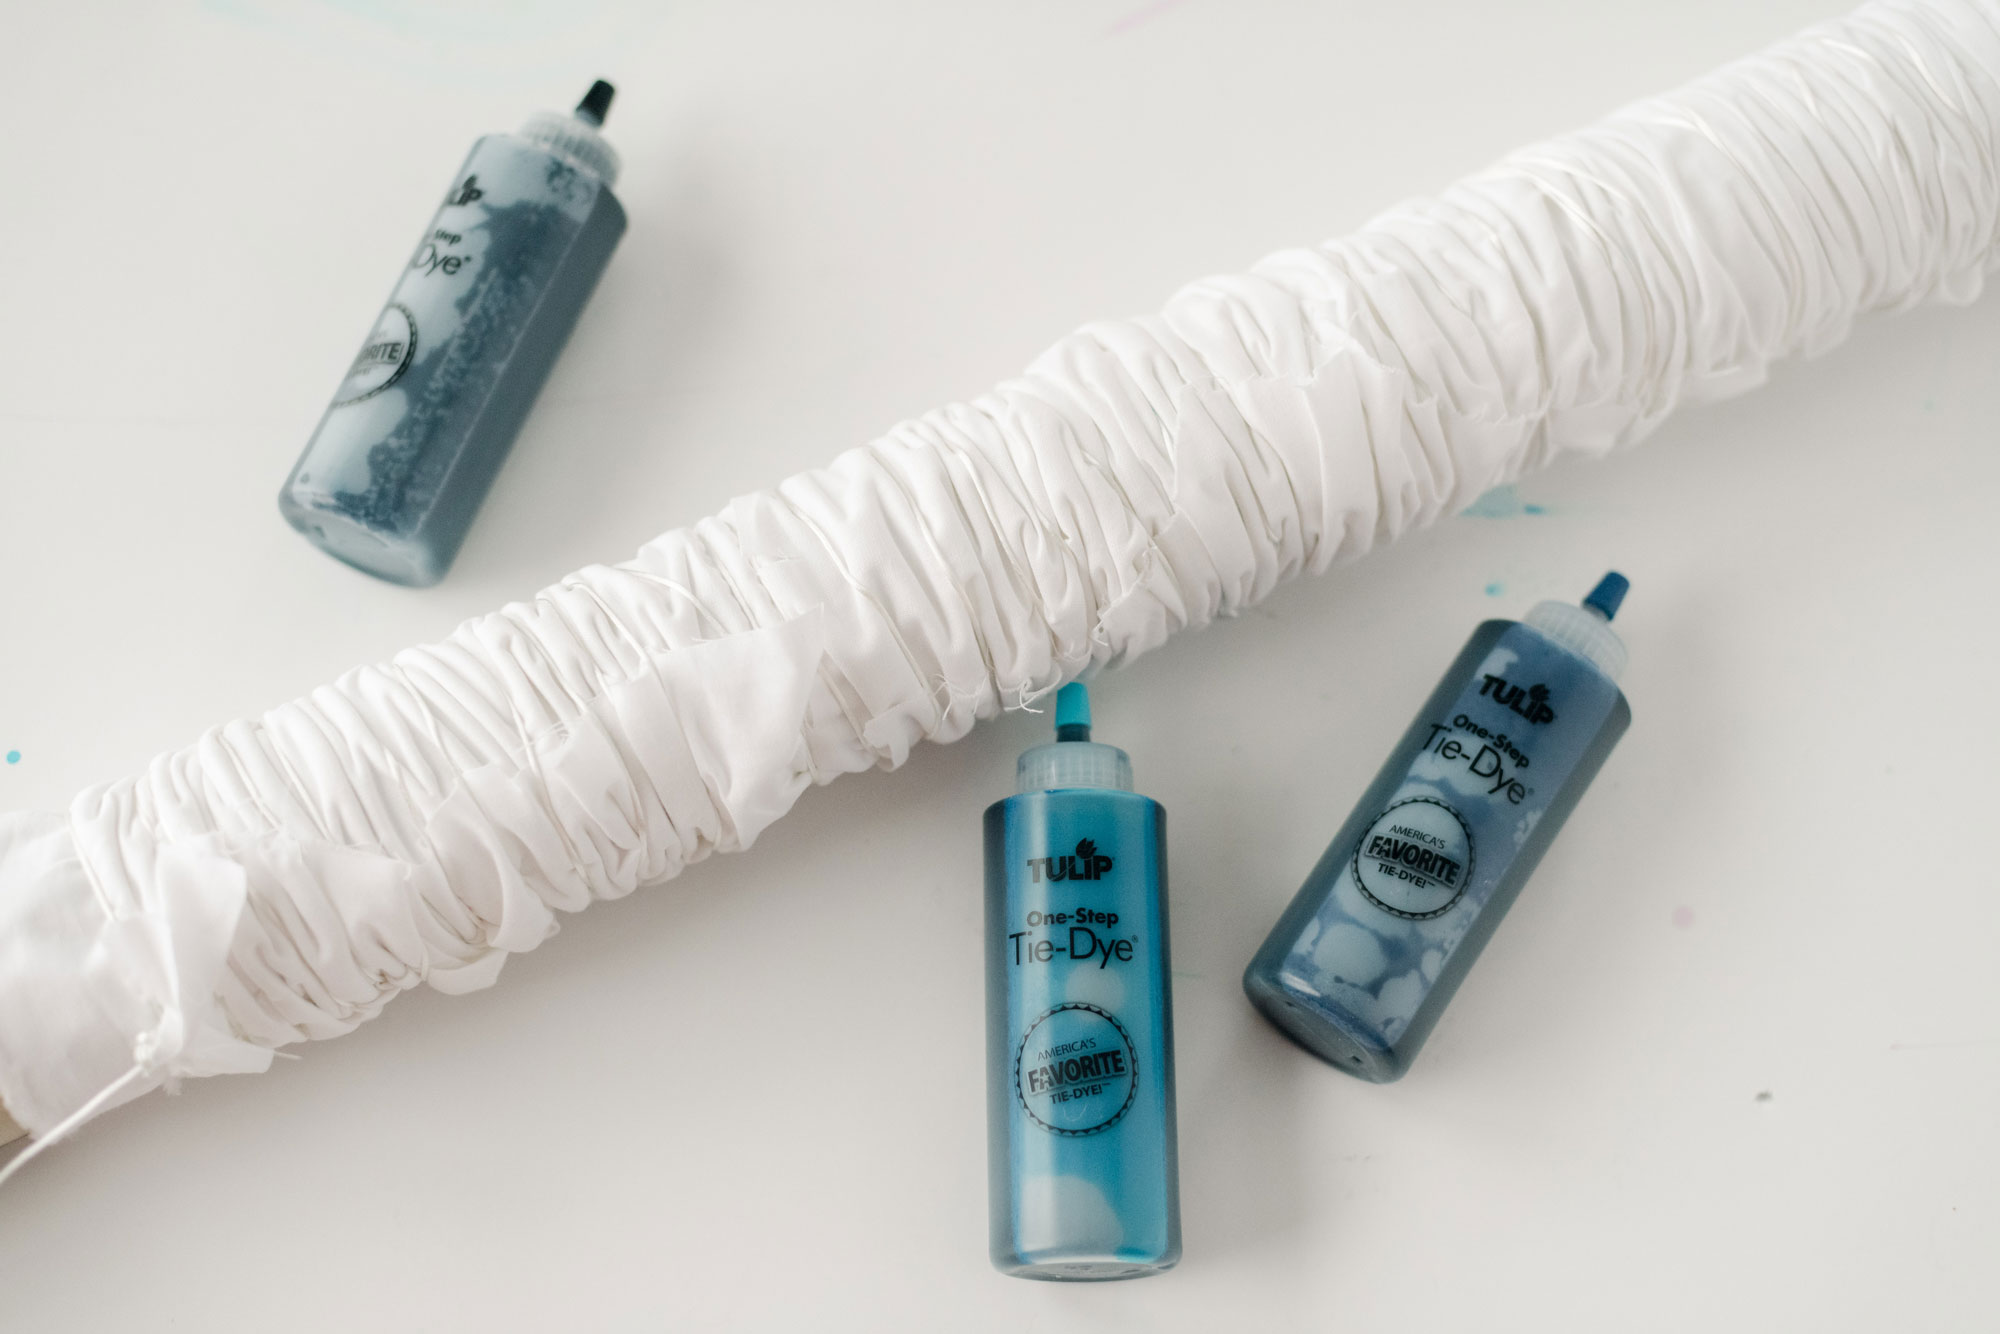
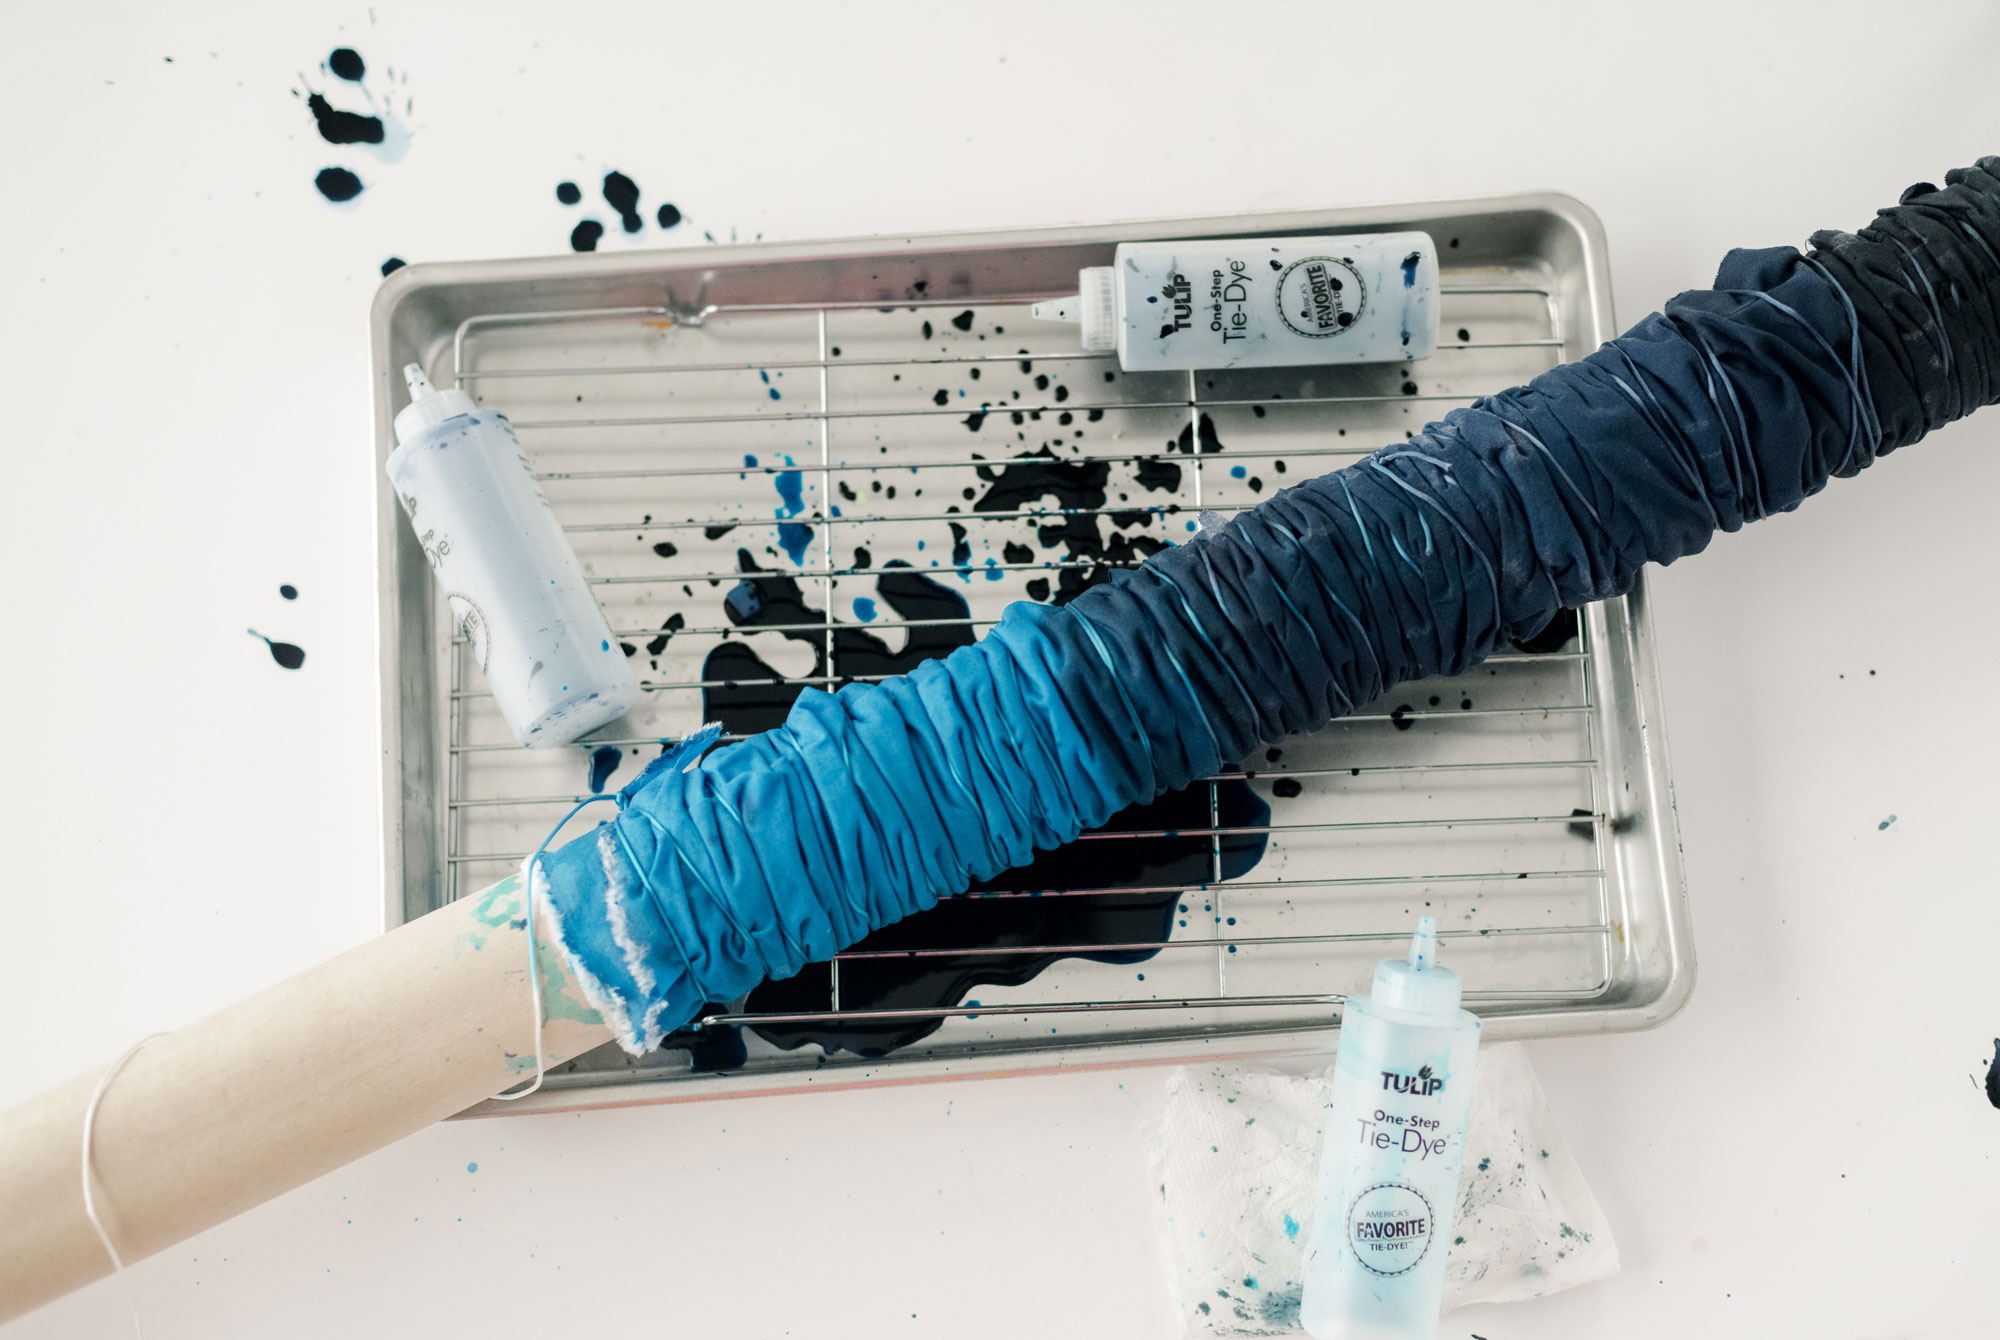
2. Look through the instructions in your Shibori one-step dye kit and decide which shibori-style folding technique you will try with your fabric. Then choose your colors of blue and fill each both with both the dye and the recommended water. Be sure to shake well (TIP…..put a paper towel over the tip of the cover before shaking so that blue dye doesn’t go EVERRRYYYWHERE! 🙂 
Set your dye aside. 

Shibori inspired footstool recovering, how to recover a footstool, shibori inspired tie dye DIY, Shibori inspired dye, how to shibori dye a footstool

3. Follow the instructions for your desired folding technique. 
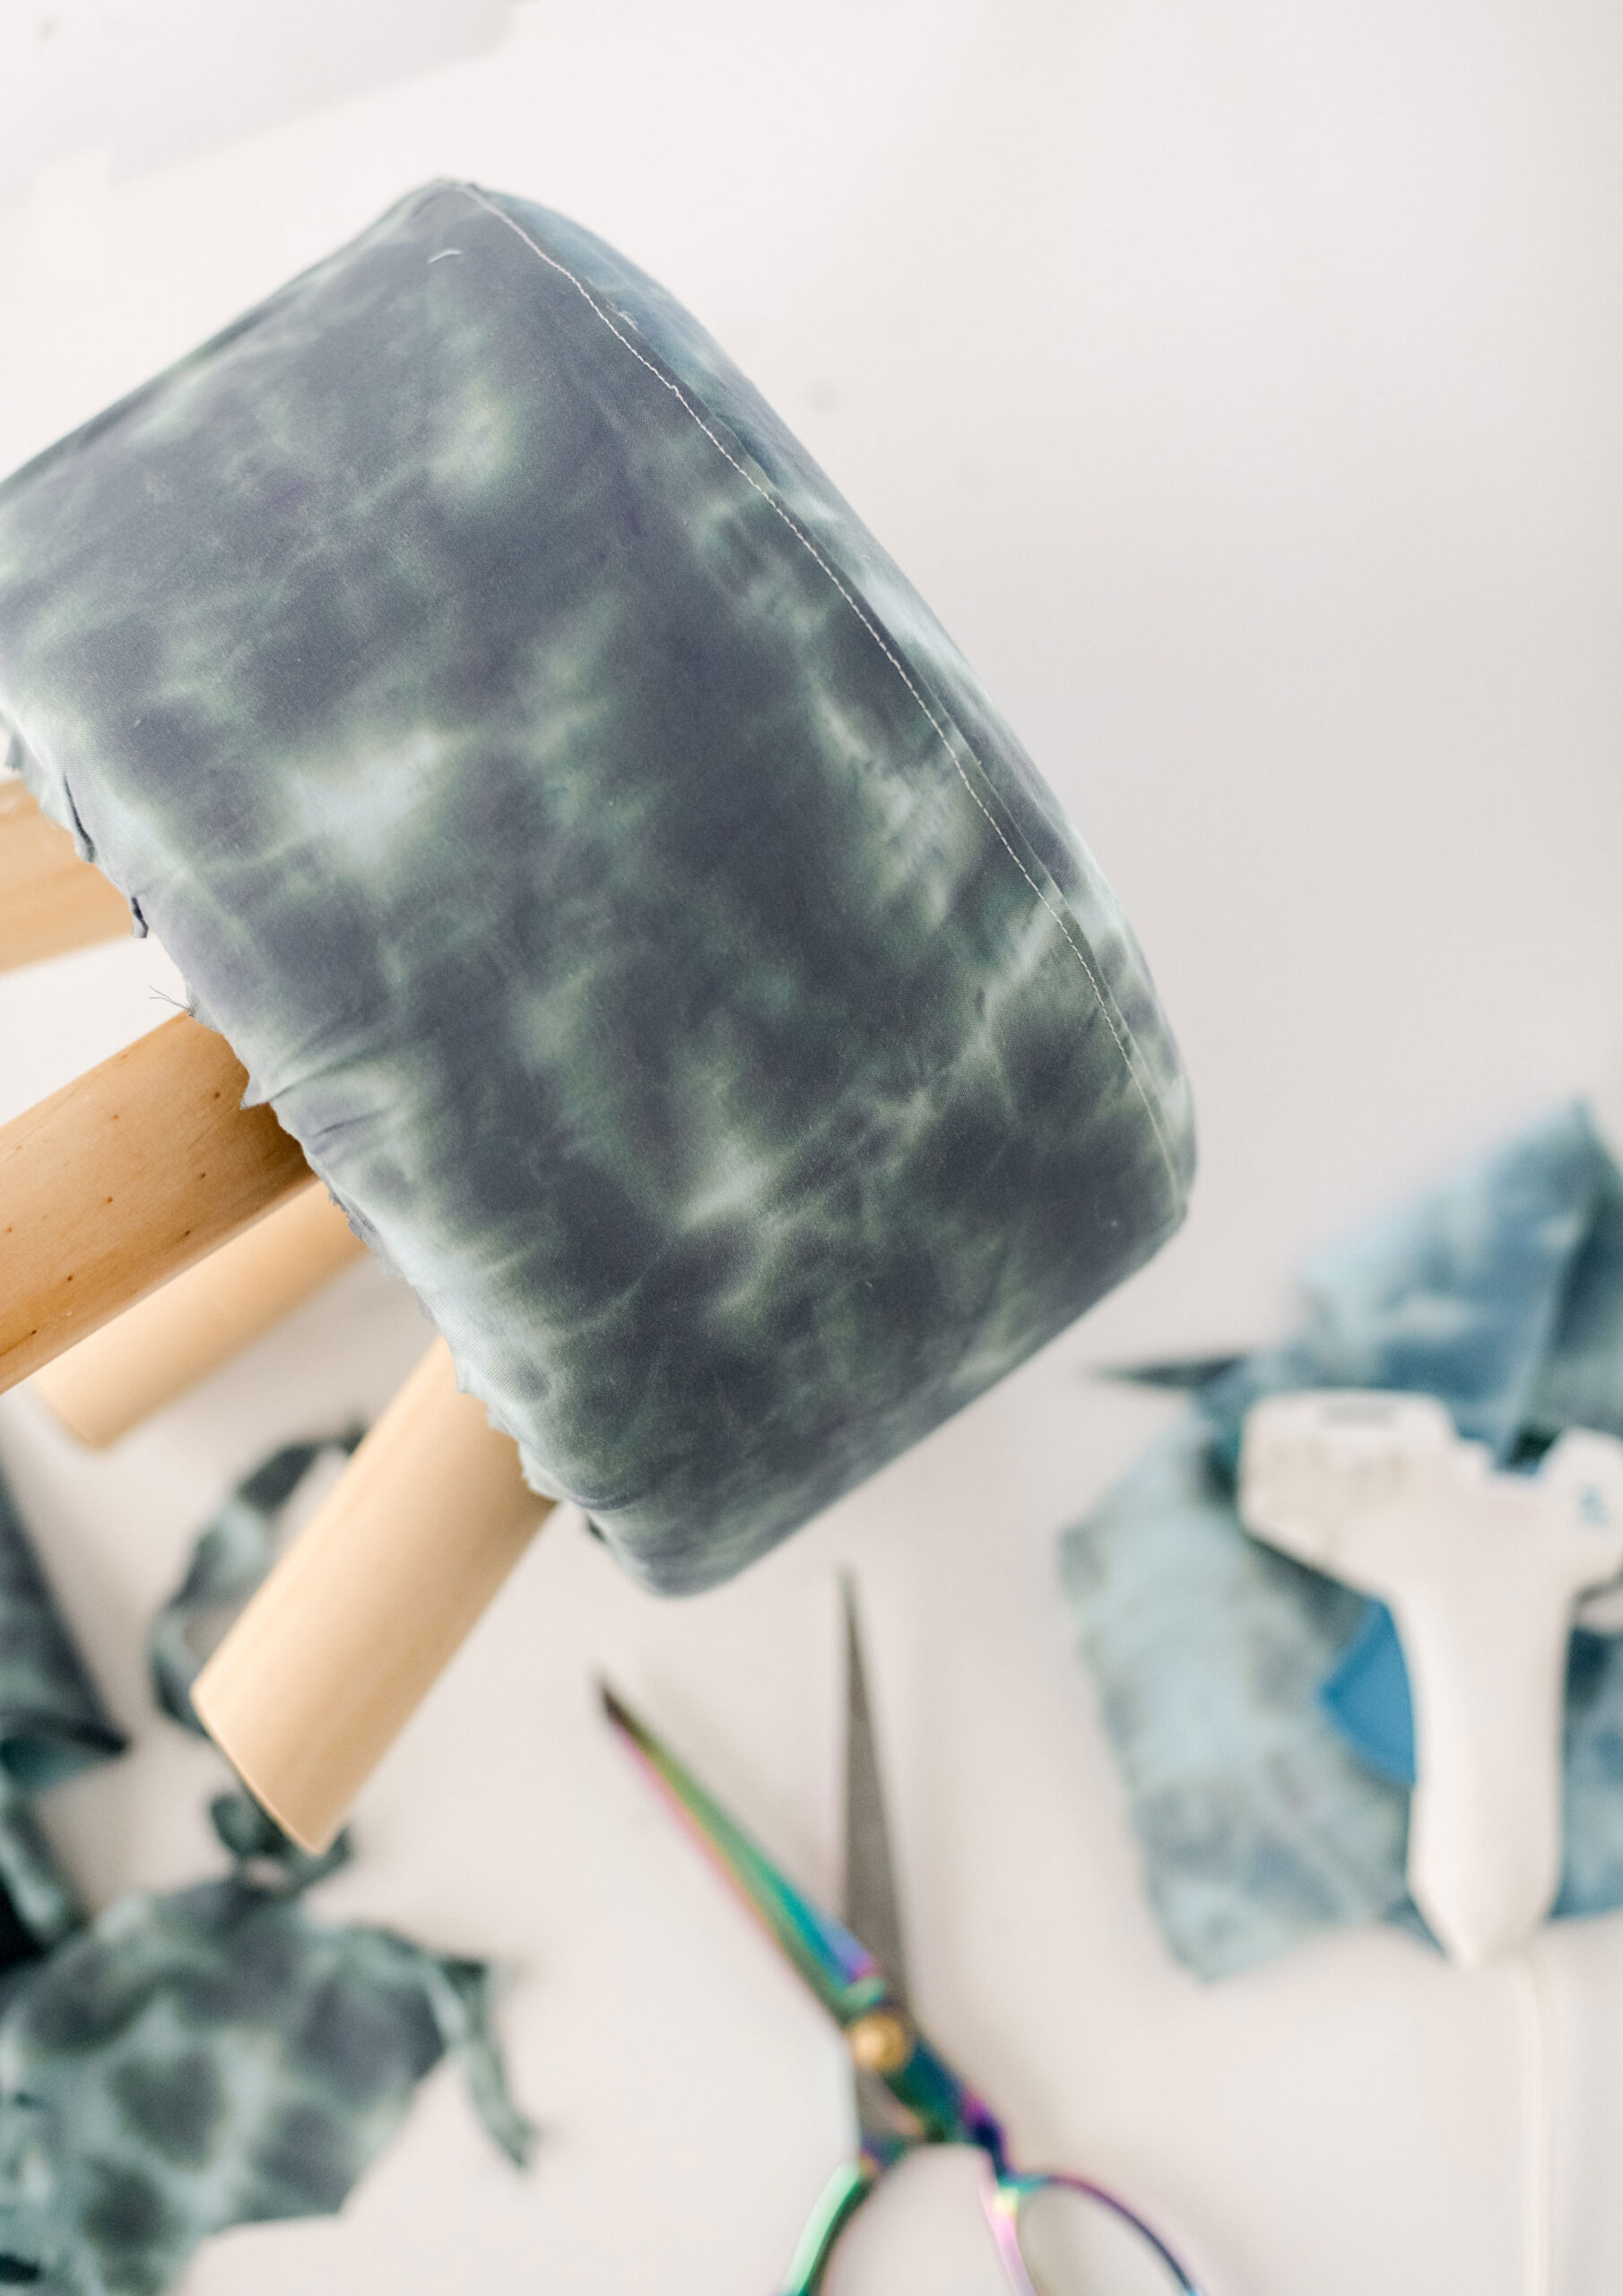
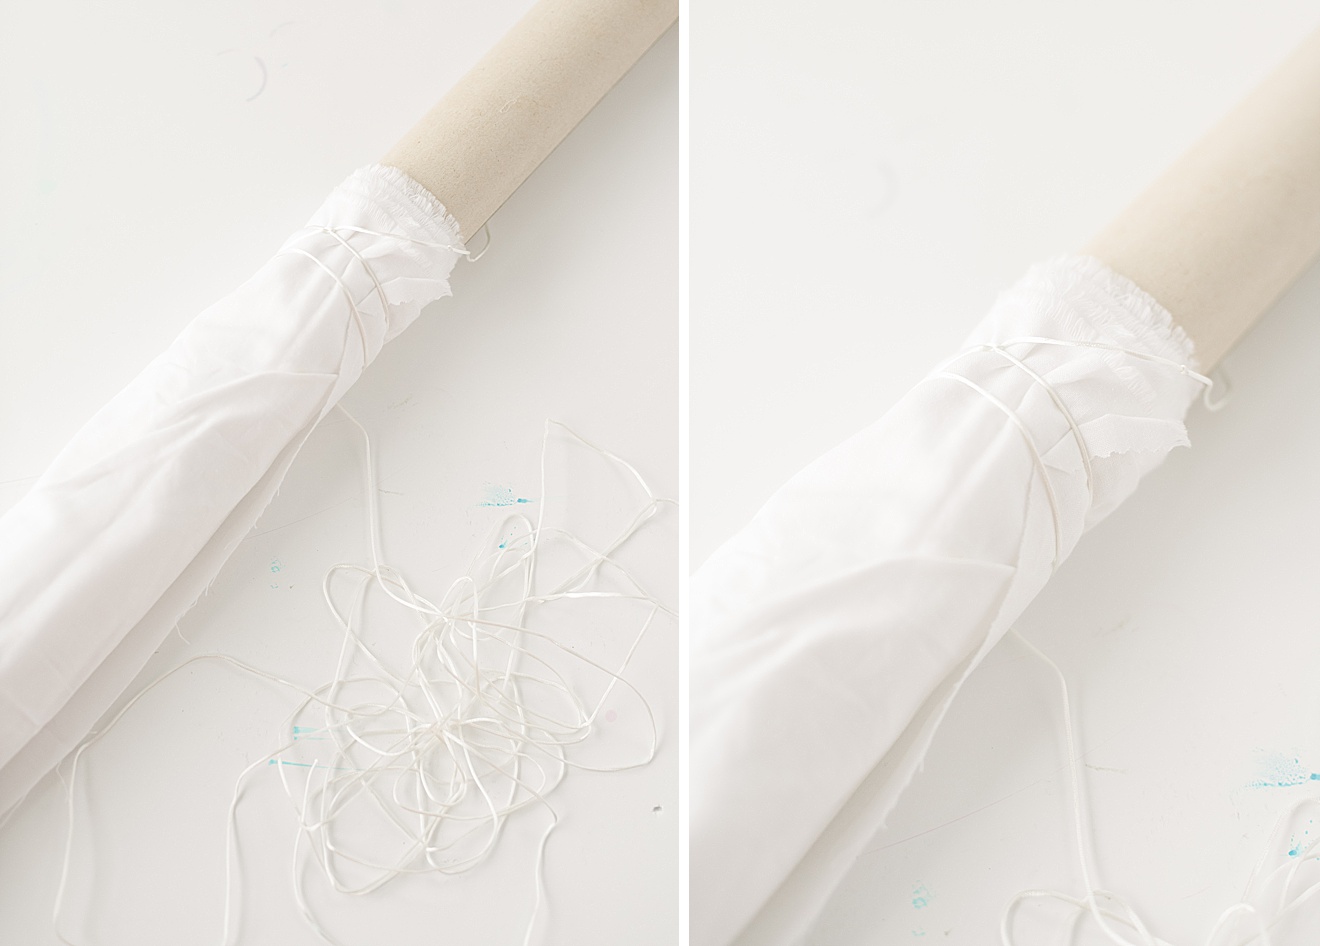
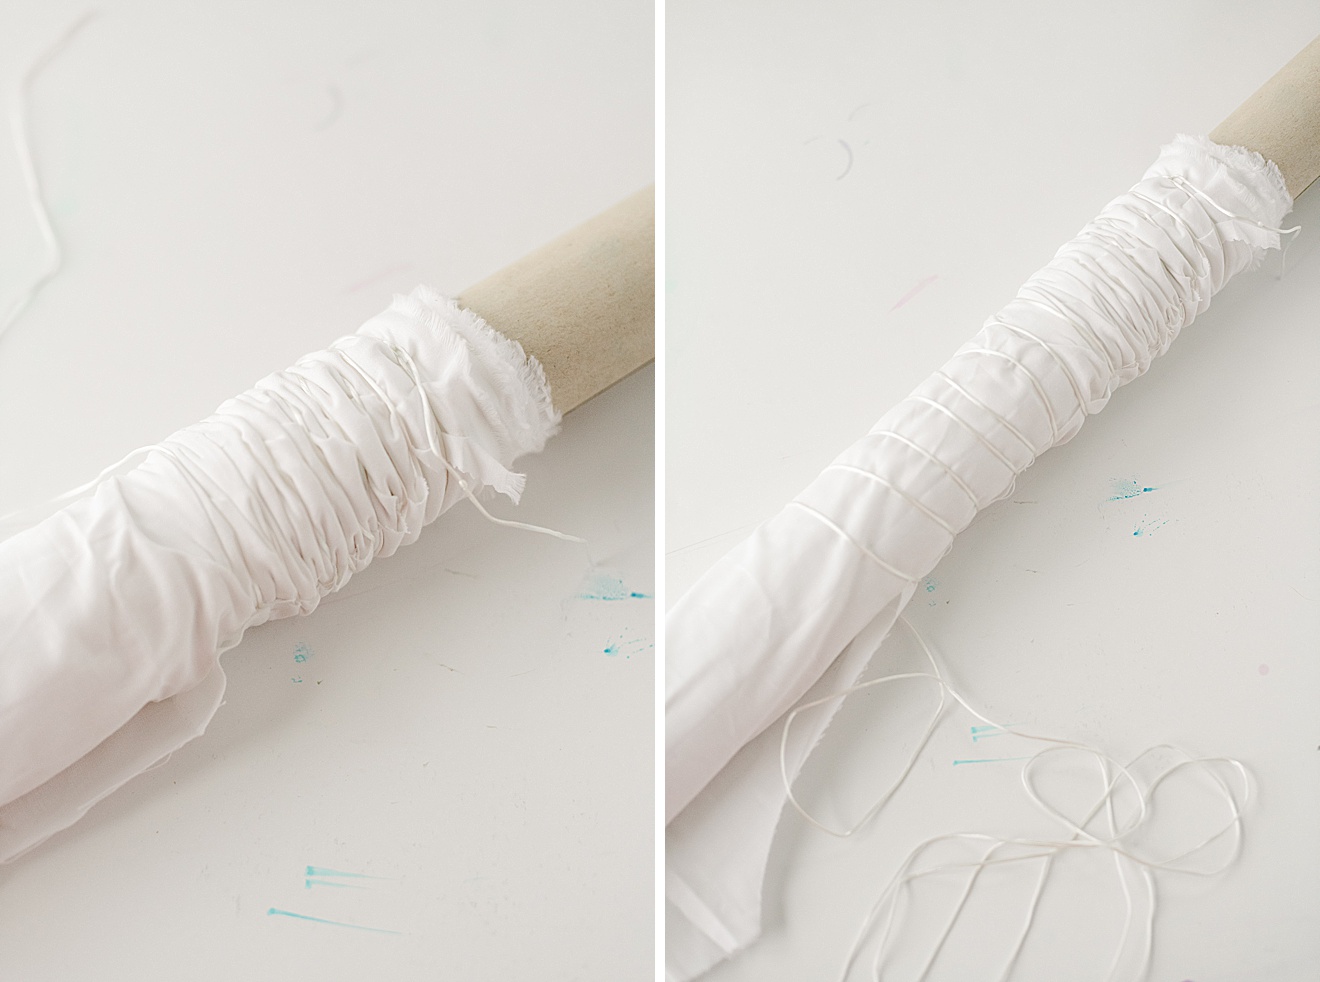
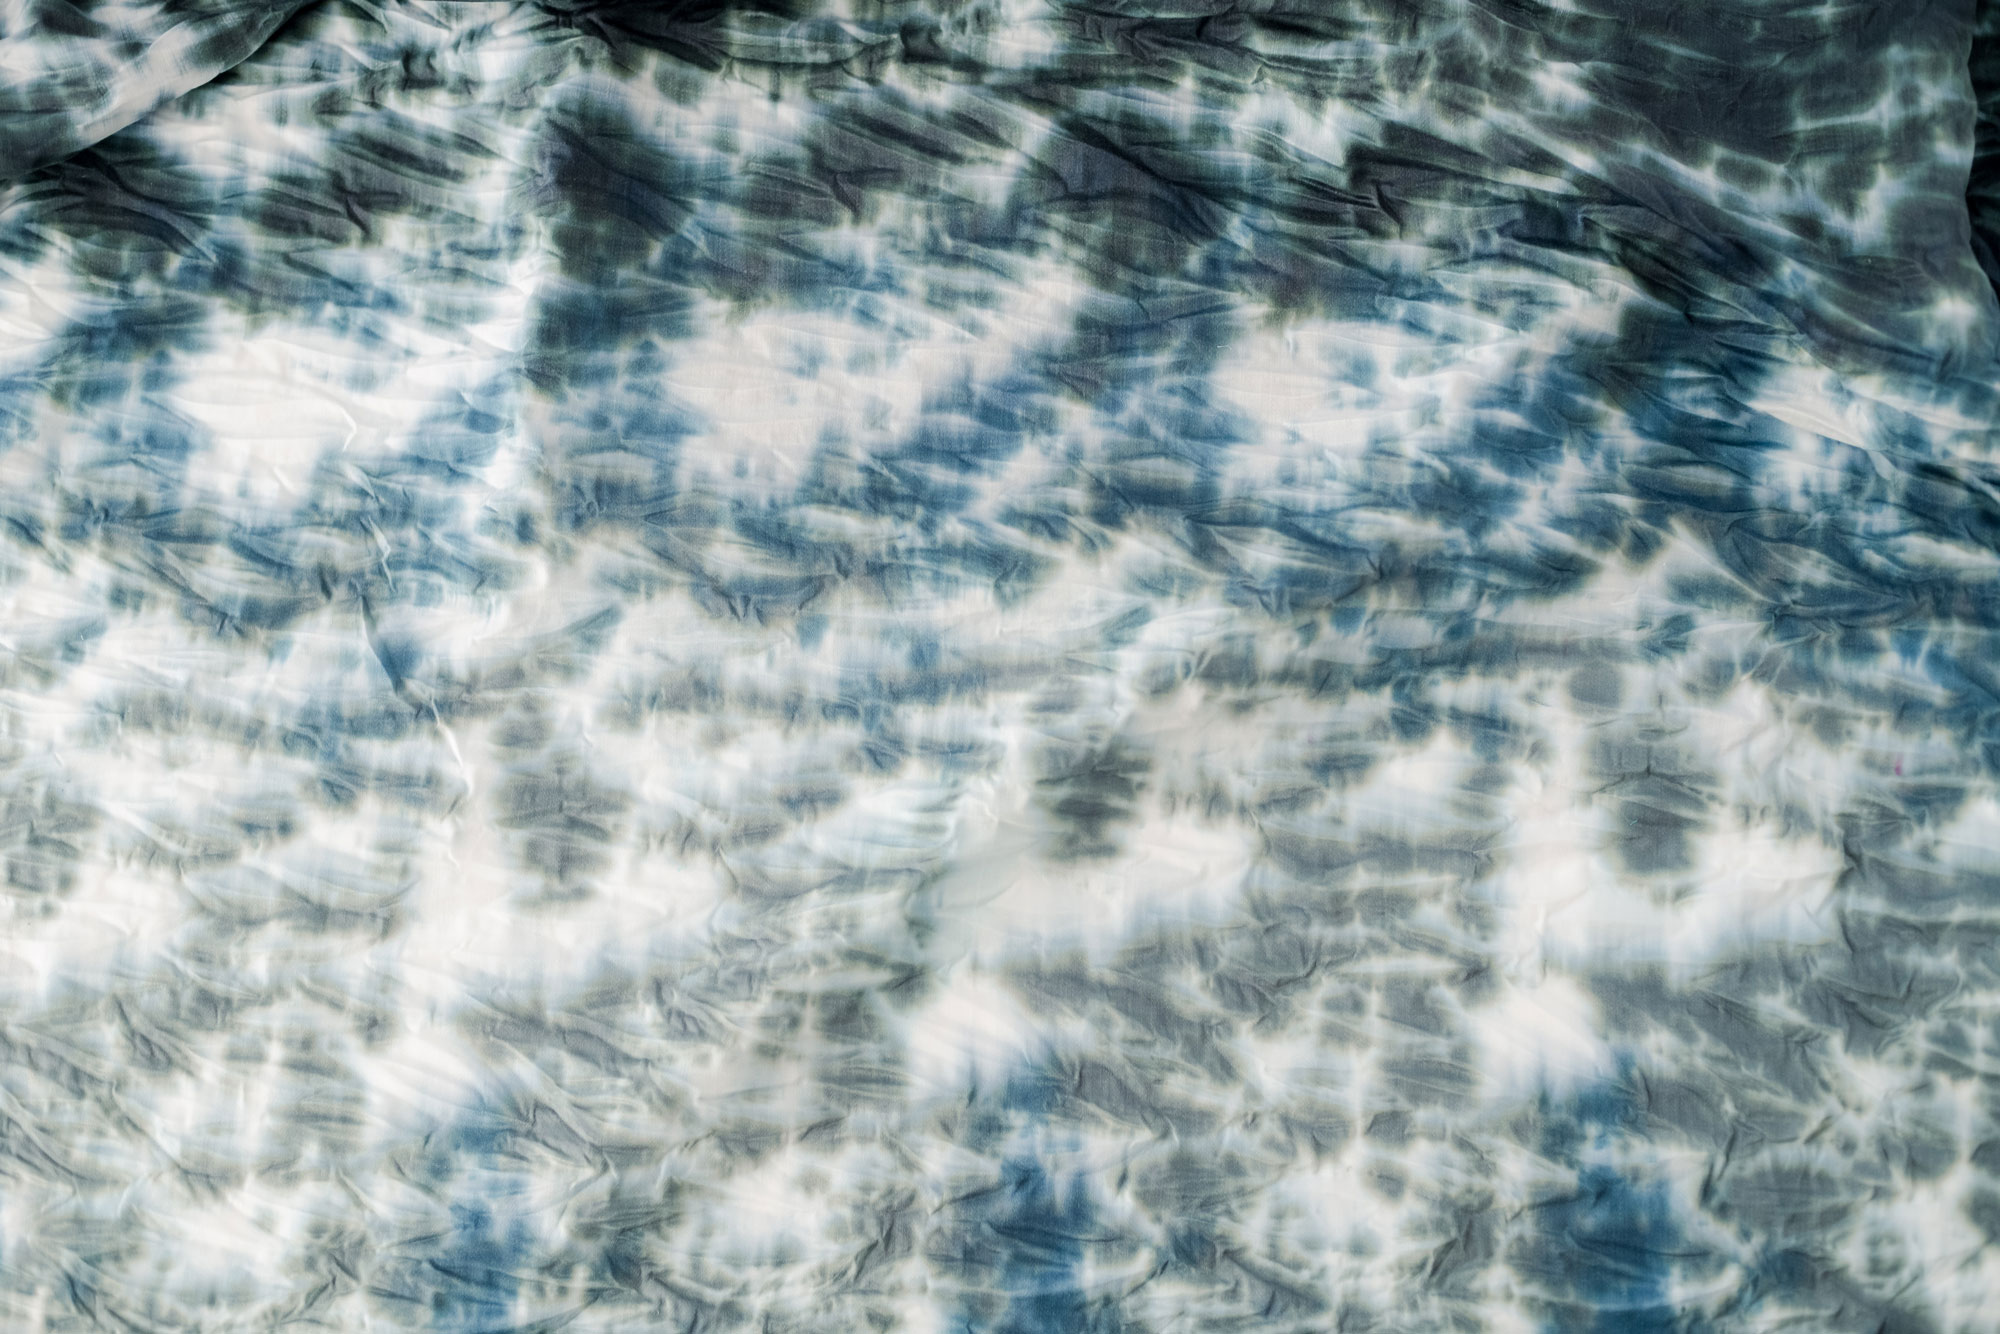
I decided to do the pole wrapping technique with my fabric and had never done anything like it before. Basically you will wrap your fabric around your pole (I couldn’t find a pole so I decided to use a thick cardboard tube that I found in my studio)! 🙂 I layed out my fabric and then placed the pole to one side, wrapped the fabric up on the pole. Then took my string (included in the kit) and begin wrapping around the fabric and pole together (not super tight). After about 7-8 wraps around the tube, I scrunched the fabric down, gave the string a tug and then kept wrapping. I continued this until the fabric was all wrapped with string and scrunched together 🙂 

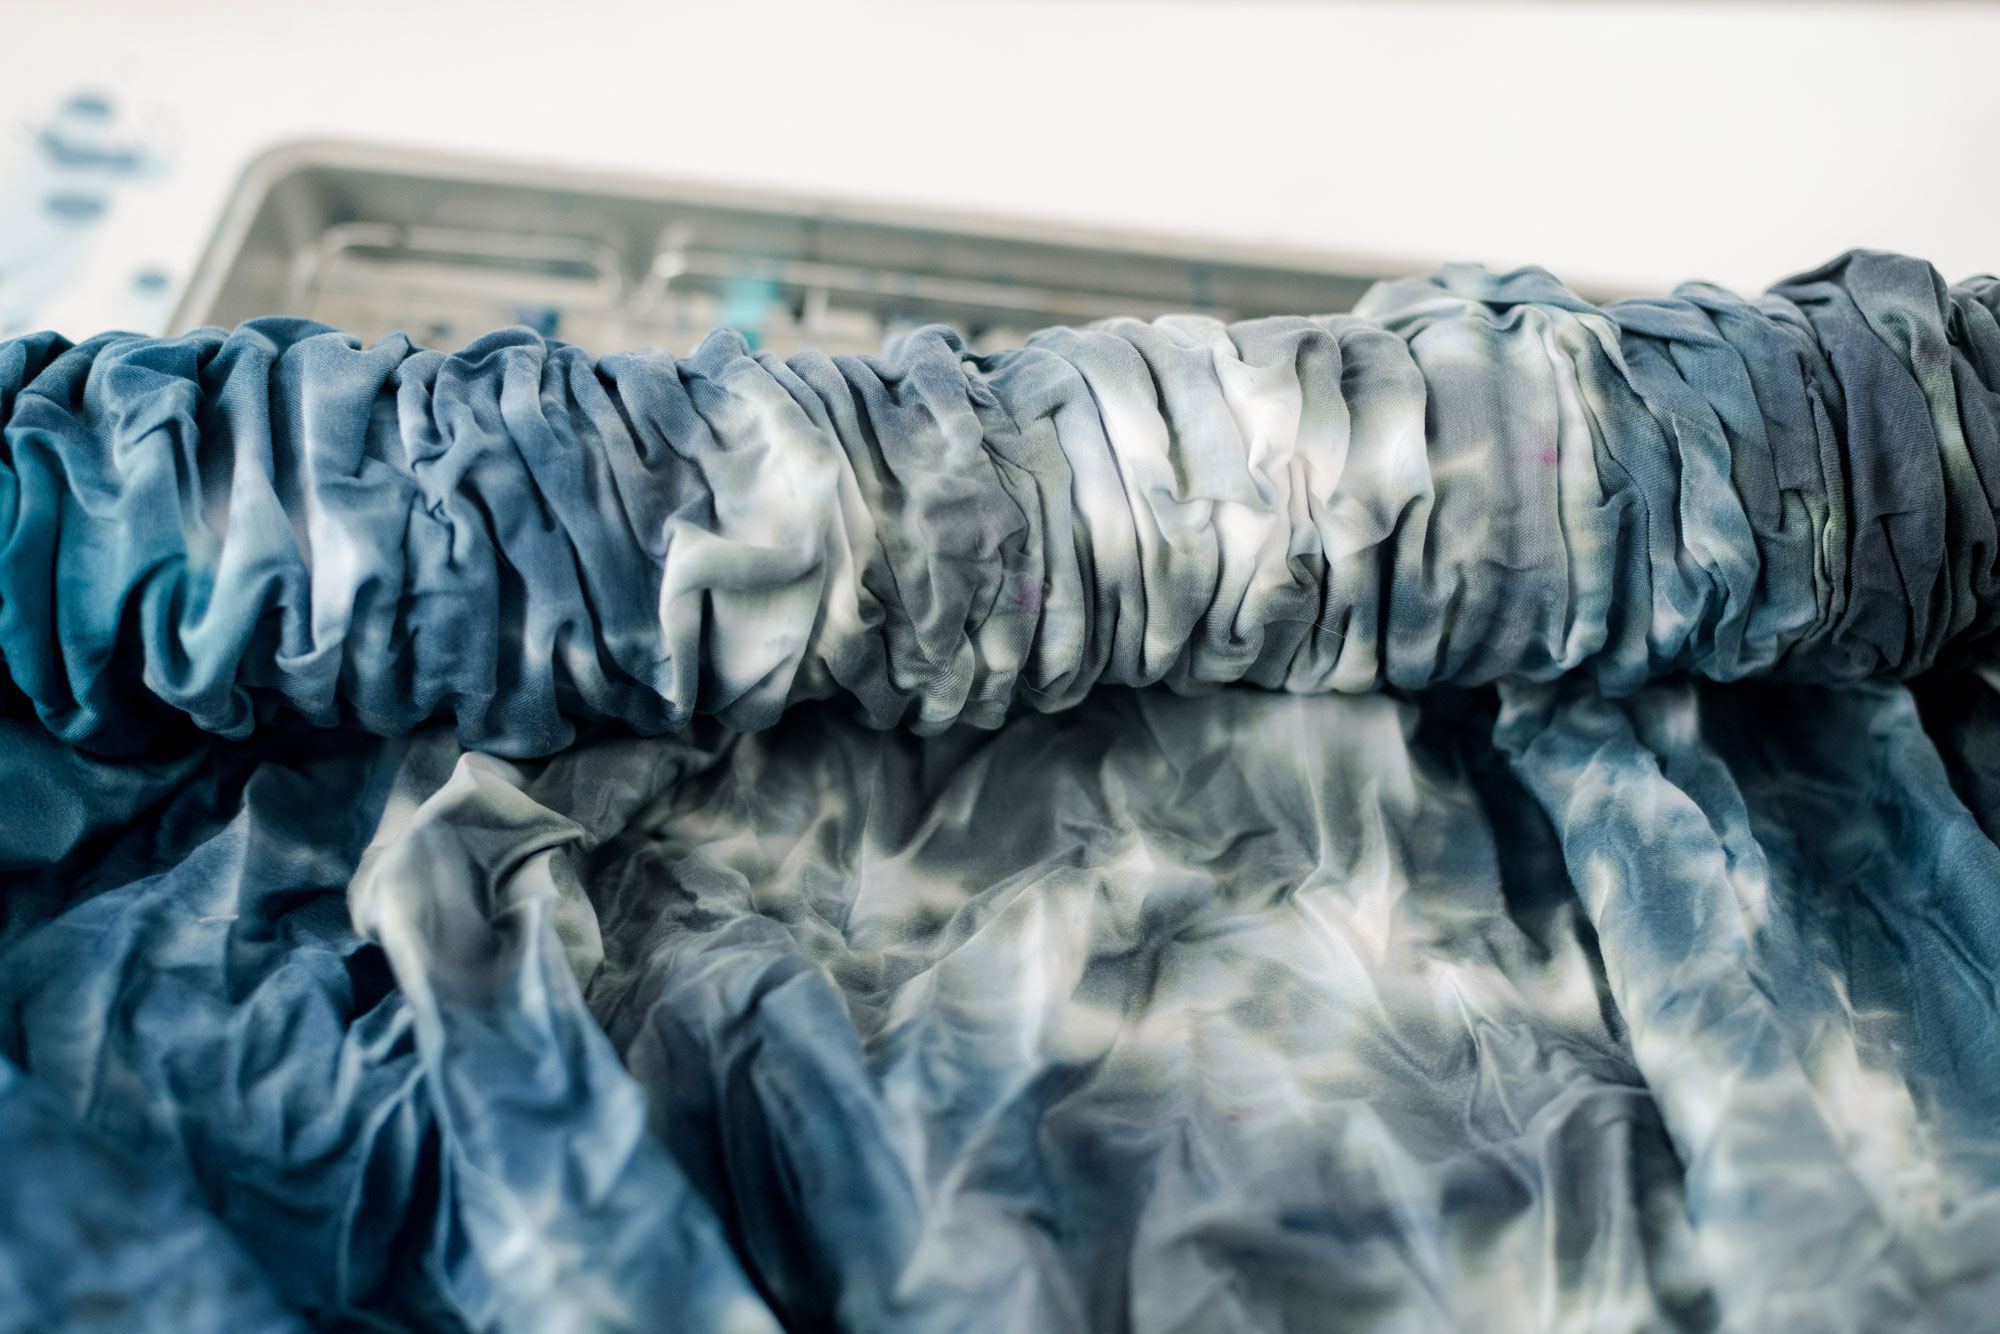
note: if you wrap the string too tight, it will be harder to scrunch your fabric downwards. The string and the scrunching is what leaves the white space on the final reveal 🙂 

Shibori inspired footstool recovering, how to recover a footstool, shibori inspired tie dye DIY, Shibori inspired dye, how to shibori dye a footstool

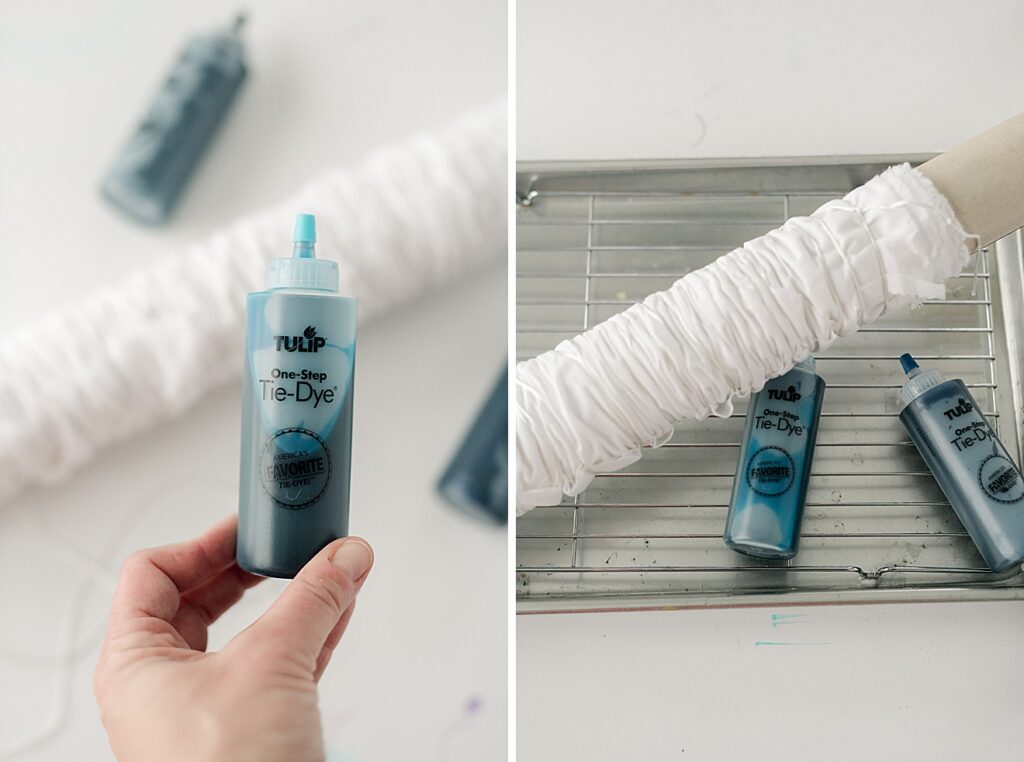
4. Place your folded or wrapped fabric onto your cookie sheet/drying rack combo. Put on your plastic gloves (included in the kit) and begin to cover your fabric with your mixed dye. 

A few tips when working with the dye: 

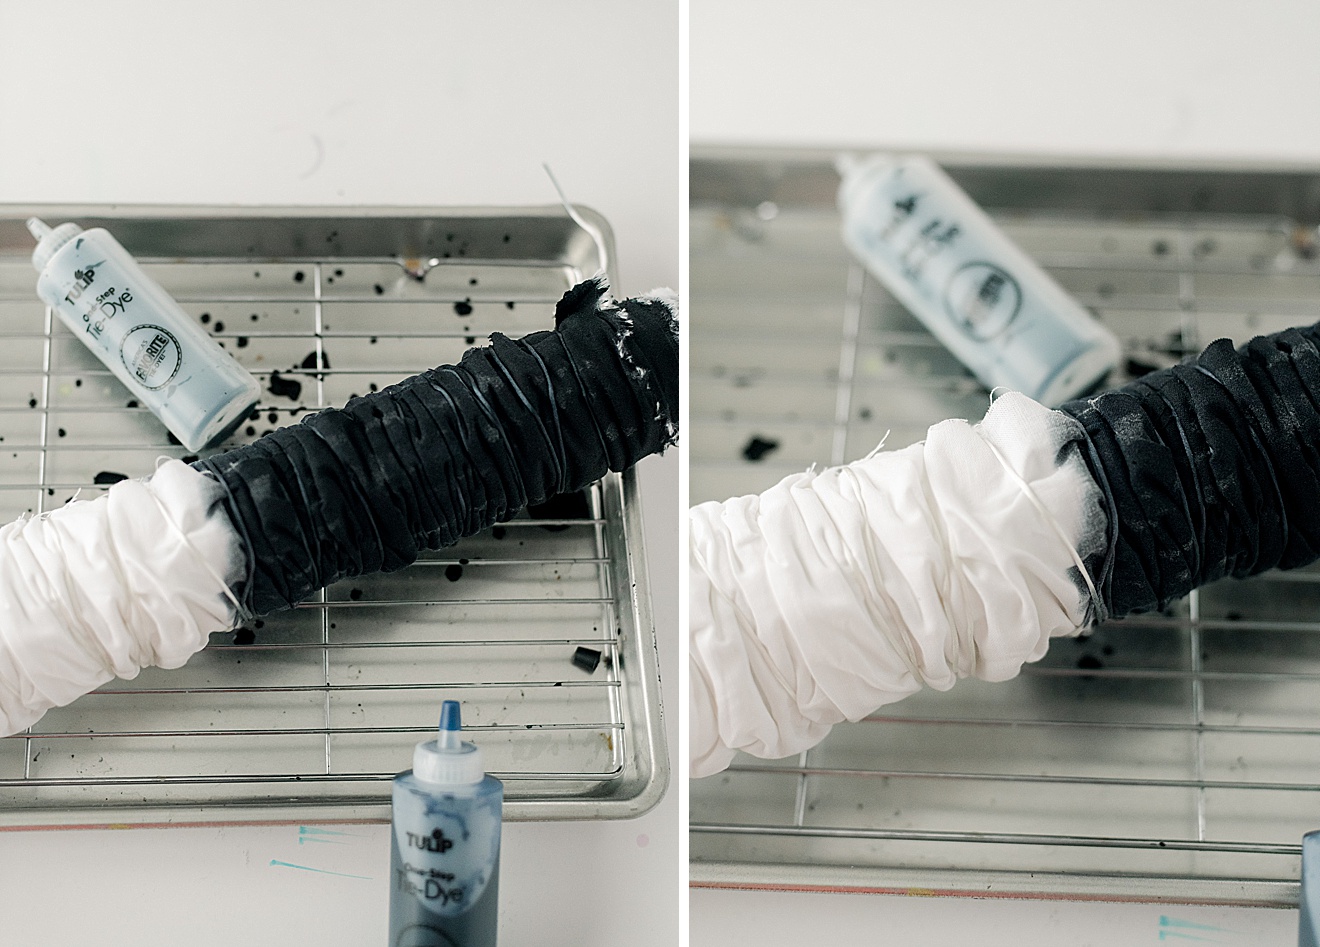
  • Go slow….no need to rush. Allow the dye to fully soak into the fabric as you squeeze the liquid onto your piece. 
  • Be sure to cover completely….you want the fabric soaked with dye. The resist (and your pattern) will be reveals in your folds, creases or your string that you used, so no need to worry about the pattern not displaying if you use too much dye. So saturate your fabric well!
  • The longer you leave the dye on the fabric, the stronger the color is (I believe)! 🙂 So take this into consideration when you’re making your project….this tends to be a good 2 day project (one day to dye, the other to complete…..the anticipation builds between both days, especially with kids)! 🙂 
Shibori inspired footstool recovering, how to recover a footstool, shibori inspired tie dye DIY, Shibori inspired dye, how to shibori dye a footstool

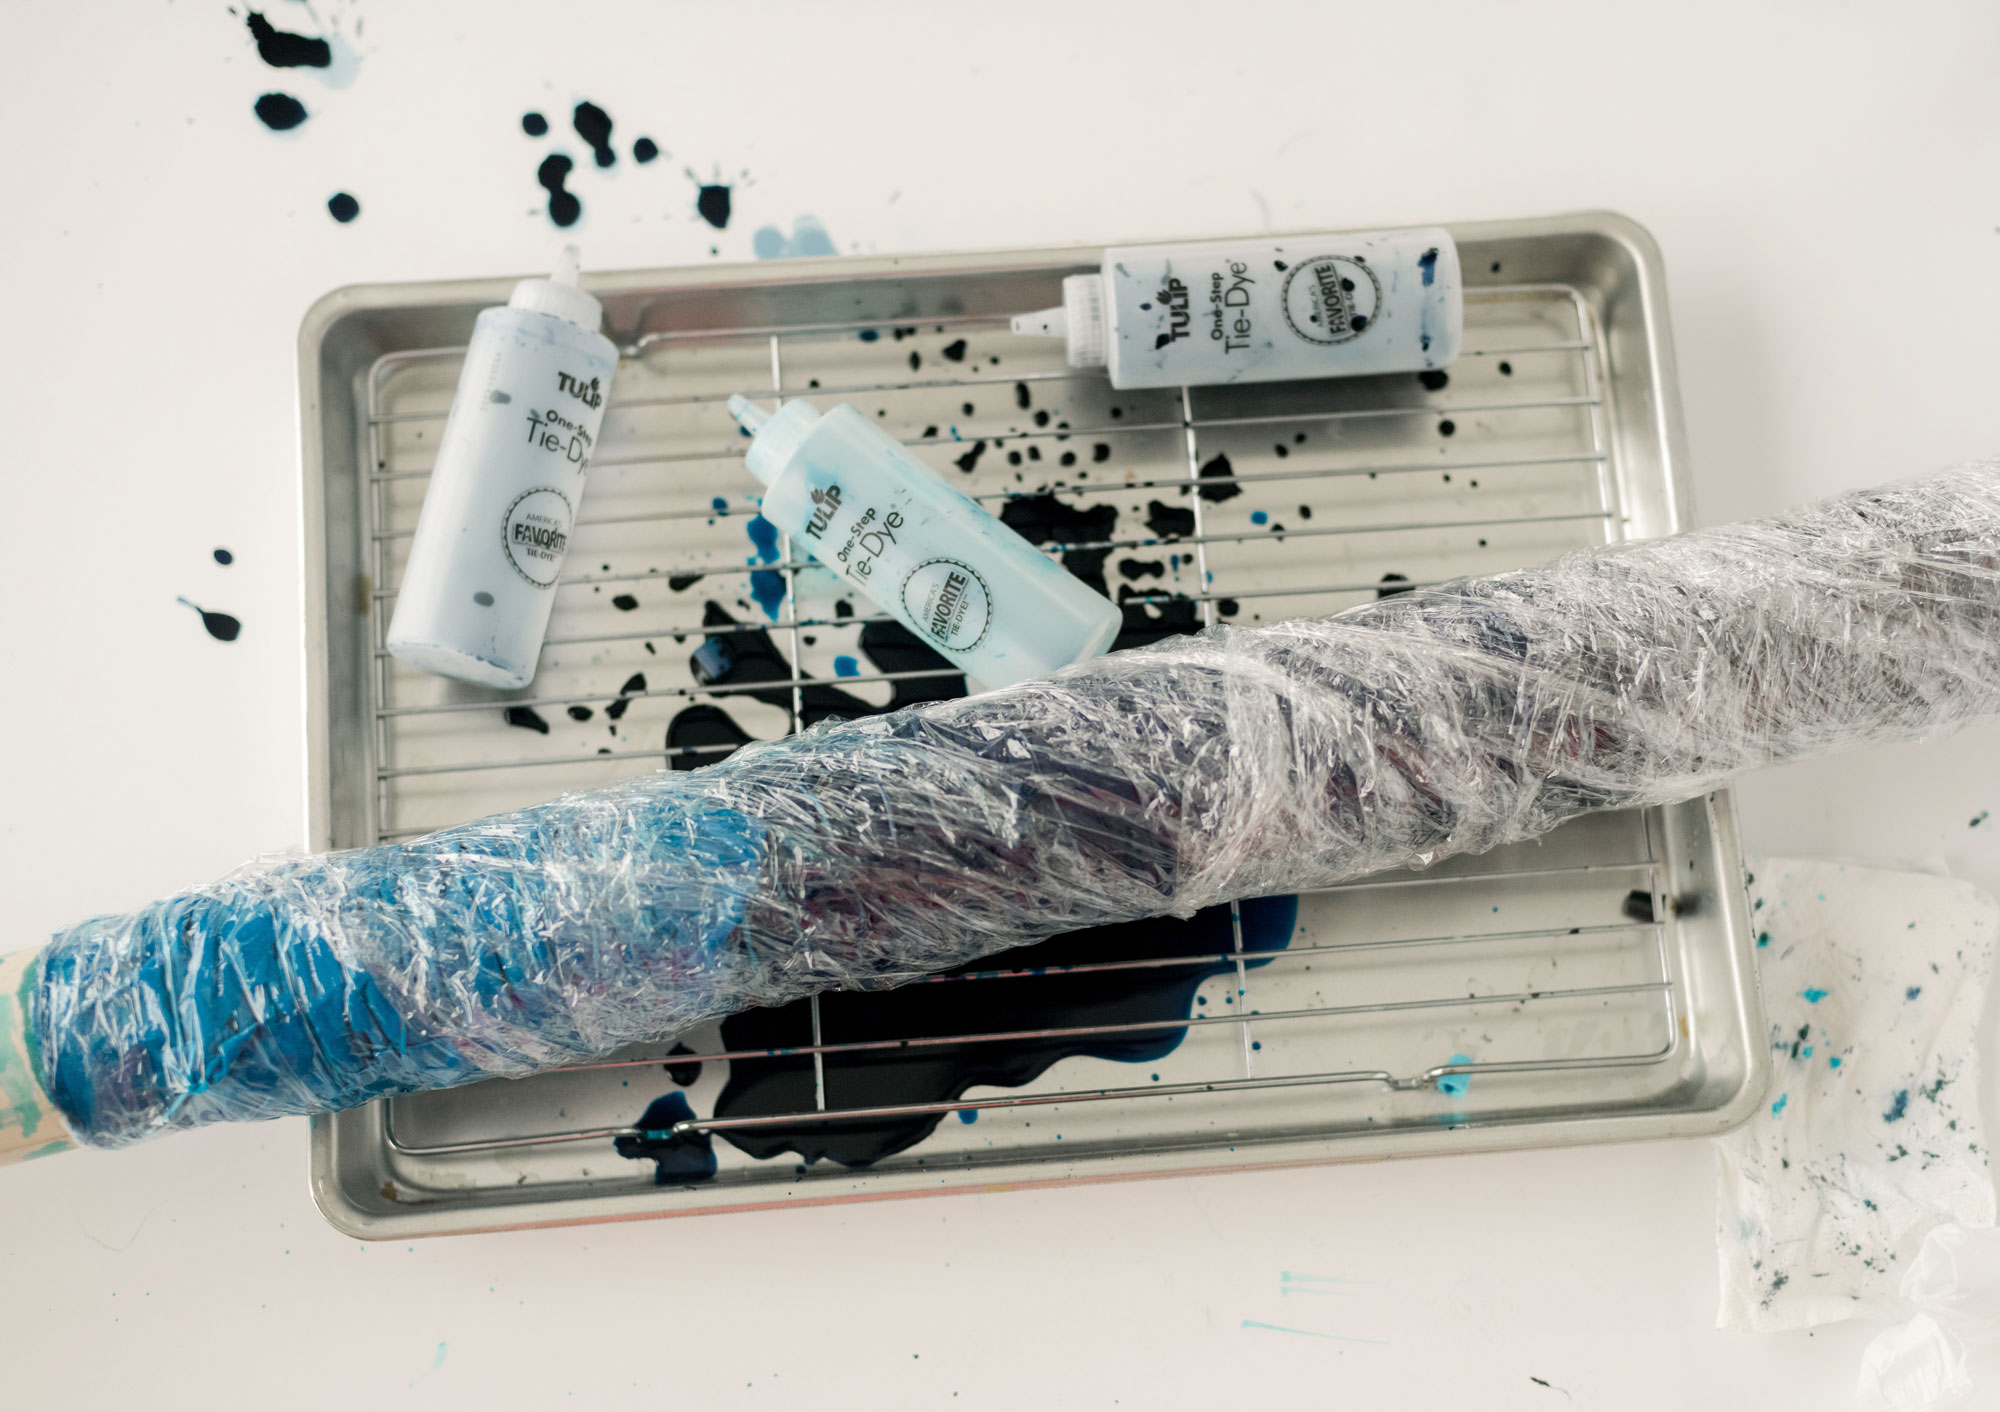
5. Once your fabric is saturated to your liking, wrap with recycled plastic bags or plastic wrap. The idea is to cover it completely so that you don’t let the fabric “dry” to the air, but rather allow the dye to keep penetrating the fabric to get the deepest color. 
Allow to sit for at least 6 hours (more if desired….I left mine overnight)! 🙂 

Shibori inspired footstool recovering, how to recover a footstool, shibori inspired tie dye DIY, Shibori inspired dye, how to shibori dye a footstool

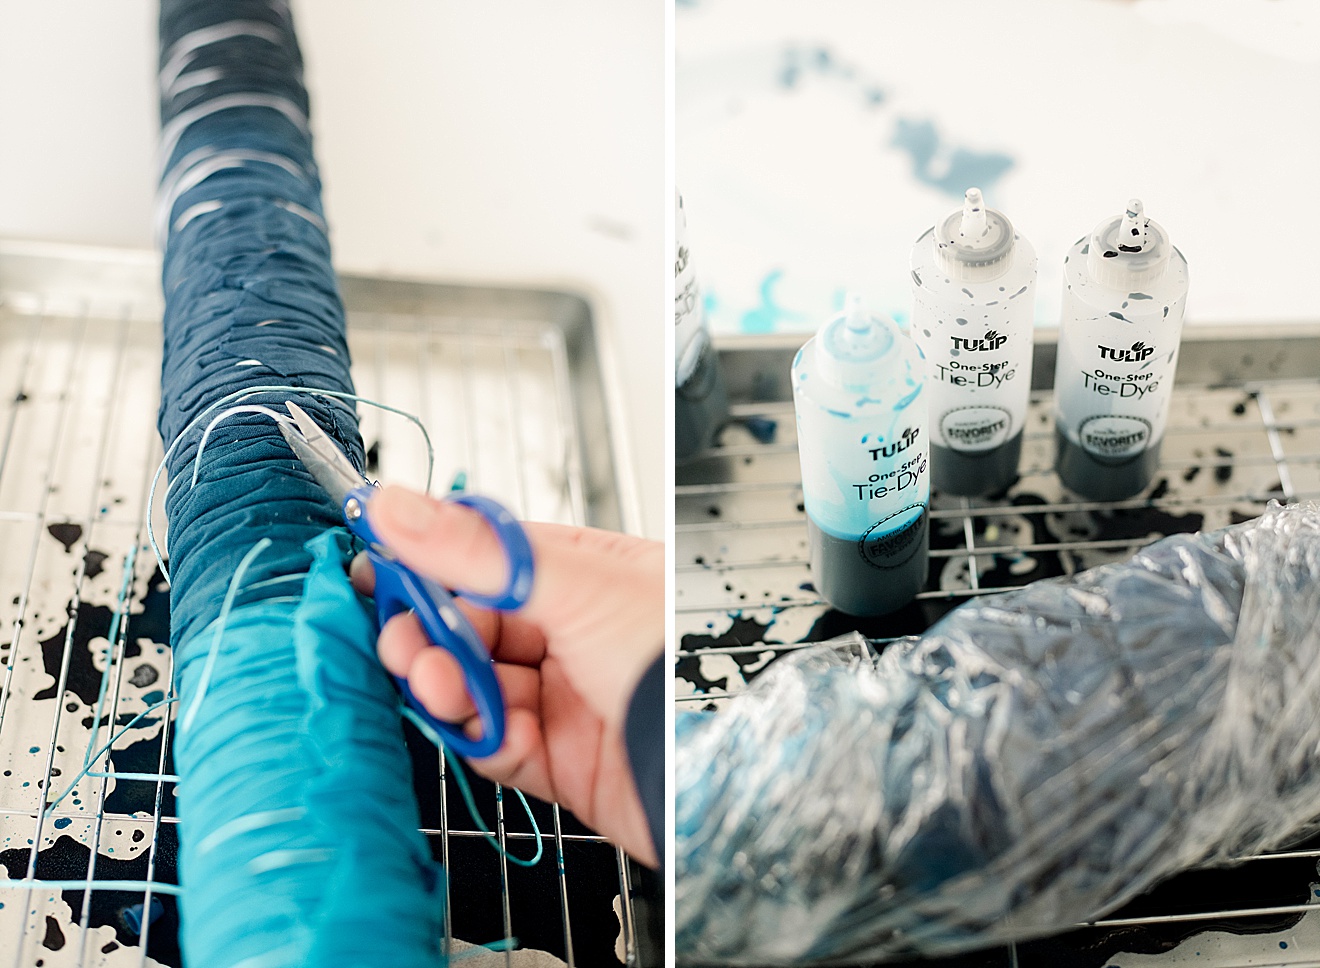
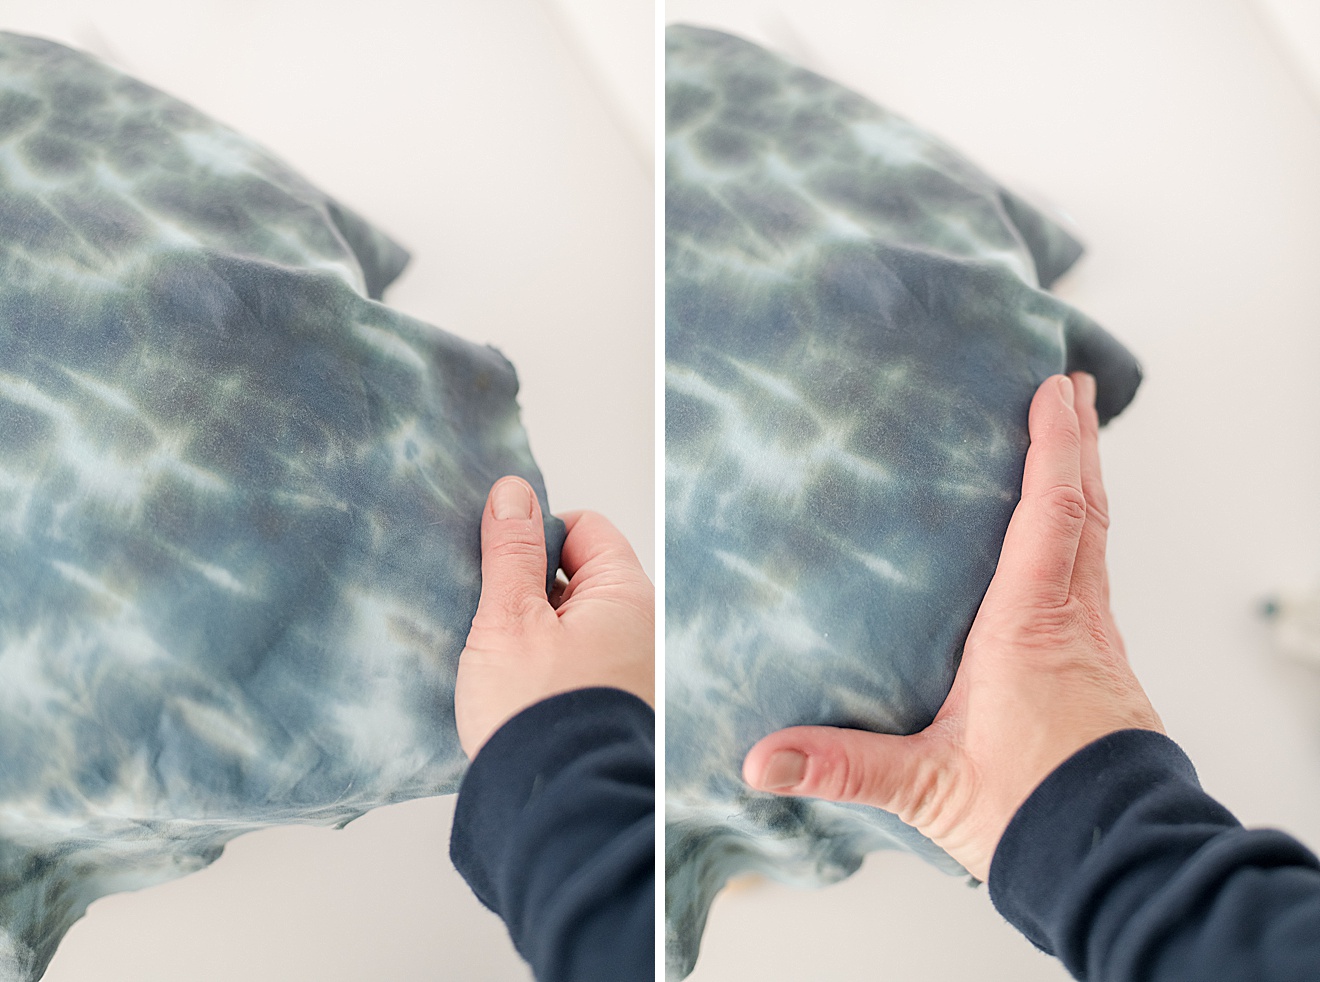
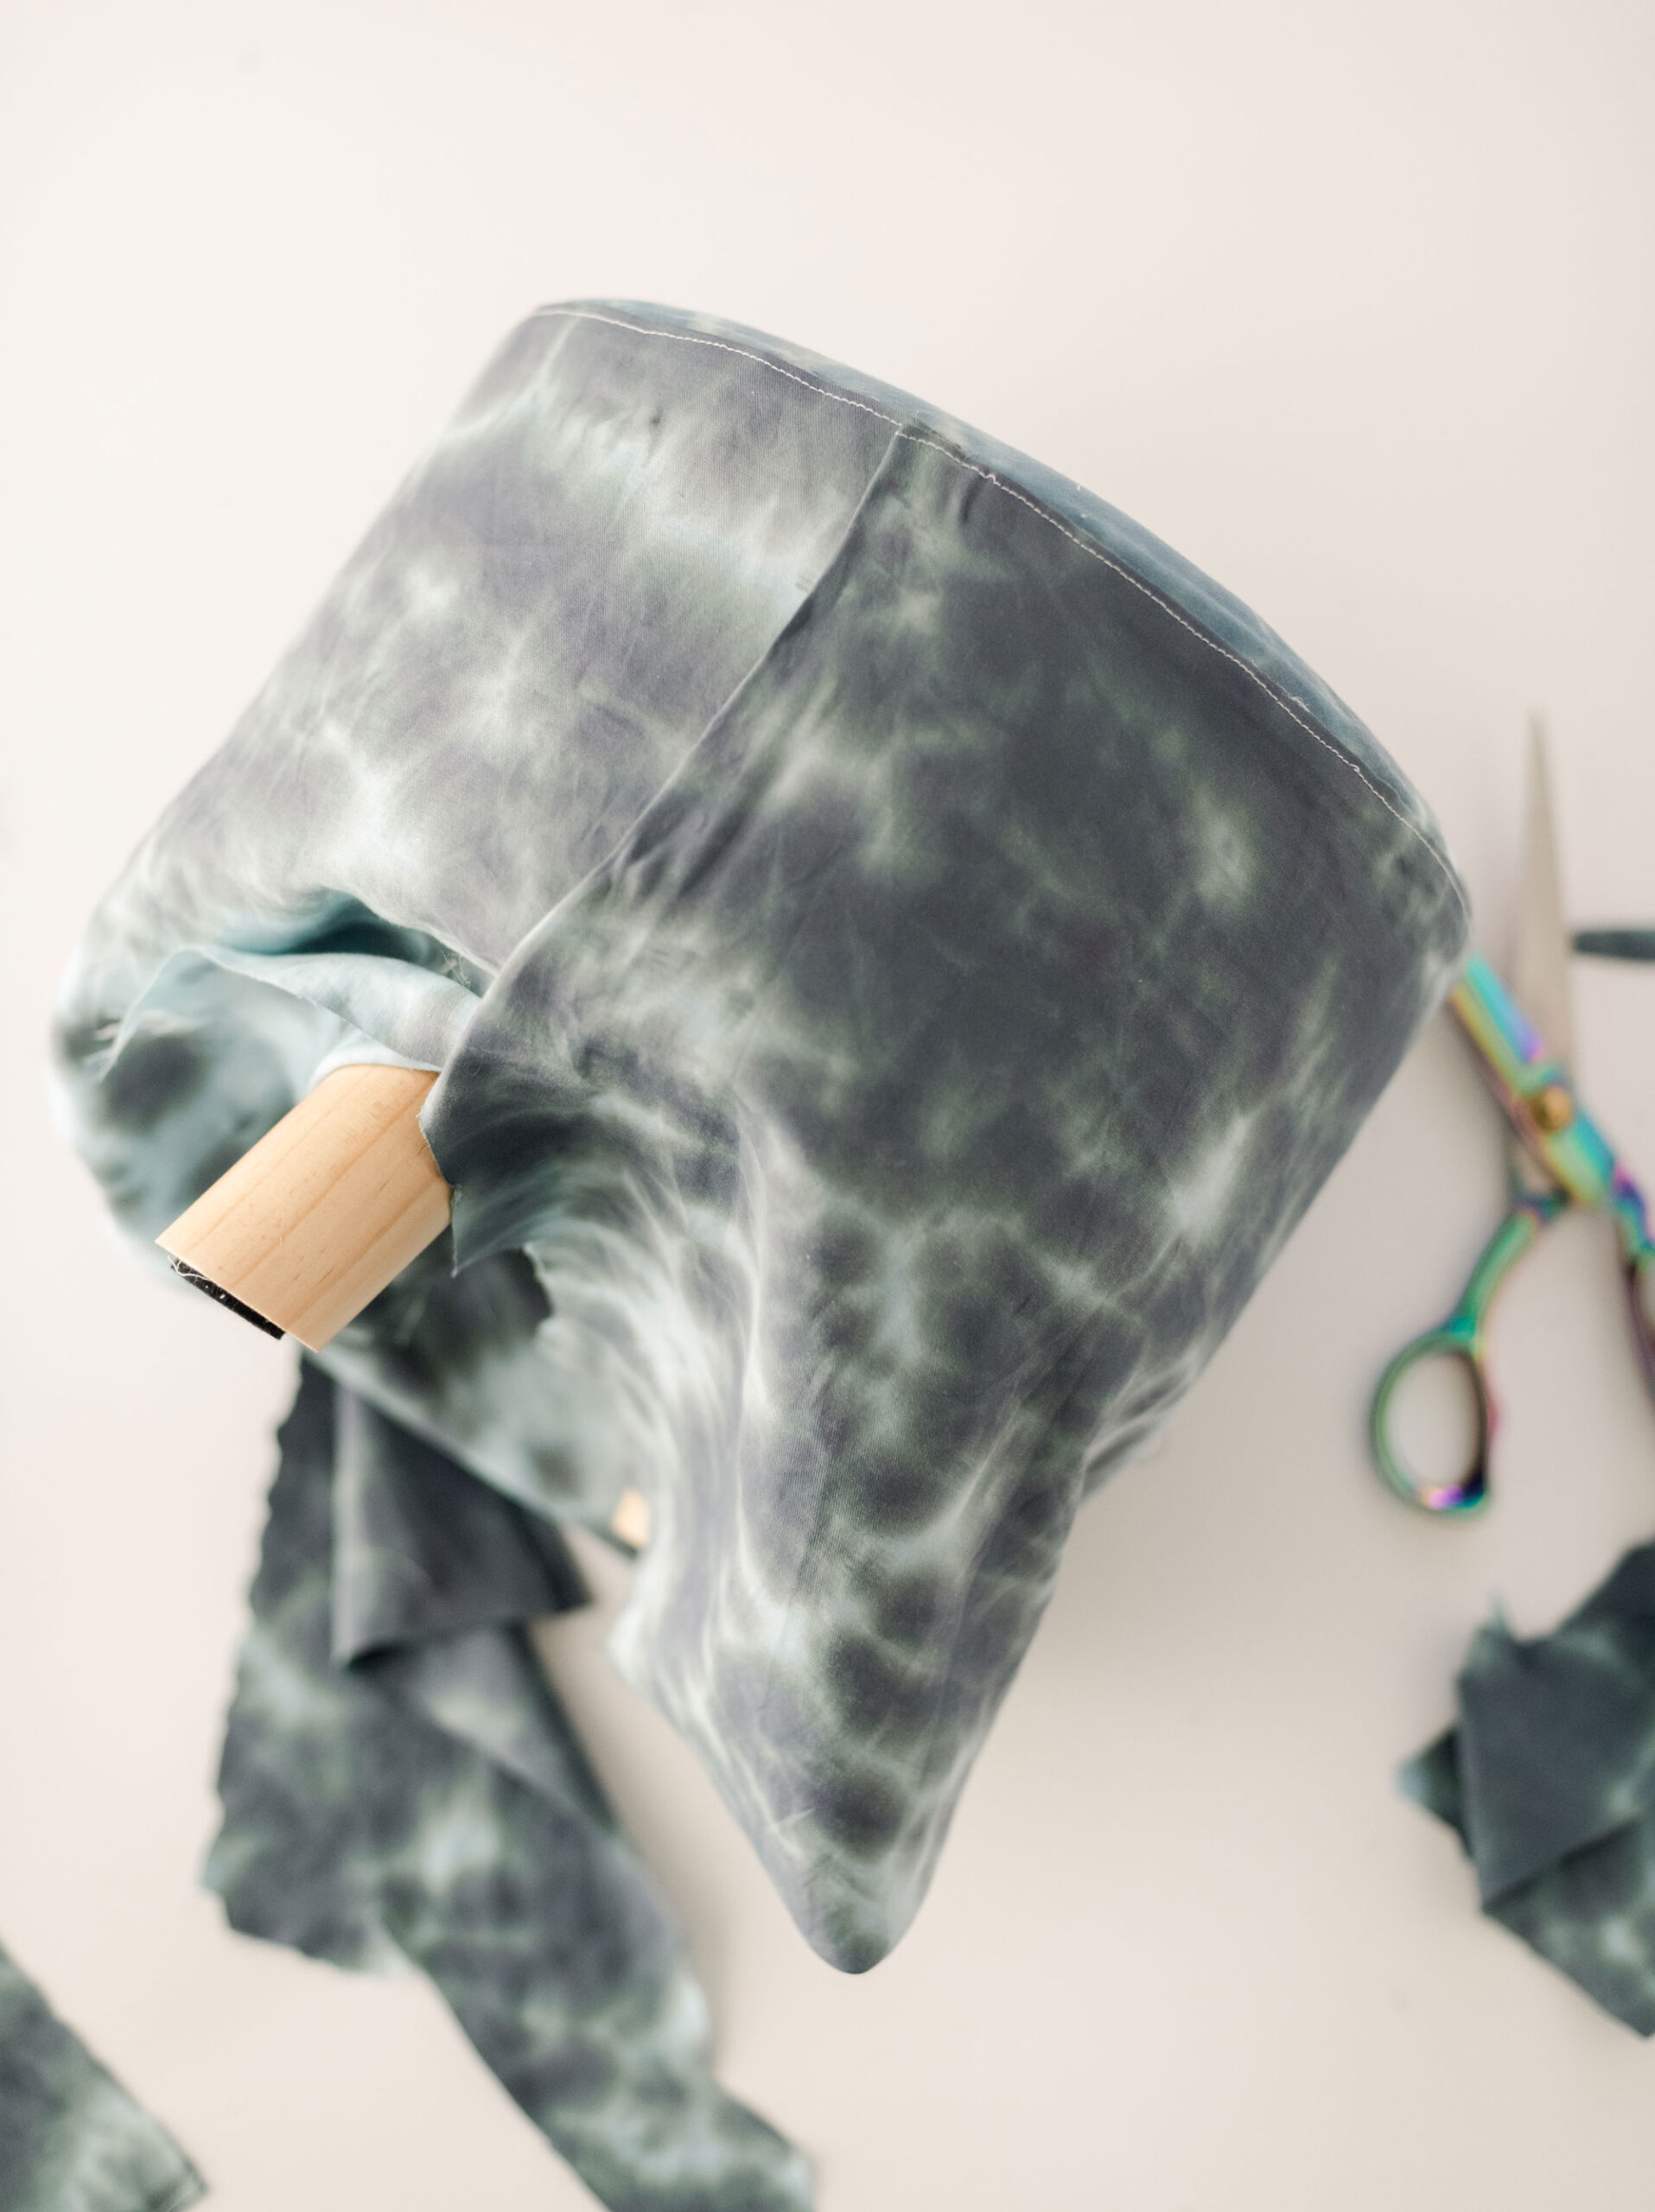
6. Remove all of your plastic wrap or covering from your dyed fabric and begin to cut or unwrap your twine around your wrapping (or rubber bands for the method you chose). I did a quick rinse in our washing machine (but you can also just run the fabric under cold water until the water runs clear)…..line dry or fully dry in the dryer! Iron your fabric if needed 🙂 

Shibori inspired footstool recovering, how to recover a footstool, shibori inspired tie dye DIY, Shibori inspired dye, how to shibori dye a footstool

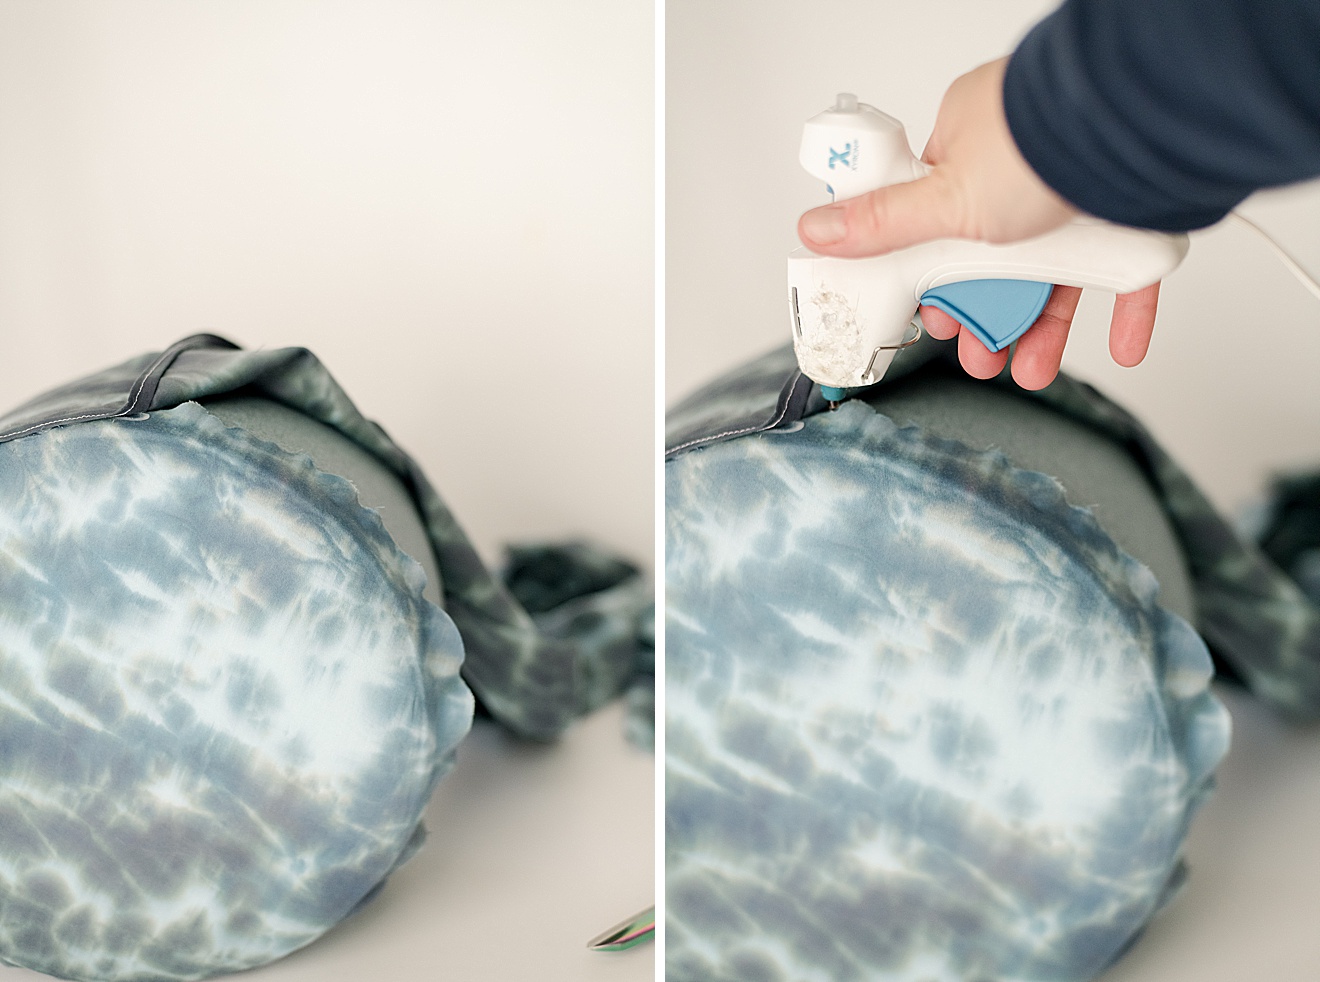
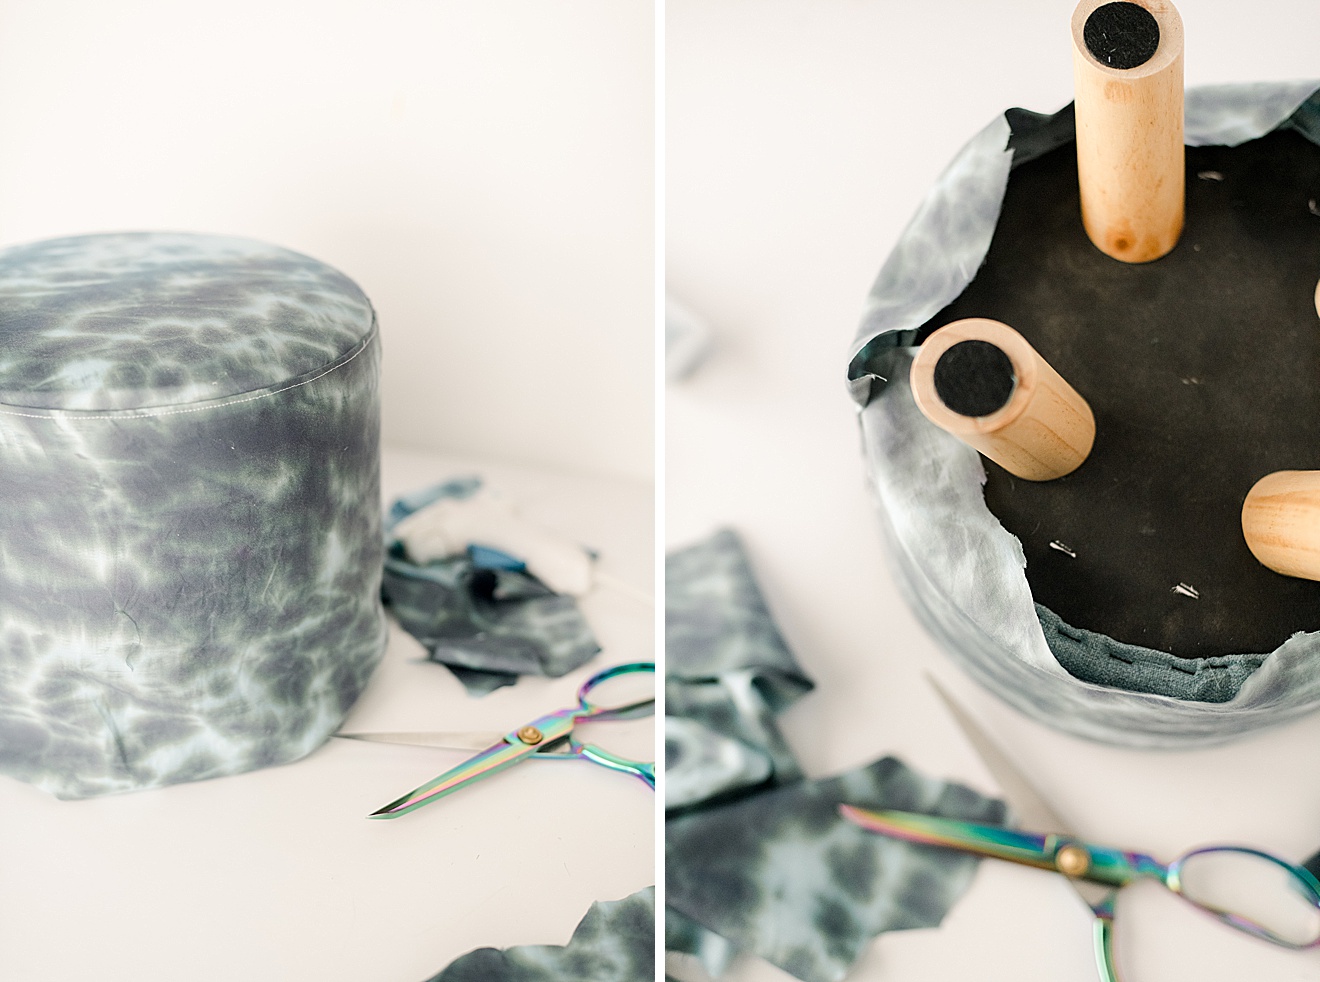
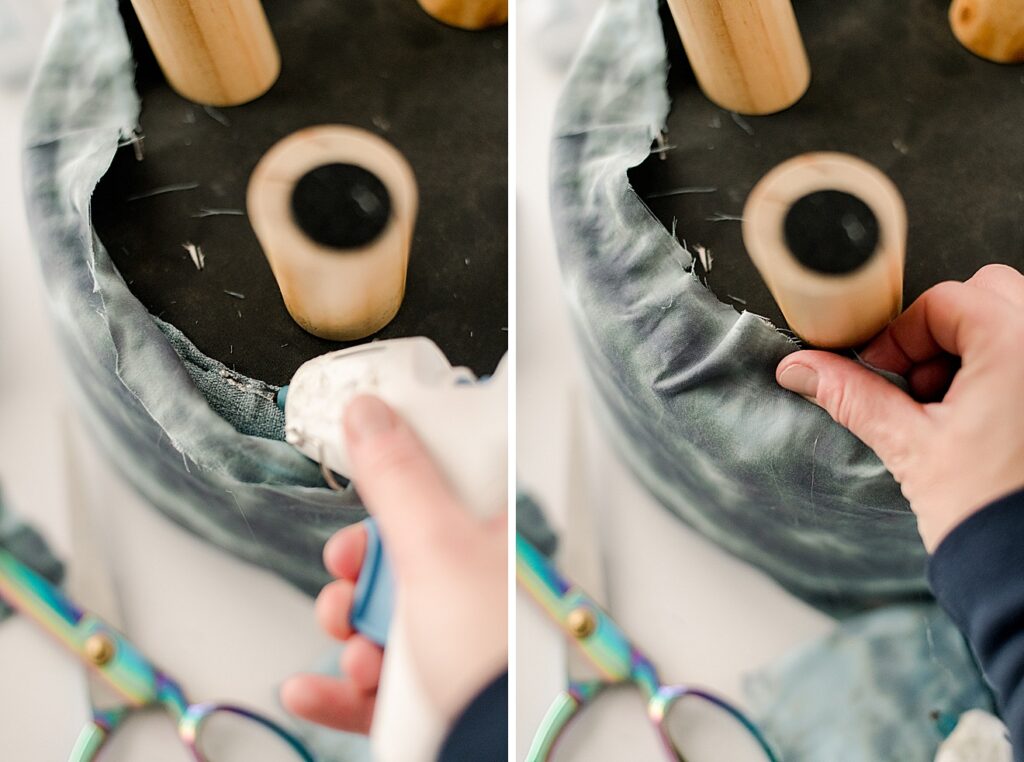
7. It’s time to re-cover the stool! 🙂 

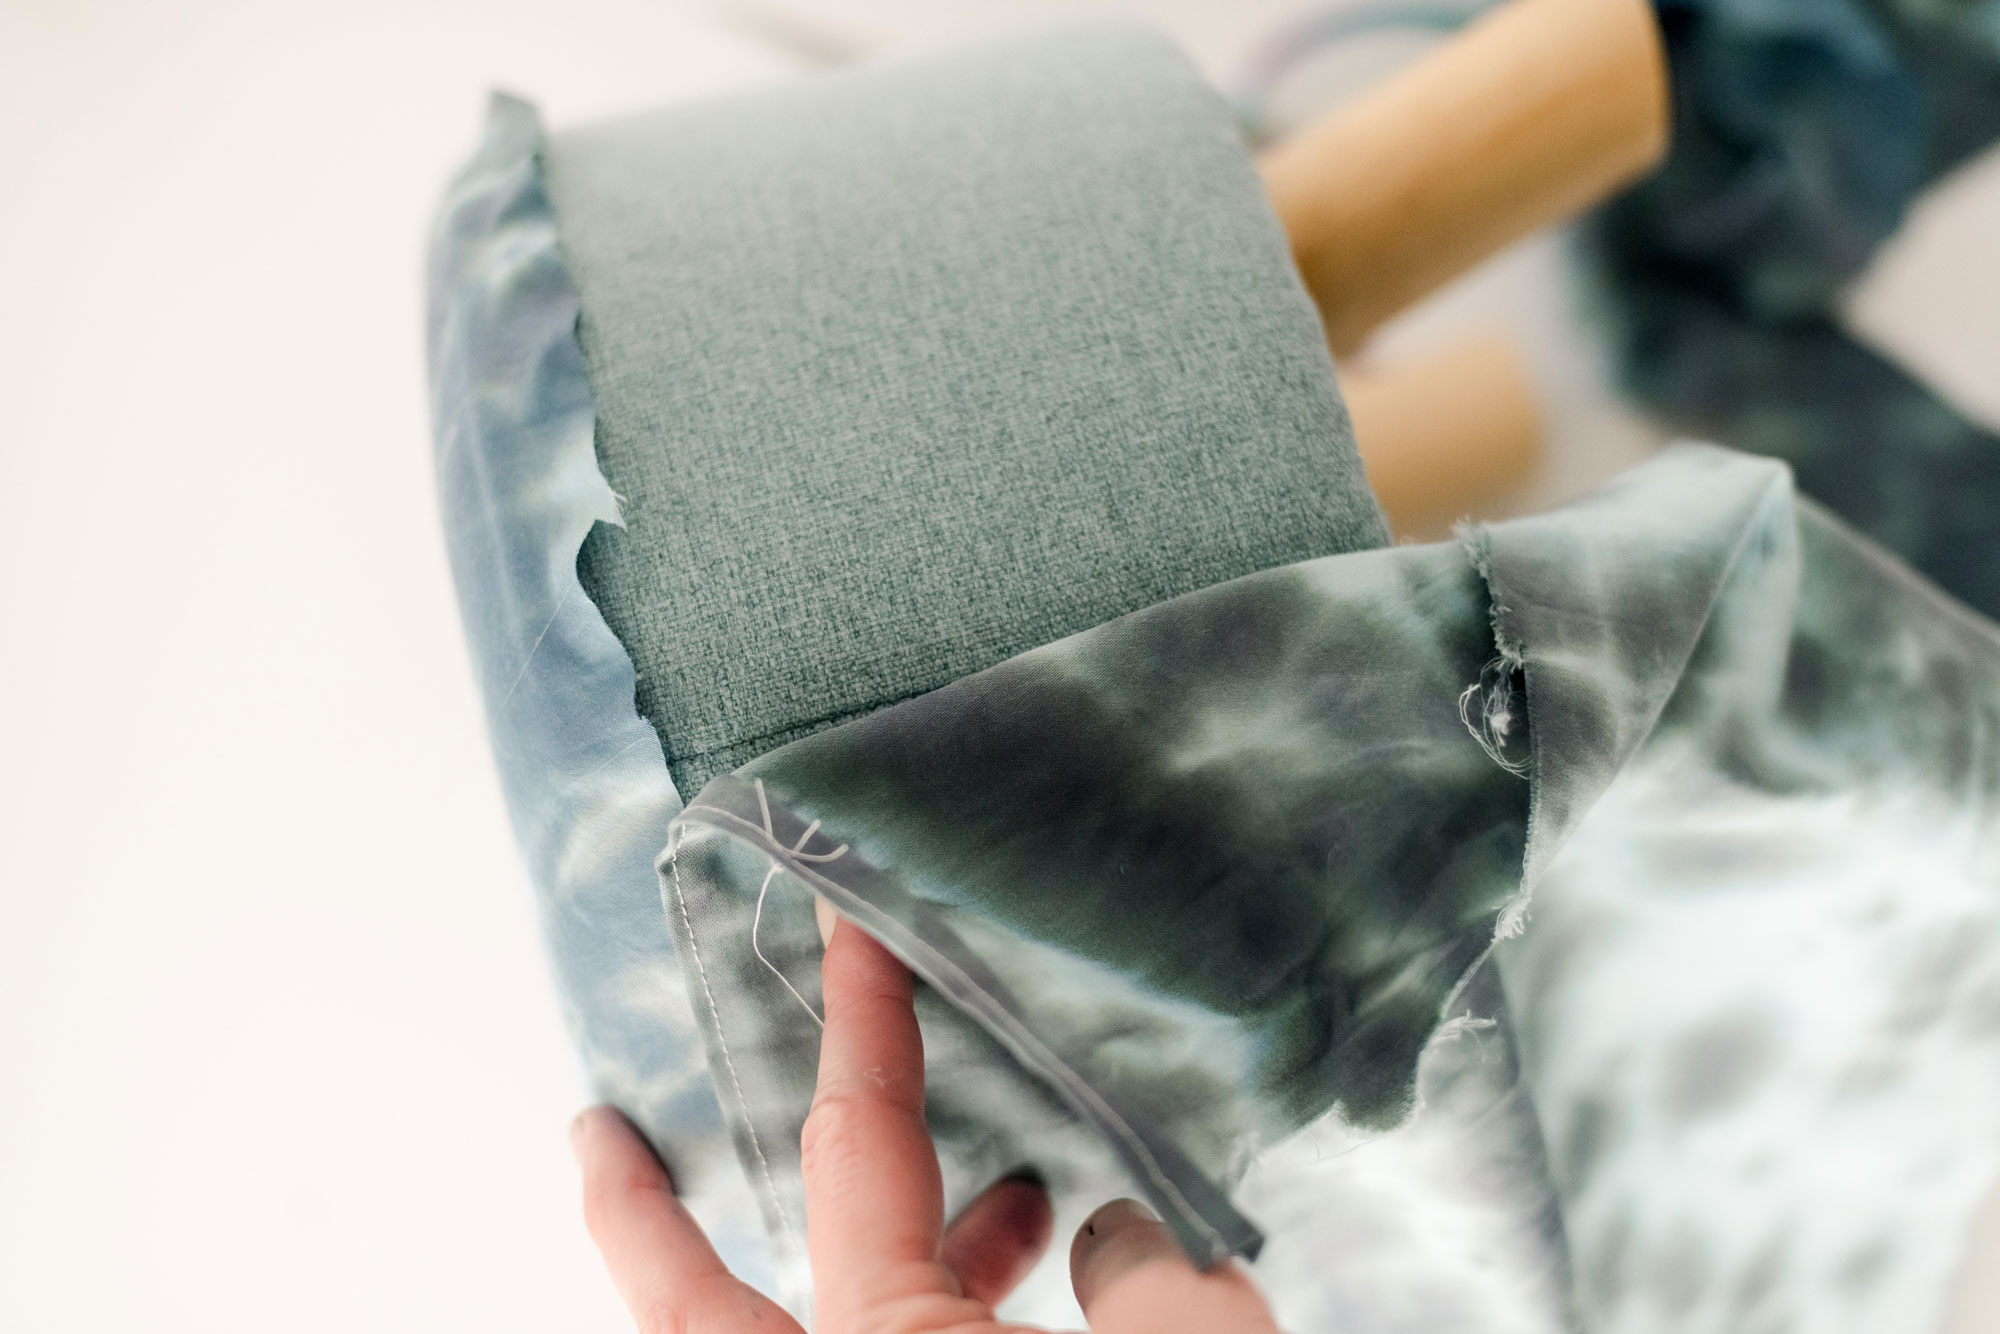
It is important that you recover your piece of furniture, footstool or item in the “same” way that it was originally put together. For instance, my stool was put together with one seam along the top outer edge, and then one seam along the backside vertically with it stapled underneath the stool. SO, I will recover the stool in the same way. 

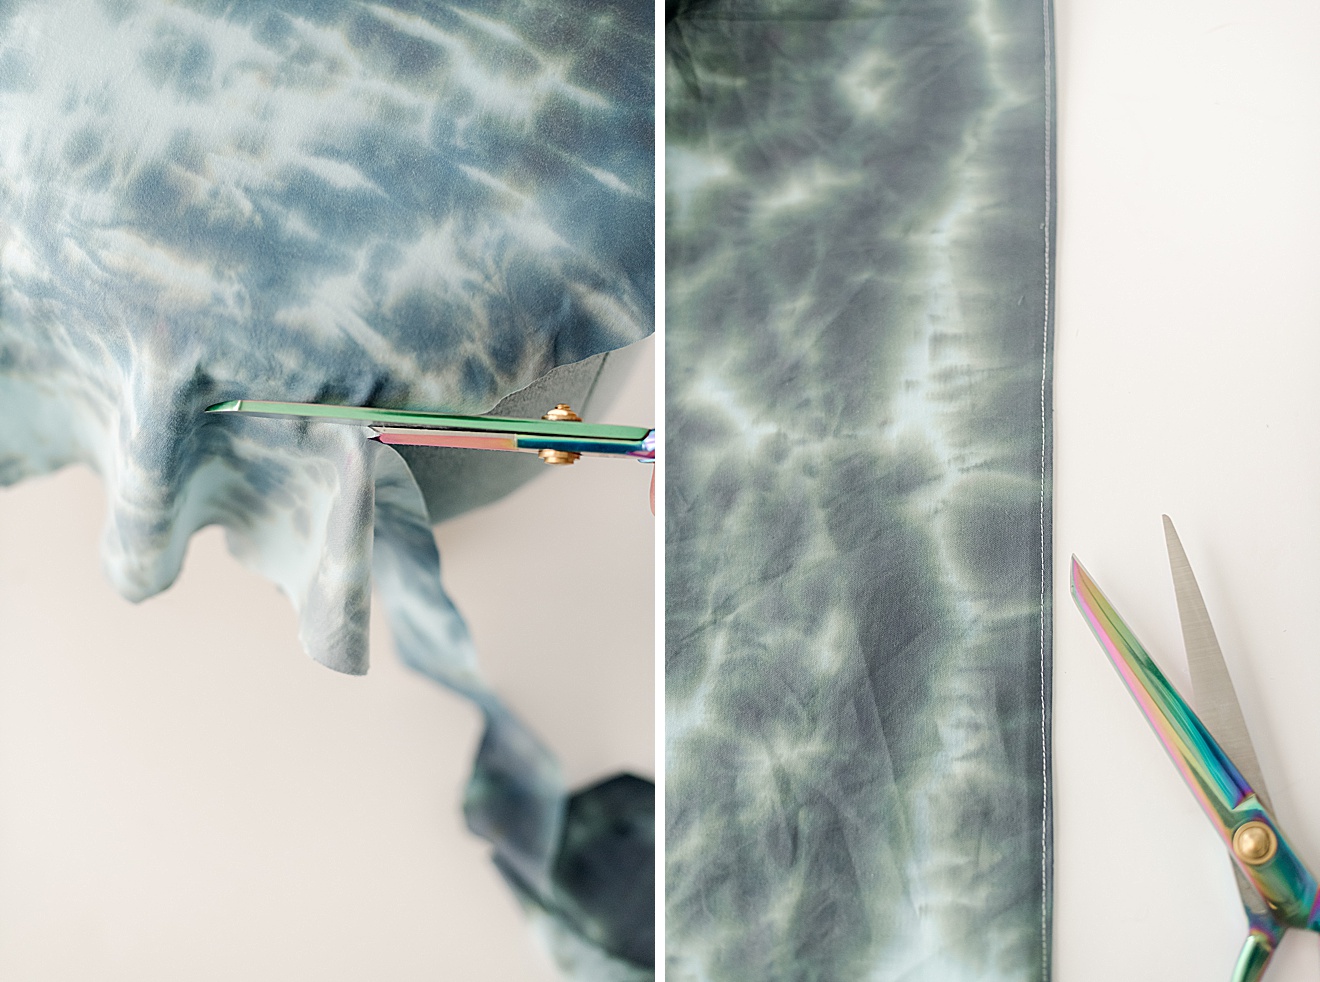
a. Begin with the top portion – cut in a circle around the top and then slowly begin to glue around the top edge (near the original seam) and tightly pull into place working your way around the top. 

Shibori inspired footstool recovering, how to recover a footstool, shibori inspired tie dye DIY, Shibori inspired dye, how to shibori dye a footstool

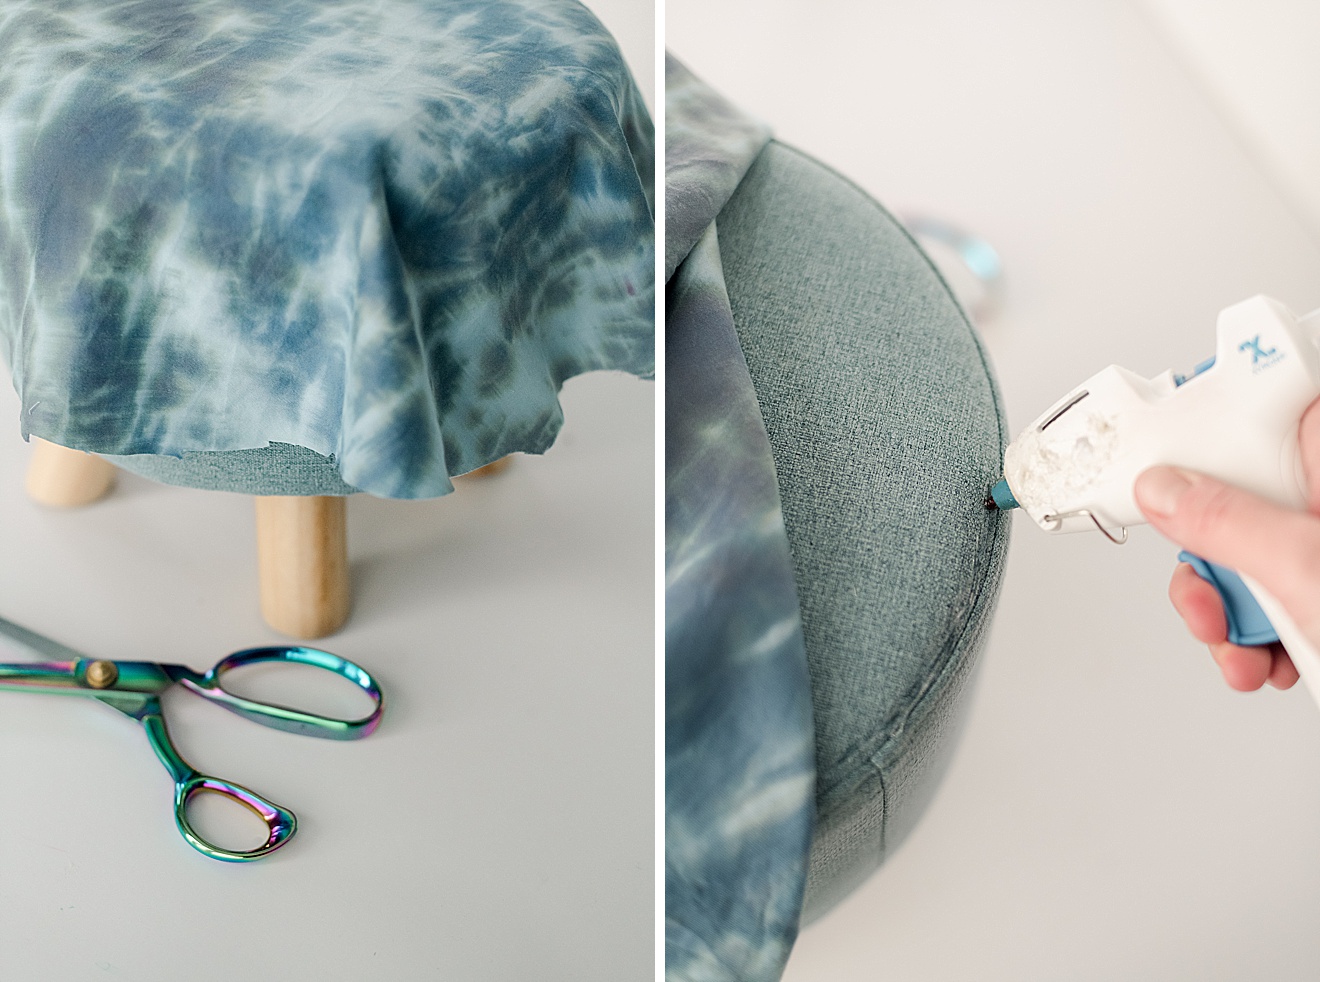
b. Either iron a straight edge or stitch (I just used a straight stitch on my sewing machine) a nice straight seam to the long edge of your tie-dyed material. Then with a bead of hot glue, carefully glue this top edge of material to the stool, overlapping the top circle that is already glued into place. Once you reach the starting point, fold over both edges and glue them into place. 

Shibori inspired footstool recovering, how to recover a footstool, shibori inspired tie dye DIY, Shibori inspired dye, how to shibori dye a footstool

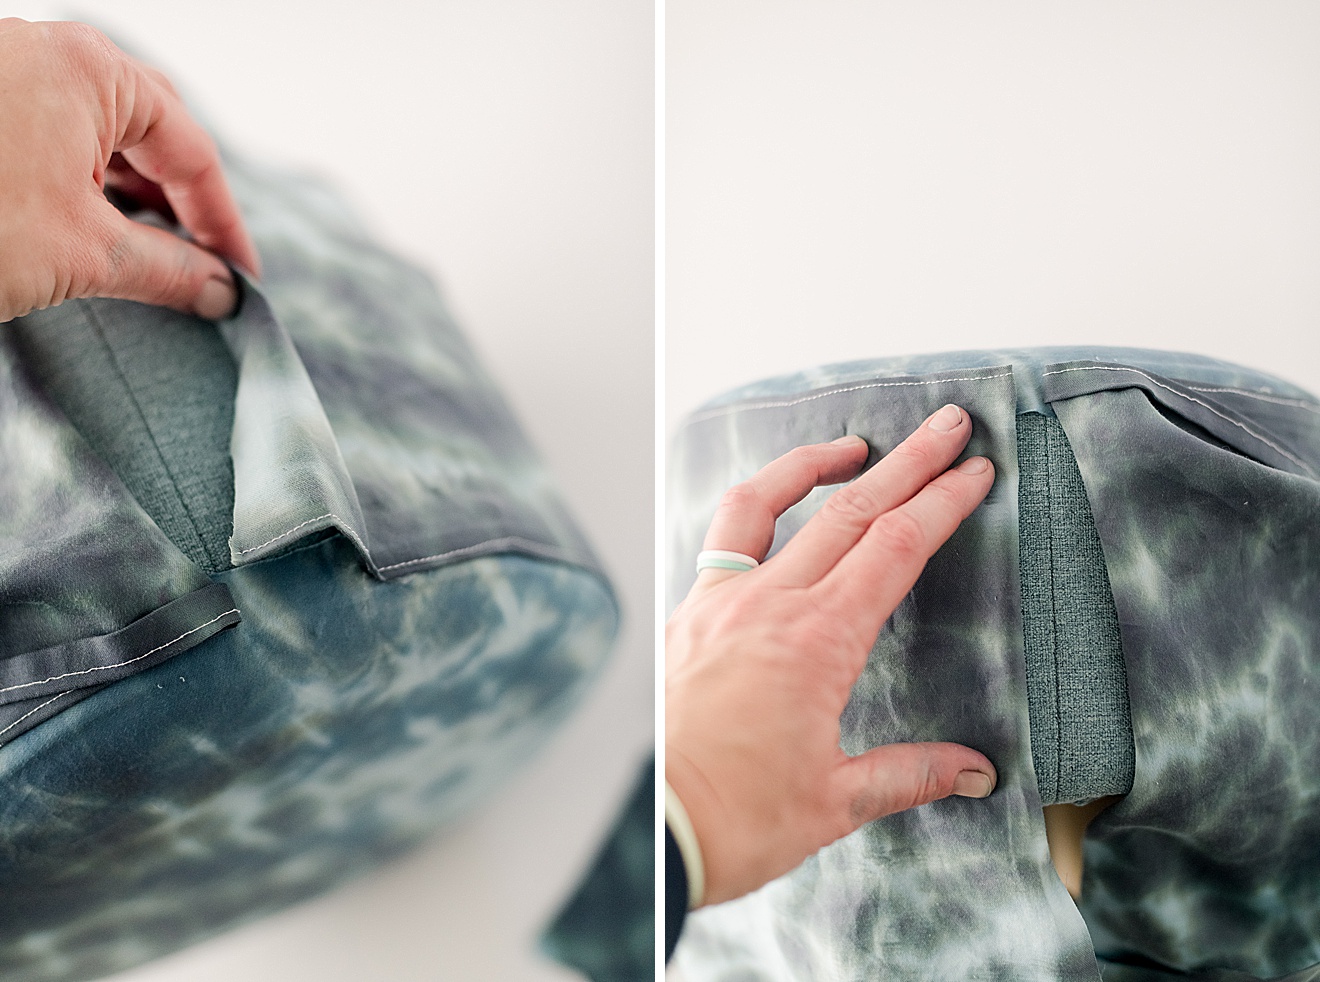
c. Then wrap your fabric to the underside of the stool and glue into place. Pull the fabric taught as you tack down! 

Shibori inspired footstool recovering, how to recover a footstool, shibori inspired tie dye DIY, Shibori inspired dye, how to shibori dye a footstool

VOILA! Now you have yourself a newly refreshed and stylishly tie-dyed footstool or piece of furniture! 🙂 I am tellin’ ya: NEVER OVERLOOK what some tie dye and an old bed sheet can do to breathe new life into an old piece of furniture! 🙂 

Shibori inspired footstool recovering, how to recover a footstool, shibori inspired tie dye DIY, Shibori inspired dye, how to shibori dye a footstool
Pin
Share
Tweet
0 Shares


Leave a Comment

  • Facebook
  • Instagram
  • Pinterest
  • Twitter
« Candy Heart Luminaries
Heart bookmark or friendship bracelet »

Leave a Reply Cancel reply

Your email address will not be published. Required fields are marked *

Recipe Rating


oh hi there, i’m Emily!

I am a believer, dreamer, photographer and maker! I use almond extract in all of my baking, have a problem hitting the snooze button and I truly believe that smiling can change the world!

Learn more about me HERE!

  • Facebook
  • Instagram
  • Pinterest
  • Twitter

Looking for something?

Popular posts!

DIY felt christmas garland, DIY Christmas bulb ornaments, DIY christmas bulb garland, how to make a felt christmas garland, DIY christmas garland ideas, christmas bulb DIY, christmas bulb decorating, colorful christmas garland, colorful christmas decor DIY

How to make a felt Christmas bulb garland (or ornaments)

Fruit slice wet bag pattern, watermelon pouch pattern, janome memory maker sewing machine, fruit pouch swimsuit bag, swimsuit wet bag pattern, free wet bag sewing pattern

How to make a fruit slice summer swimsuit wet bag!

How to DIY a colorful wall mural, colorful wall mural, joyful wall mural, in home mural, how to make an easy colorful wall mural, dining room mural, house mural, how to paint a wall, diagonal grid on wall

Our colorful, diagonal grid dining room mural + my urge to paint more!

how to make a plushy bookend, sloth plushie pattern, sloth pattern, DIY sloth bookend, handmade bookend, janome sewing machine review, janome kids camp project

How to make the cutest sloth plush bookend or doorstop!

Categories

  • All
  • Costumes
  • Cricut + SVG files
  • DIYs
  • Donuts
  • Holiday
  • Ice Cream
  • Kids
  • Life
  • Murals
  • Painting
  • Paper Crafts
  • phone backgrounds
  • Printables
  • Recipes
  • Sewing
  • Tie Dye
  • Uncategorized
  • Yarn + Fibers
Adding color and lots of little personalities and Adding color and lots of little personalities and faces to our weekend. Because love wins and death is conquered….so yes, this is for sure how we celebrate🎉 
Also, every time I cracked an egg this weekend, I squealed in the sound or noise that I thought the personality of the egg would sound 😂😂😂 obvi.
I would PICKle you as my Valentine over and over i I would PICKle you as my Valentine over and over if I could! 😂
Also, yes, this is clearly a @claussenpicklesofficial because duh, they are the best! ❤️

The alternate caption could also be “yup…..it’s a Valentine pickle. Because my kids are obsessed with vinegar soaked veggies. Just swipe for the Halloween pickle proof 🥒 “
For the record, I got approximately zero adulting For the record, I got approximately zero adulting things done while constructing this cardboard @encantomovie Casita of my daughters dreams. Except of course inserting many phrases in place of the “we don’t talk about Bruno” song…..ya know, “we don’t talk about dishes no no nooooo. We don’t talk about laundryyyyyy.” 🏠 🎨 💛 
Also, the minute the hot glue was dry, Esther picked up the Casita, hugged it and ran it to the living room where she played most of the afternoon. A moment of Mom win to warm my heart 😭❤️
“May you find the light that guides you home” “May you find the light that guides you home” 
One of my fave song + fave yearly progression that makes me allll happy and sappy. Merry Christmas 🎄 I hope you’re finding light this holiday season!
If I’ve said it once and I’ll say it 3 squllio If I’ve said it once and I’ll say it 3 squllion more times: I LOVE PAINNNTTTTT! Here’s the thing……paint is always, 100% paint-overable. If you paint something, step back, live with it for while but just doesn’t feel right…..simply paint over it. Like really that simple. 
I’ve done this a handful of times in our own home….bathrooms, bedrooms, hallways (like so many times in the hallways 😂)! 
Painting to me is a slight reflection of life: nothing is perfect, and even when mistakes or missteps feel overwhelming they are always worth fixing and usually fixable annnnnd it’s amazing how much a  small moment can bring big joy…..or in this case a big moment on a biiigggg wall 🎉🎨
I am doing my last restock of these little nutcrac I am doing my last restock of these little nutcracker buddies tonight at 7pm (central time)! So if you’ve had your eyes on them, especially after seeing them in @hgtvmagazine (gahhhhhhh, still can’t get over this), then be sure to find yourself in my shop tonight at 7pm central!
Even thought I had alllll the intentions of postin Even thought I had alllll the intentions of posting this sooner, I make no apologies because I don’t like living in the land of the “shoulddas”. Especially during this season of intentional slowing down and anticipating the arrival of Christmas. 
Download this coloring advent village and take a few min away to color each house and talk about the season and the way you can shine light! 
PS, download the file on my blog amongst the other holiday themed doodles coloring sheets…..AND we printed our village in gargantuan size from Staples….(their engineer print) and I am not one but mad about the fact that it will take up nearly half a wall! 😂 ❤️🎄
Tis the season for my crafting fingers to be full Tis the season for my crafting fingers to be full of hot glue burns and can honestly say it makes me happy. Like so thankful and happy! 
Okkayyy well maybe not the burns themselves but the fact that I’m over here, in my little studio space in Wisconsin crafting my heart out and you’re sending the love right back to me with all the support! Support for the doodles and painting and costumes and sewing and other colorful things that I’m eager to share! 
SO thankful. Like I’d really love to give you all a humongous big hug right now. 

And for all the online shoppers this weekend, use code YAYcreatives for 20% off everything in my shop through Monday night. Including these happy Colorful felt trees! (I meannnnn, look at their personality 😂😍)
Follow Emily on Insta

Stay Connected

  • Facebook
  • Instagram
  • Pinterest
  • Twitter

all rights reserved © oh yay studio 2019

  • About
  • Contact
  • Disclosure
  • Terms
Adding color and lots of little personalities and Adding color and lots of little personalities and faces to our weekend. Because love wins and death is conquered….so yes, this is for sure how we celebrate🎉 
Also, every time I cracked an egg this weekend, I squealed in the sound or noise that I thought the personality of the egg would sound 😂😂😂 obvi.
I would PICKle you as my Valentine over and over i I would PICKle you as my Valentine over and over if I could! 😂
Also, yes, this is clearly a @claussenpicklesofficial because duh, they are the best! ❤️

The alternate caption could also be “yup…..it’s a Valentine pickle. Because my kids are obsessed with vinegar soaked veggies. Just swipe for the Halloween pickle proof 🥒 “
For the record, I got approximately zero adulting For the record, I got approximately zero adulting things done while constructing this cardboard @encantomovie Casita of my daughters dreams. Except of course inserting many phrases in place of the “we don’t talk about Bruno” song…..ya know, “we don’t talk about dishes no no nooooo. We don’t talk about laundryyyyyy.” 🏠 🎨 💛 
Also, the minute the hot glue was dry, Esther picked up the Casita, hugged it and ran it to the living room where she played most of the afternoon. A moment of Mom win to warm my heart 😭❤️
“May you find the light that guides you home” “May you find the light that guides you home” 
One of my fave song + fave yearly progression that makes me allll happy and sappy. Merry Christmas 🎄 I hope you’re finding light this holiday season!
If I’ve said it once and I’ll say it 3 squllio If I’ve said it once and I’ll say it 3 squllion more times: I LOVE PAINNNTTTTT! Here’s the thing……paint is always, 100% paint-overable. If you paint something, step back, live with it for while but just doesn’t feel right…..simply paint over it. Like really that simple. 
I’ve done this a handful of times in our own home….bathrooms, bedrooms, hallways (like so many times in the hallways 😂)! 
Painting to me is a slight reflection of life: nothing is perfect, and even when mistakes or missteps feel overwhelming they are always worth fixing and usually fixable annnnnd it’s amazing how much a  small moment can bring big joy…..or in this case a big moment on a biiigggg wall 🎉🎨
I am doing my last restock of these little nutcrac I am doing my last restock of these little nutcracker buddies tonight at 7pm (central time)! So if you’ve had your eyes on them, especially after seeing them in @hgtvmagazine (gahhhhhhh, still can’t get over this), then be sure to find yourself in my shop tonight at 7pm central!
Even thought I had alllll the intentions of postin Even thought I had alllll the intentions of posting this sooner, I make no apologies because I don’t like living in the land of the “shoulddas”. Especially during this season of intentional slowing down and anticipating the arrival of Christmas. 
Download this coloring advent village and take a few min away to color each house and talk about the season and the way you can shine light! 
PS, download the file on my blog amongst the other holiday themed doodles coloring sheets…..AND we printed our village in gargantuan size from Staples….(their engineer print) and I am not one but mad about the fact that it will take up nearly half a wall! 😂 ❤️🎄
Tis the season for my crafting fingers to be full Tis the season for my crafting fingers to be full of hot glue burns and can honestly say it makes me happy. Like so thankful and happy! 
Okkayyy well maybe not the burns themselves but the fact that I’m over here, in my little studio space in Wisconsin crafting my heart out and you’re sending the love right back to me with all the support! Support for the doodles and painting and costumes and sewing and other colorful things that I’m eager to share! 
SO thankful. Like I’d really love to give you all a humongous big hug right now. 

And for all the online shoppers this weekend, use code YAYcreatives for 20% off everything in my shop through Monday night. Including these happy Colorful felt trees! (I meannnnn, look at their personality 😂😍)
Follow Emily on Insta

Copyright © 2022 · Divine theme by Restored 316

Copyright © 2022 · Divine Theme on Genesis Framework · WordPress · Log in