• Murals
  • Paper Crafts
  • Cricut + SVG files
  • Sewing
  • doodled coloring pages
    • Facebook
    • Instagram
    • Pinterest
    • Twitter

oh yay studio - Making + baking + everyday celebrating

Celebrating Holidays + everydays through making + DIYs + Murals + costumes + a creative monthly subscription

  • Home
  • About
  • Categories
    • DIYs
      • Painting
      • Cricut + SVG files
      • Paper Crafts
      • Sewing
      • Yarn + Fibers
      • Tie Dye
    • Printables
    • Murals
    • Recipes
    • Holiday
    • Costumes
    • Life
    • Uncategorized
  • Contact
  • SHOP!

All Cricut + SVG files Holiday

Candy Heart Luminaries

candy heart luminaries oh yay studio, valentine SVG file, valentines day svg, heart svg file, free cricut svg files

It’s the month of LOOOOVVEEEEE! And here in the midwest it’s still kinda dark outside so of course I had to make some luminaries to add some of that night-time soft glowing light that I just love so much (and kinda crave after we take our Christmas tree down for the year)! 🙂
SOOOOO! I made a set of these candy heart’s and turned them into luminaries so that we could group them on our mantle….download the FREE SVG files below (and a whole slew of others at the end of the blog post) and cut out some of your own to get you through those dark wintery nights! 🙂

candy heart luminaries oh yay studio, valentine SVG file, valentines day svg, heart svg file, free cricut svg files

You can make these in any size and group them together on your mantle, kitchen table, or even in the foreground of your zoom calls! 🙂 ANNND feel free to even customize the sayings (if you have extra time to play in design space before cutting them out…….essentially you’d just swap out the wording on the hearts and customize)! 🙂

MATERIALS:

  • Downloaded SVG files (below)
  • Cardstock paper in various colors
  • Your Cricut cut machine (or cutting machine of choice)
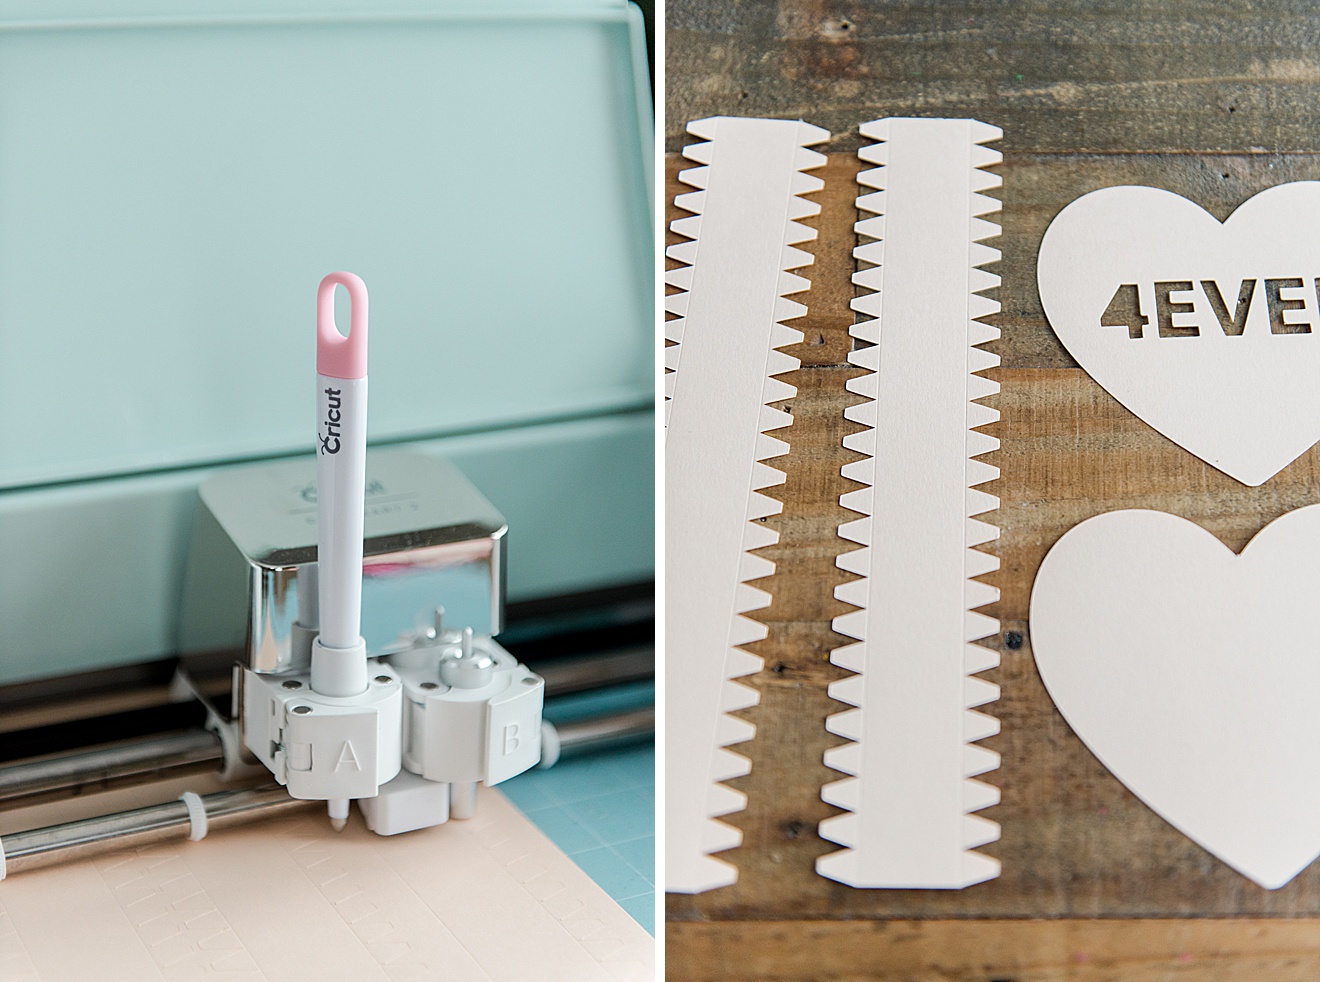
  • Your scoring stylus + cutting blade for your Cricut
  • Hot glue gun or glue of choice
  • String of lights to complete luminaries 🙂 
Glue the sides to your heart by running a bead of glue along the inside outer edge of one of the hearts. I decided to “break” my sides at the inner tip of the heart (this seems to be the least obvious part to make a “seam” to join the 2 side pieces together. Be sure to leave a 2-4” opening along one of the “flat” side parts of the heart. This is where the heart will “lay down” and where the light from the string lights or tea light will illuminate the heart. Once one side of the heart has the sides attached, run a bead of glue along the other inside outer edge of the heart and attach it all together.

INSTRUCTIONS:

  1. Download the SVG files below
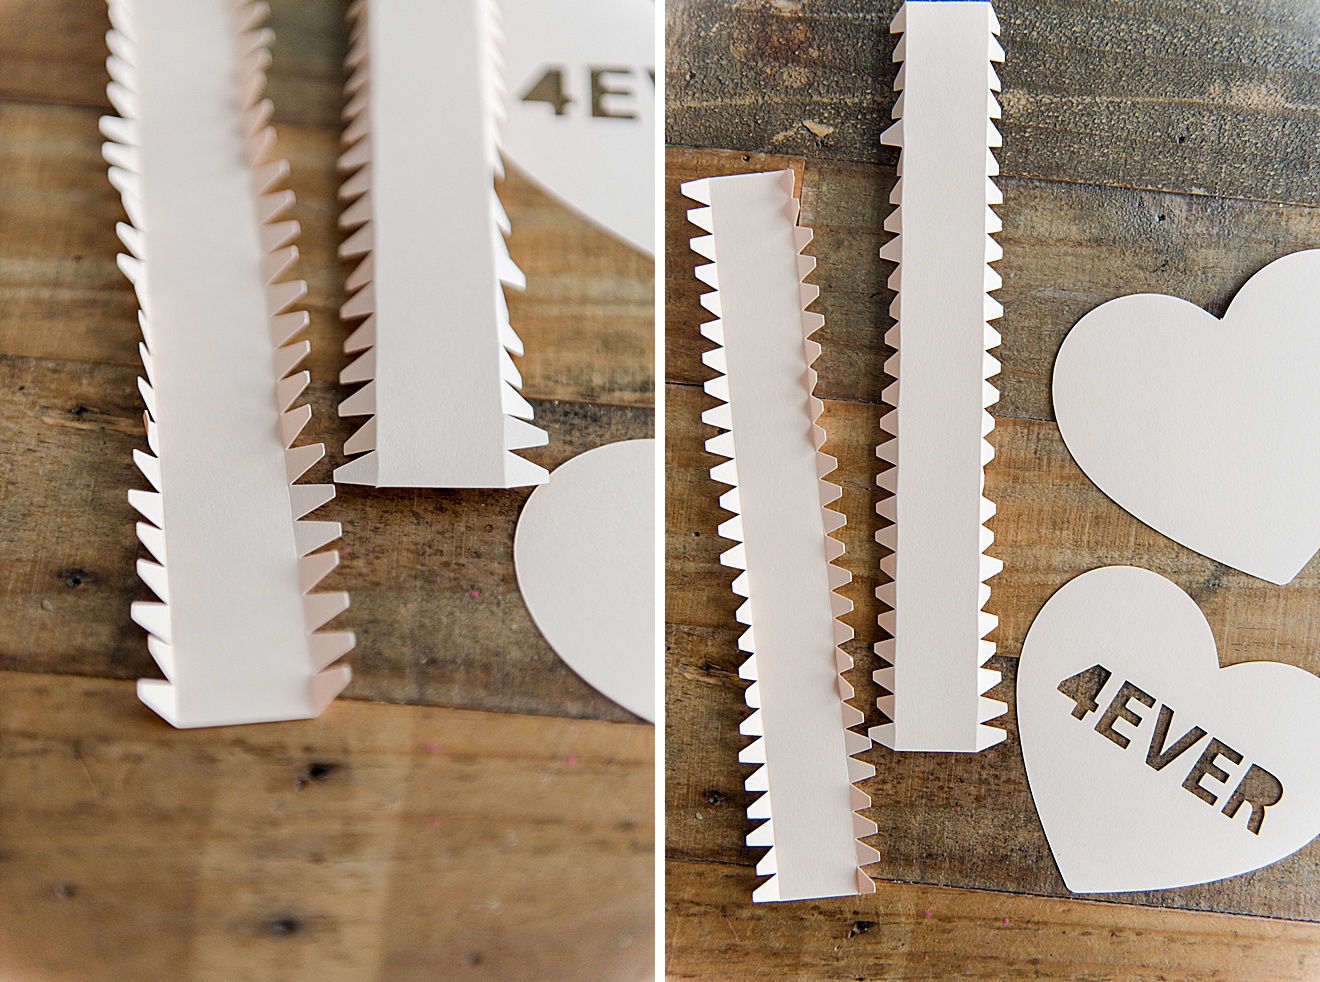
    *note: there are 2 files per completed heart – the heart itself and then the side piece

LOVE YOU svg
BE MINE svg
XOXO svg
HUG ME svg
YAY svg
4EVER svg
Heart Side pieces

2. Upload the various heart SVGs into your design software and cut out (you can resize them to any size that you want….I did a larger and smaller size for variety). 

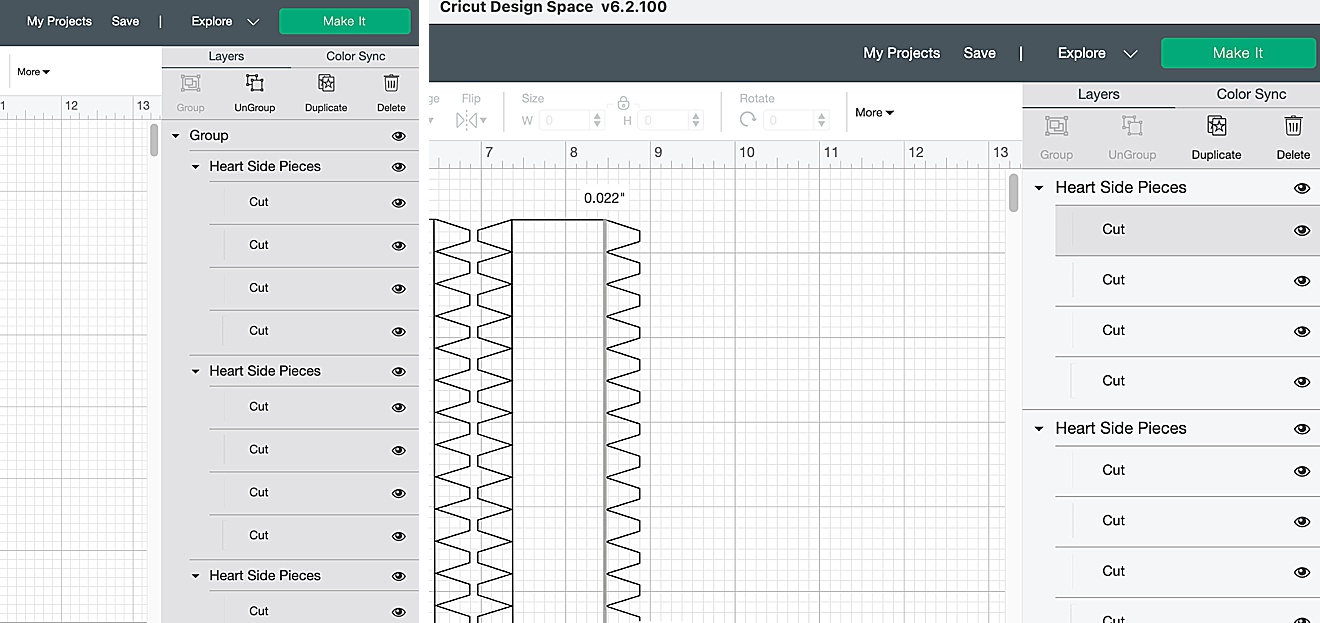
3. When you open this file, you will need to do a few things to prep for scoring + cutting:

candy heart luminaries oh yay studio, valentine SVG file, valentines day svg, heart svg file, free cricut svg files
  • a. Go to the right side panel and “ungroup” at the very top of the grey side panel (this will allow you to select the lines to score vs. cut). 
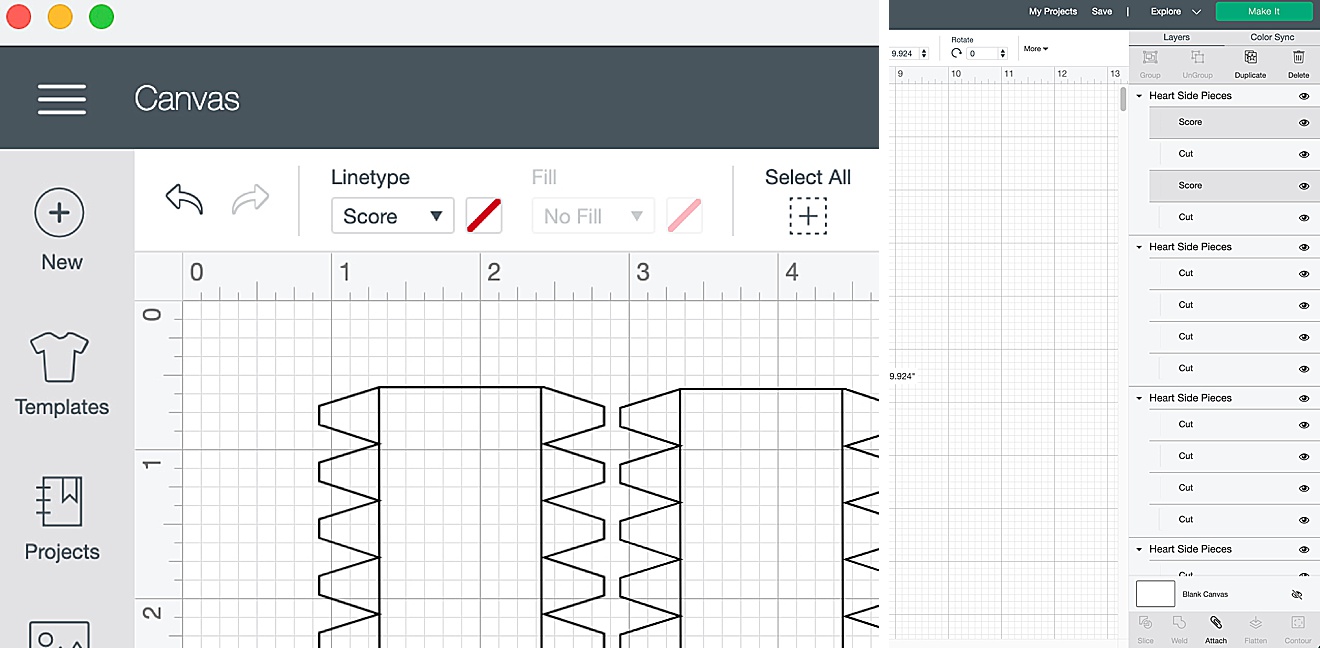
  • b. Go to the right side panel (each grouping) and highlight each vertical line that needs to be scored. Then go to the top left “linetype” dropdown and select “score” . 
  • c. Then with those vertical lines selected (hold shift and select the vertical score lines in each side panel) and go to the bottom and hit “attach” (this will attach the scored line directly to the spot on the side panel. 
  • d. Repeat b-c for as many side pieces that you think you will need. I used about 1.5 side pieces for each 4.5” finished heart
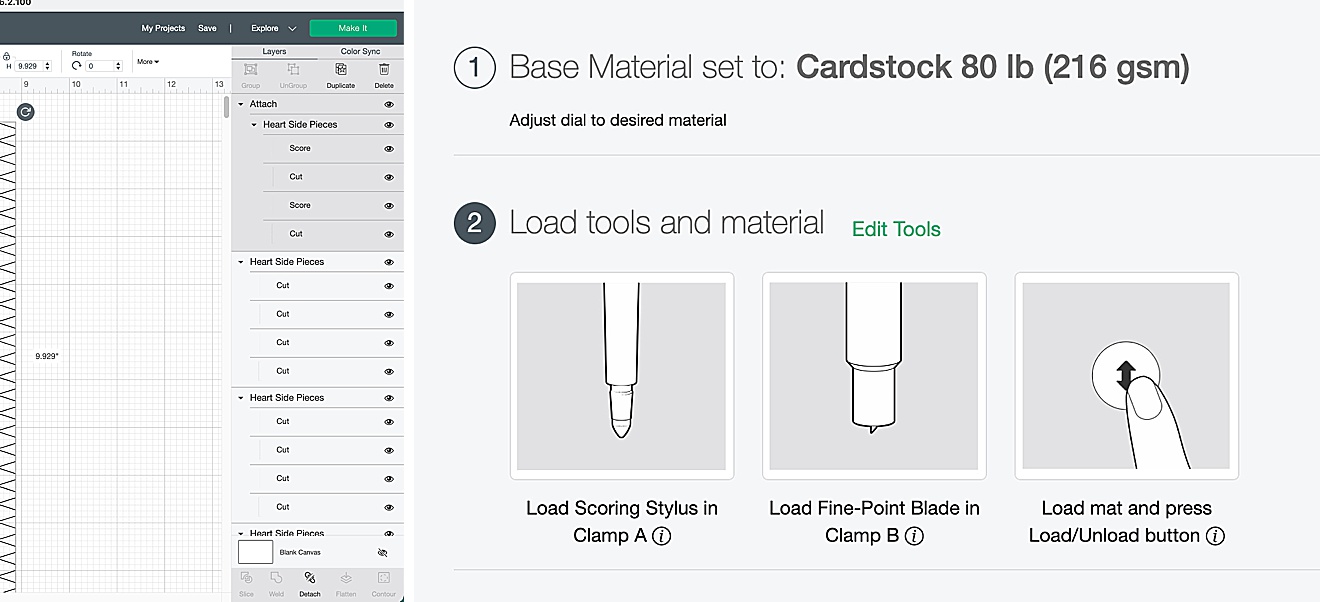
  • e. Follow the instructions on the design software screen on how to insert (and which slot) your scoring stylus + cutting blade + cut out your side pieces! 🙂
candy heart luminaries oh yay studio, valentine SVG file, valentines day svg, heart svg file, free cricut svg files

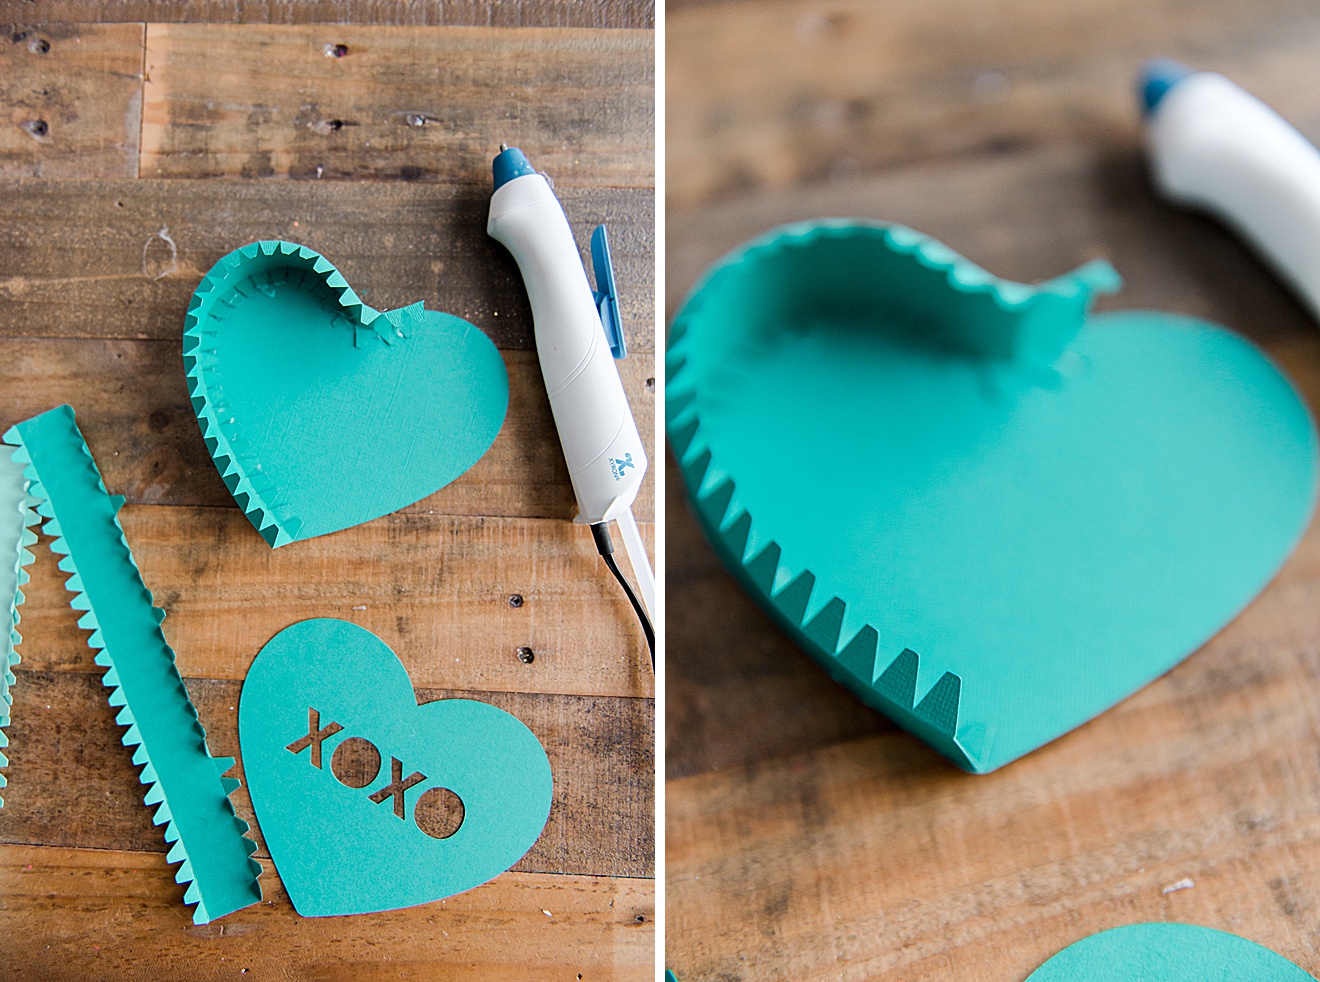
4. Once everything is cut, pull the side pieces (or mountain-y looking pieces) from the sticky mat and then fold the little tabs inward to make a 90* angle. Those tabs will be what you glue to your sides to make them 3D 🙂

Glue the sides to your heart by running a bead of glue along the inside outer edge of one of the hearts. I decided to “break” my sides at the inner tip of the heart (this seems to be the least obvious part to make a “seam” to join the 2 side pieces together. Be sure to leave a 2-4” opening along one of the “flat” side parts of the heart. This is where the heart will “lay down” and where the light from the string lights or tea light will illuminate the heart. Once one side of the heart has the sides attached, run a bead of glue along the other inside outer edge of the heart and attach it all together.

5. Glue the sides to your heart by running a bead of glue along the inside outer edge of one of the hearts. I decided to “break” my sides at the inner tip of the heart (this seems to be the least obvious part to make a “seam” to join the 2 side pieces together. Be sure to leave a 2-4” opening along one of the “flat” side parts of the heart. This is where the heart will “lay down” and where the light from the string lights or tea light will illuminate the heart. Once one side of the heart has the sides attached, run a bead of glue along the other inside outer edge of the heart and attach it all together.

Glue the sides to your heart by running a bead of glue along the inside outer edge of one of the hearts. I decided to “break” my sides at the inner tip of the heart (this seems to be the least obvious part to make a “seam” to join the 2 side pieces together. Be sure to leave a 2-4” opening along one of the “flat” side parts of the heart. This is where the heart will “lay down” and where the light from the string lights or tea light will illuminate the heart. Once one side of the heart has the sides attached, run a bead of glue along the other inside outer edge of the heart and attach it all together.

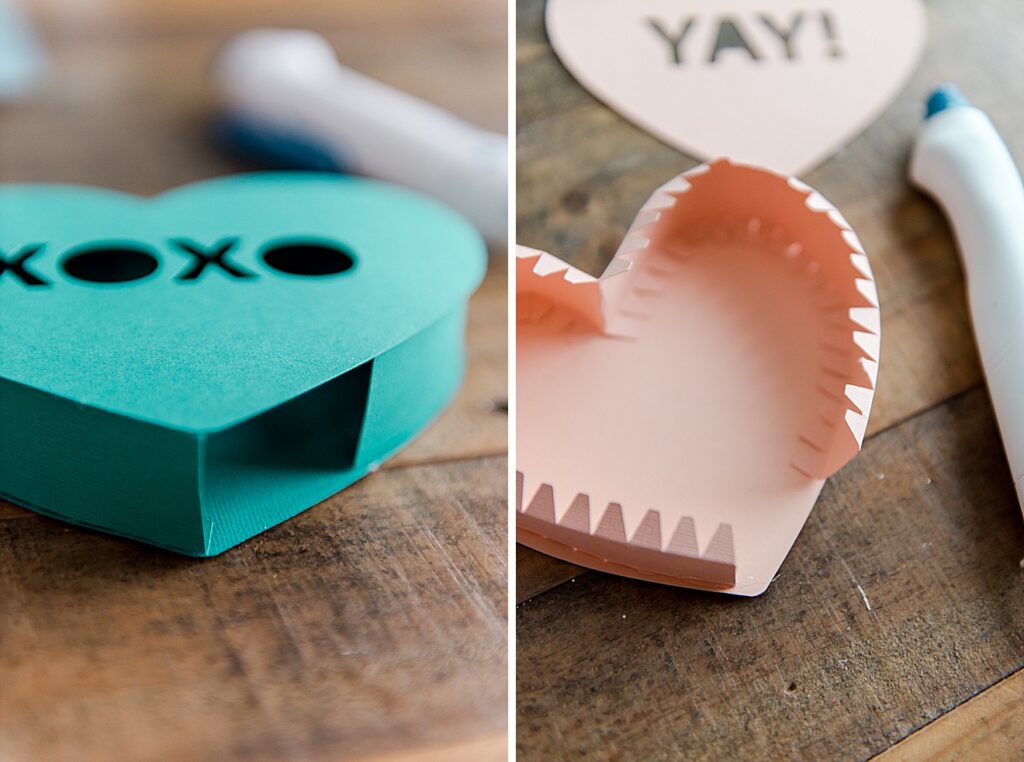
6. You will be left with a little opening near the edge of one of the sides of the heart….this is where the string of lights will be inserted into! Have fun laying out your hearts and leaning them along your mantles!

Glue the sides to your heart by running a bead of glue along the inside outer edge of one of the hearts. I decided to “break” my sides at the inner tip of the heart (this seems to be the least obvious part to make a “seam” to join the 2 side pieces together. Be sure to leave a 2-4” opening along one of the “flat” side parts of the heart. This is where the heart will “lay down” and where the light from the string lights or tea light will illuminate the heart. Once one side of the heart has the sides attached, run a bead of glue along the other inside outer edge of the heart and attach it all together.
candy heart luminaries oh yay studio, valentine SVG file, valentines day svg, heart svg file, free cricut svg files

AND AND ANNNNNND be sure to take a gander and download all of these other awesome FREE SVG files:

Valentine Doodle Heart by Persia Lou Always and Forever by Studio Xtine My Heart Belongs to Chocolate by Polka Dotted Blue Jay Candy Heart Luminaries by Oh Yay Studio Curvy Sweet Heart by Gina C. Creates Mama & Mini by Poofy Cheeks Blog Owl Valentine Box by Me and My Inklings Not Today Cupid by Artsy-Fartsy Mama Retro Love by My Designs in the Chaos Valentine Unicorn by Weekend Craft A Love Like Gnome Other Card by The Bearded Housewife Okay, Love You. Bye! by The Walnut Street House I Love You 365 Days A Year by Sunshine and Munchkins Yep! Still Single by Lettered by Stephanie Kitten and Puppy Peekaboo Cupcake Toppers by Craftara Creates Love Bug Lollipop Holder SVG by Spot of Tea Designs Play-Doh Valentine Gift Tags by Simply Made Fun Cactus Valentine’s Day SVG by Tried & True Creative
Pin36
Share
Tweet
36 Shares


  • Facebook
  • Instagram
  • Pinterest
  • Twitter
« Matching holiday sweaters for YOU + your pup!
Shibori inspired footstool DIY »

Comments

  1. Mary G. says

    January 14, 2022 at 1:17 pm

    Won’t the lights start the paper on fire?

    • ohyaystudio27 says

      January 18, 2022 at 10:16 am

      Hi Mary! The lights I Have in them aren’t super hot….they are dim Christmas-style lights! In fact, the paper doesn’t even get super hot because the light itself isn’t touching the paper at all, so I haven’t had an issue with it yet. But perhaps just make sure you buy lower wattage lights when you purchase some.

  2. Aurora says

    January 14, 2022 at 1:41 pm

    Love, love, love the candy hearts. How do you get the svg? Do I need a special program? I have a Mac and it’s not working….:(

    • Aurora says

      January 14, 2022 at 3:11 pm

      I figured it out!! No need to reply. Thanks.

  3. Kelsey says

    February 5, 2022 at 7:26 am

    This is my favorite project in the roundup for real! Love these!!! Such a great idea.

Trackbacks

  1. Easy DIY valentine cupcake toppers with Cricut | Free SVG Cut File - Craftara Creates says:
    January 14, 2022 at 1:09 am

    […] Lou Always and Forever by Studio Xtine My Heart Belongs to Chocolate by Polka Dotted Blue Jay Candy Heart Luminaries by Oh Yay Studio Curvy Sweet Heart by Gina C. Creates Mama & Mini by Poofy Cheeks Blog Owl […]

  2. Mama and Mini Valentine's SVG - 18 Free Valentine's Cut Files says:
    January 14, 2022 at 5:46 am

    […] Lou Always and Forever by Studio Xtine My Heart Belongs to Chocolate by Polka Dotted Blue Jay Candy Heart Luminaries by Oh Yay Studio Curvy Sweet Heart by Gina C. Creates Mama & Mini by Poofy Cheeks Blog Owl […]

  3. Valentine Unicorn SVG - Weekend Craft says:
    January 14, 2022 at 6:00 am

    […] Lou Always and Forever by Studio Xtine My Heart Belongs to Chocolate by Polka Dotted Blue Jay Candy Heart Luminaries by Oh Yay Studio Curvy Sweet Heart by Gina C. Creates Mama & Mini by Poofy Cheeks […]

  4. How to Make a Gnome Card for Valentine's Day - The Bearded Housewife says:
    January 14, 2022 at 6:05 am

    […] Lou Always and Forever by Studio Xtine My Heart Belongs to Chocolate by Polka Dotted Blue Jay Candy Heart Luminaries by Oh Yay Studio Curvy Sweet Heart by Gina C. Creates Mama & Mini by Poofy Cheeks Blog Owl […]

  5. Valentine’s Day Crafts Free SVG Files – Gina C. Creates says:
    January 14, 2022 at 6:30 am

    […] Candy Heart Luminaries by Oh Yay Studio […]

  6. Love Bug Lollipop Holder SVG - Spot of Tea Designs says:
    February 11, 2022 at 2:10 pm

    […] Lou Always and Forever by Studio Xtine My Heart Belongs to Chocolate by Polka Dotted Blue Jay Candy Heart Luminaries by Oh Yay Studio Curvy Sweet Heart by Gina C. Creates Mama & Mini by Poofy Cheeks Blog Owl […]

oh hi there, i’m Emily!

I am a believer, dreamer, photographer and maker! I use almond extract in all of my baking, have a problem hitting the snooze button and I truly believe that smiling can change the world!

Learn more about me HERE!

  • Facebook
  • Instagram
  • Pinterest
  • Twitter

Looking for something?

Popular posts!

Ombre Tie Dyed curtains!

DIY felt christmas garland, DIY Christmas bulb ornaments, DIY christmas bulb garland, how to make a felt christmas garland, DIY christmas garland ideas, christmas bulb DIY, christmas bulb decorating, colorful christmas garland, colorful christmas decor DIY

How to make a felt Christmas bulb garland (or ornaments)

Fruit slice wet bag pattern, watermelon pouch pattern, janome memory maker sewing machine, fruit pouch swimsuit bag, swimsuit wet bag pattern, free wet bag sewing pattern

How to make a fruit slice summer swimsuit wet bag!

How to DIY a colorful wall mural, colorful wall mural, joyful wall mural, in home mural, how to make an easy colorful wall mural, dining room mural, house mural, how to paint a wall, diagonal grid on wall

Our colorful, diagonal grid dining room mural + my urge to paint more!

Categories

  • All
  • Costumes
  • Cricut + SVG files
  • DIYs
  • Donuts
  • Holiday
  • Ice Cream
  • Kids
  • Life
  • Murals
  • Painting
  • Paper Crafts
  • phone backgrounds
  • Printables
  • Recipes
  • Sewing
  • Tie Dye
  • Uncategorized
  • Yarn + Fibers
Of course Norman pug needed a colorful house to sn Of course Norman pug needed a colorful house to snore and catch some shade in this summer!!!!
I bought a dog house kit (maybe I will get ambitious and make a matching wayyyyy bigger one for Milton) and then gave it a colorful makeover with the amazing @mycolorshot sprays! 🎉🐽🐶☀️
When tropical meets 4th of July for some colorful When tropical meets 4th of July for some colorful backyard fun! Yay for custom bag boards….a quick and super satisfying paint project! 🌿🎉❤️
To celebrate two incredibly creative and beautiful To celebrate two incredibly creative and beautiful crafting legends (the inventors of @aleenesdiy + Mod Podge), I paired @plaidcrafts Mod Podge and @aleenesdiy glue to give some colorful love to these glass jars that I found in the Target dollar spot. 
And lest you think that I could keep them on the counter as adorable cookie jars or something, nope….they’ve already been snatched up by my kids for mini squishies, football cards and rock collections 😂😂😂 

Also! Tomorrow is officially #nationalmodpodgeday sooooo I have a fabulous giveaway! Simply follow @aleenesdiy + @plaidcrafts + @ohyaystudio + tag a friend in the comments for your chance to be chosen at random for a crafty creative bundle of awesome things. A winner will be chosen on 05.22! :)
And now I want to paint no less than 8264 more col And now I want to paint no less than 8264 more colorful free little libraries. This was painted for the incredible team at @therealcraftsy (also, can we just celebrate companies that promote reading and books and give them a big YAY!?)! 

Now, to come up with the plans for one we need in our yard! Perhaps florals or reverse color stripes or even a heap of rainbow circles! Obvi! 🌈🎉
Adding color and lots of little personalities and Adding color and lots of little personalities and faces to our weekend. Because love wins and death is conquered….so yes, this is for sure how we celebrate🎉 
Also, every time I cracked an egg this weekend, I squealed in the sound or noise that I thought the personality of the egg would sound 😂😂😂 obvi.
Whenever I’m in a creative slump, it works for m Whenever I’m in a creative slump, it works for me to just have to.
Have to grab the sketchbook and pencil. 
Have to just get something on paper without overthinking. 
Have to just use the markers and fill in the space or overlap the shapes. Or even grab a color I wouldn’t normally go for. 
Have to step back and see. Like really SEE the lines and colors and shapes that I gravitate towards. Like those fern leaves and shapes of the butterfly centers. 
And this weekend’s early morning “have to” doodle is full of springtime butterflies and a sign of new life this week!
Yup, in case you’re wondering Esther has request Yup, in case you’re wondering Esther has requested that I paint our refrigerator to match our newly painted @kitchenaidusa. Soooooo 🤷‍♀️🤷‍♀️😂😂 

This DIY for sure goes down in the “wow, I’m so glad this idea actually worked” category (ya know, because I’m totes the kind of person that just starts a project that is always half experimentation)! 😂 
And for the record @mycolorshot is the best spray paint on the actual planet and @frogtape is magically awesome! 

Also, who’s painting their Kitchenaid now? Also, can you promise me you’ll send pics if you do? :)
Yup, you can totally see the pencil line under the Yup, you can totally see the pencil line under these paint markers and yes, this isn’t my go-to color palette…..but sometimes I just gotta make art on a Sunday when the sun is setting and the dog is snoring (loudly) after I just unwrapped a new mini sketchbook! 
Make the art. 
Do the thing. 
Even if it isn’t perfect.
Follow Emily on Insta

Stay Connected

  • Facebook
  • Instagram
  • Pinterest
  • Twitter

all rights reserved © oh yay studio 2019

  • About
  • Contact
  • Disclosure
  • Terms
Of course Norman pug needed a colorful house to sn Of course Norman pug needed a colorful house to snore and catch some shade in this summer!!!!
I bought a dog house kit (maybe I will get ambitious and make a matching wayyyyy bigger one for Milton) and then gave it a colorful makeover with the amazing @mycolorshot sprays! 🎉🐽🐶☀️
When tropical meets 4th of July for some colorful When tropical meets 4th of July for some colorful backyard fun! Yay for custom bag boards….a quick and super satisfying paint project! 🌿🎉❤️
To celebrate two incredibly creative and beautiful To celebrate two incredibly creative and beautiful crafting legends (the inventors of @aleenesdiy + Mod Podge), I paired @plaidcrafts Mod Podge and @aleenesdiy glue to give some colorful love to these glass jars that I found in the Target dollar spot. 
And lest you think that I could keep them on the counter as adorable cookie jars or something, nope….they’ve already been snatched up by my kids for mini squishies, football cards and rock collections 😂😂😂 

Also! Tomorrow is officially #nationalmodpodgeday sooooo I have a fabulous giveaway! Simply follow @aleenesdiy + @plaidcrafts + @ohyaystudio + tag a friend in the comments for your chance to be chosen at random for a crafty creative bundle of awesome things. A winner will be chosen on 05.22! :)
And now I want to paint no less than 8264 more col And now I want to paint no less than 8264 more colorful free little libraries. This was painted for the incredible team at @therealcraftsy (also, can we just celebrate companies that promote reading and books and give them a big YAY!?)! 

Now, to come up with the plans for one we need in our yard! Perhaps florals or reverse color stripes or even a heap of rainbow circles! Obvi! 🌈🎉
Adding color and lots of little personalities and Adding color and lots of little personalities and faces to our weekend. Because love wins and death is conquered….so yes, this is for sure how we celebrate🎉 
Also, every time I cracked an egg this weekend, I squealed in the sound or noise that I thought the personality of the egg would sound 😂😂😂 obvi.
Whenever I’m in a creative slump, it works for m Whenever I’m in a creative slump, it works for me to just have to.
Have to grab the sketchbook and pencil. 
Have to just get something on paper without overthinking. 
Have to just use the markers and fill in the space or overlap the shapes. Or even grab a color I wouldn’t normally go for. 
Have to step back and see. Like really SEE the lines and colors and shapes that I gravitate towards. Like those fern leaves and shapes of the butterfly centers. 
And this weekend’s early morning “have to” doodle is full of springtime butterflies and a sign of new life this week!
Yup, in case you’re wondering Esther has request Yup, in case you’re wondering Esther has requested that I paint our refrigerator to match our newly painted @kitchenaidusa. Soooooo 🤷‍♀️🤷‍♀️😂😂 

This DIY for sure goes down in the “wow, I’m so glad this idea actually worked” category (ya know, because I’m totes the kind of person that just starts a project that is always half experimentation)! 😂 
And for the record @mycolorshot is the best spray paint on the actual planet and @frogtape is magically awesome! 

Also, who’s painting their Kitchenaid now? Also, can you promise me you’ll send pics if you do? :)
Yup, you can totally see the pencil line under the Yup, you can totally see the pencil line under these paint markers and yes, this isn’t my go-to color palette…..but sometimes I just gotta make art on a Sunday when the sun is setting and the dog is snoring (loudly) after I just unwrapped a new mini sketchbook! 
Make the art. 
Do the thing. 
Even if it isn’t perfect.
Follow Emily on Insta

Copyright © 2022 · Divine theme by Restored 316

Copyright © 2022 · Divine Theme on Genesis Framework · WordPress · Log in