• Murals
  • Paper Crafts
  • Cricut + SVG files
  • Sewing
  • doodled coloring pages
    • Facebook
    • Instagram
    • Pinterest
    • Twitter

oh yay studio - Making + baking + everyday celebrating

Celebrating Holidays + everydays through making + DIYs + Murals + costumes + a creative monthly subscription

  • Home
  • About
  • Categories
    • DIYs
      • Painting
      • Cricut + SVG files
      • Paper Crafts
      • Sewing
      • Yarn + Fibers
    • Printables
    • Murals
    • Recipes
    • Holiday
    • Costumes
    • Life
    • Uncategorized
  • Contact
  • SHOP!
  • oh yay studio squad

All DIYs Kids Yarn + Fibers

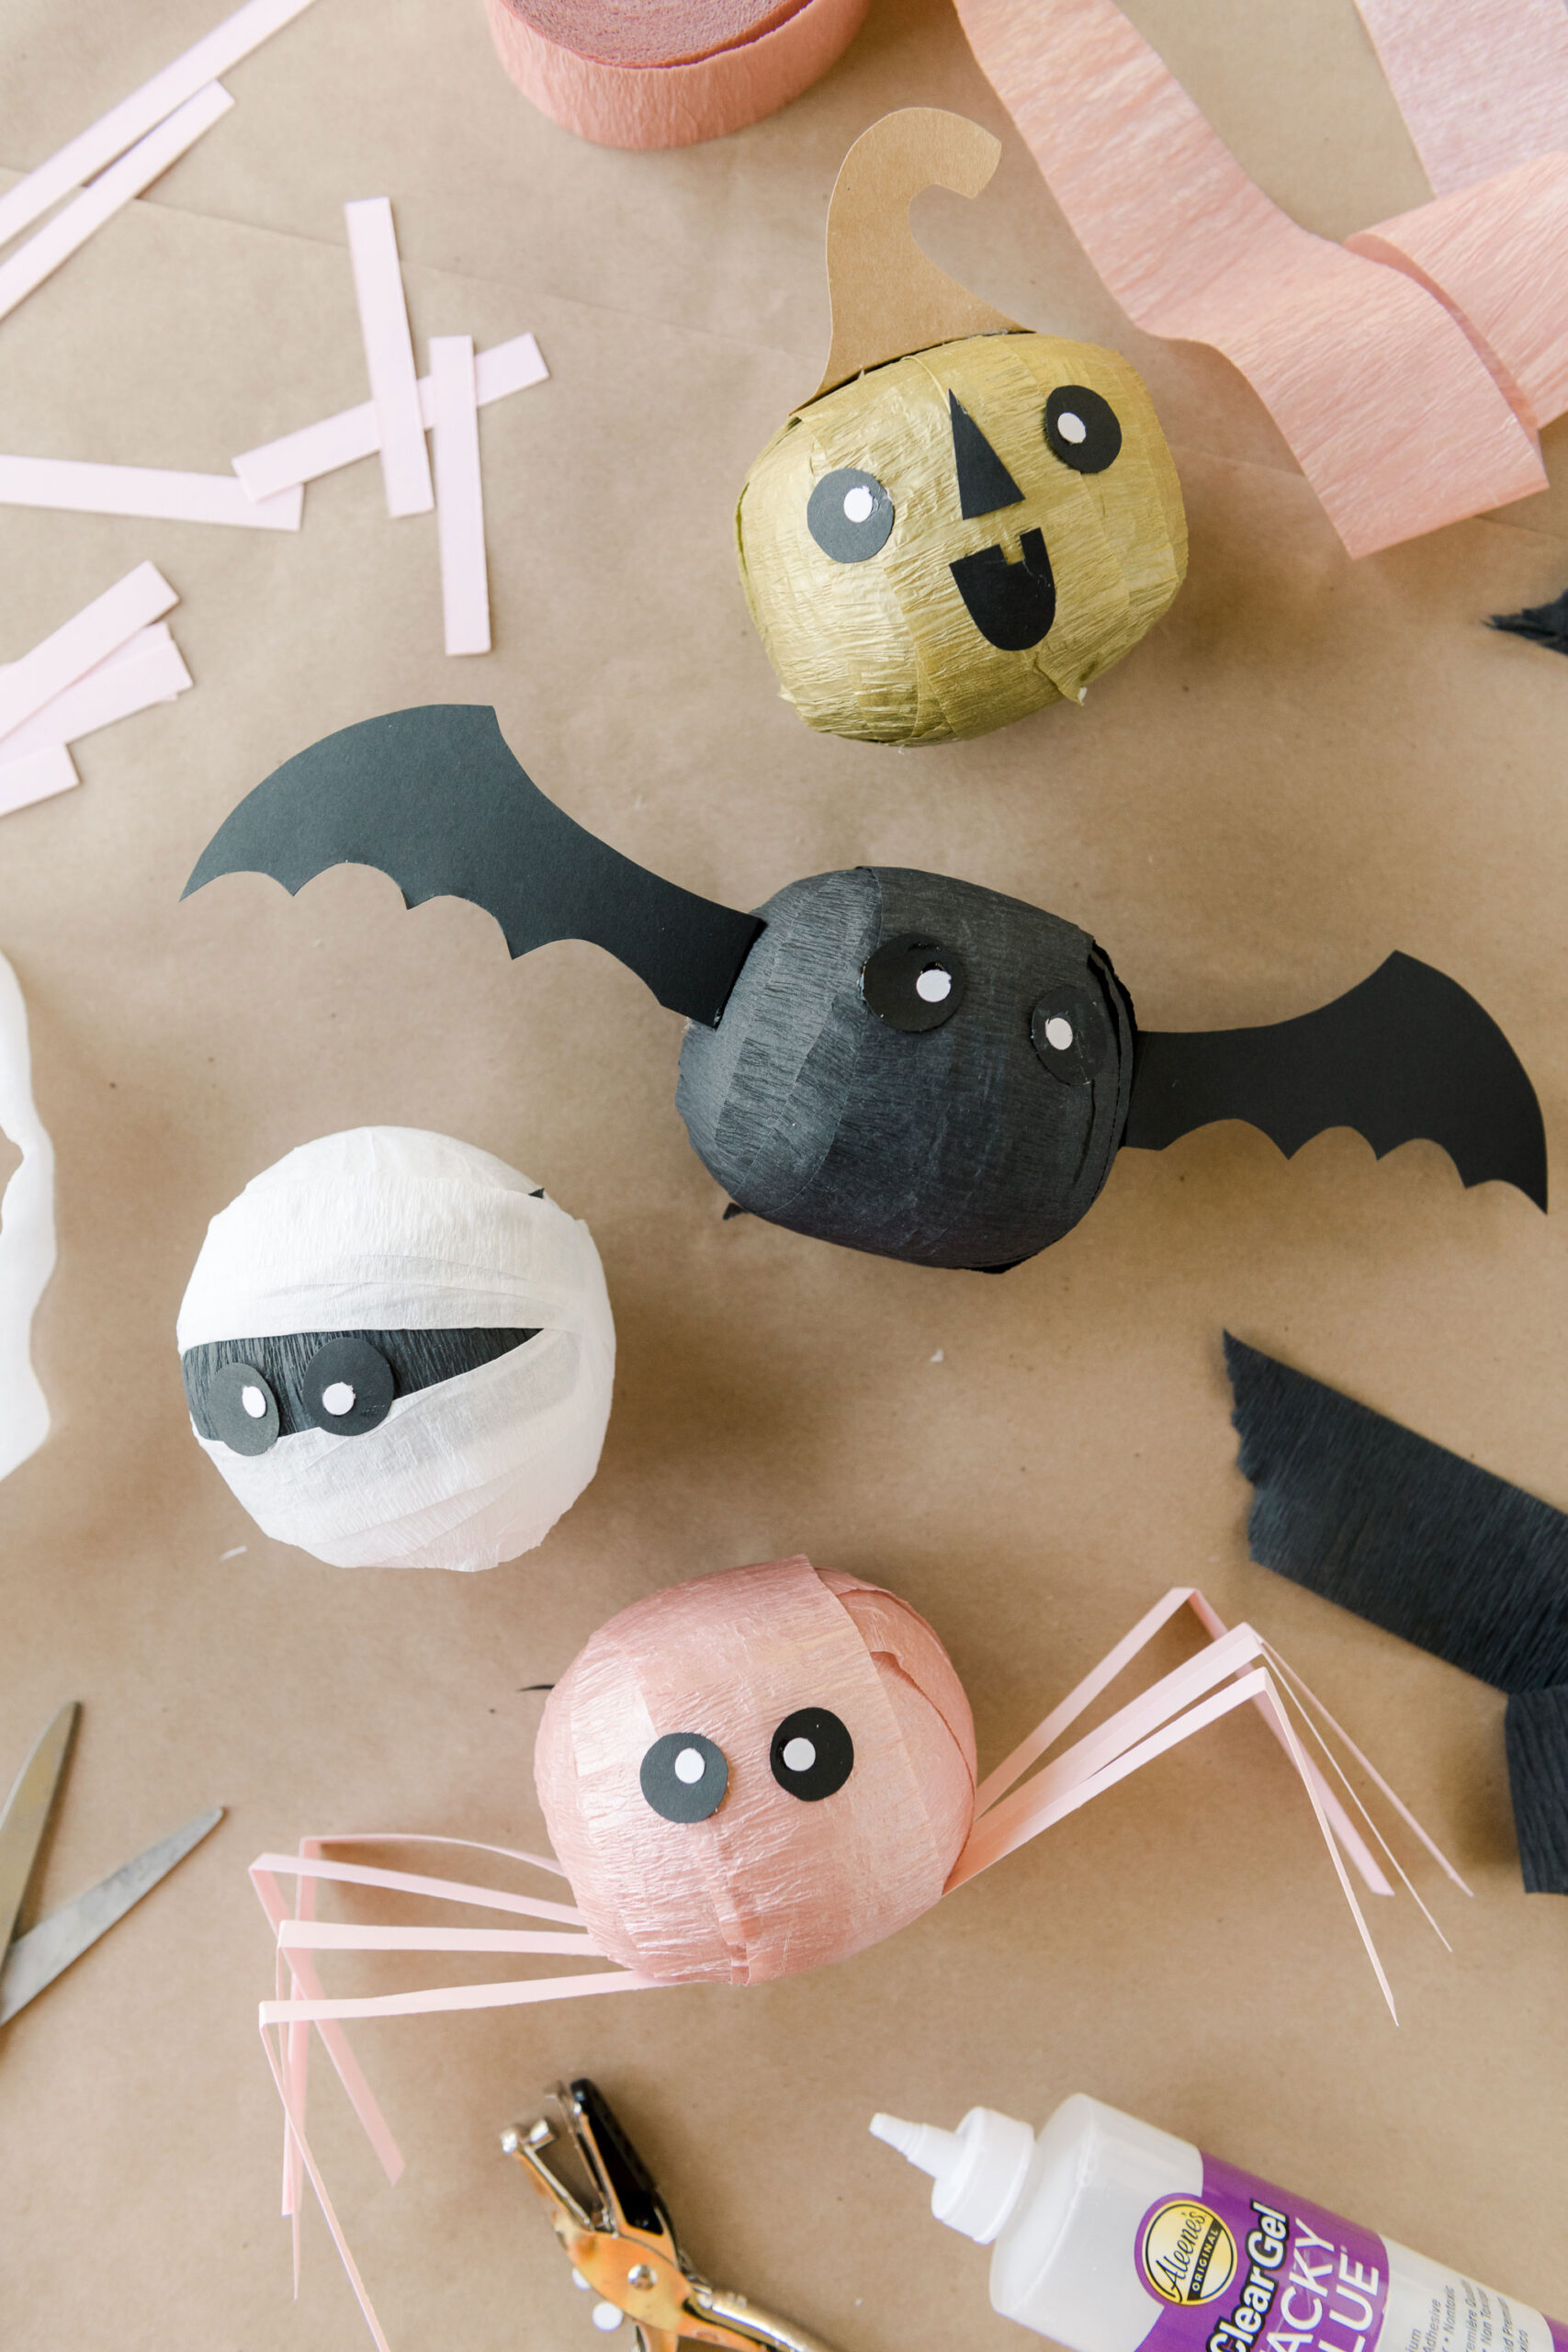
How to make the perfect pom pom + turn them into POM POM MONSTERS! :)

how to make a perfect yarn pom pom, pom pom monsters, how to make a pom pom monster, crafting through corona, kids craft ideas, kids crafting, kids rainy day activities

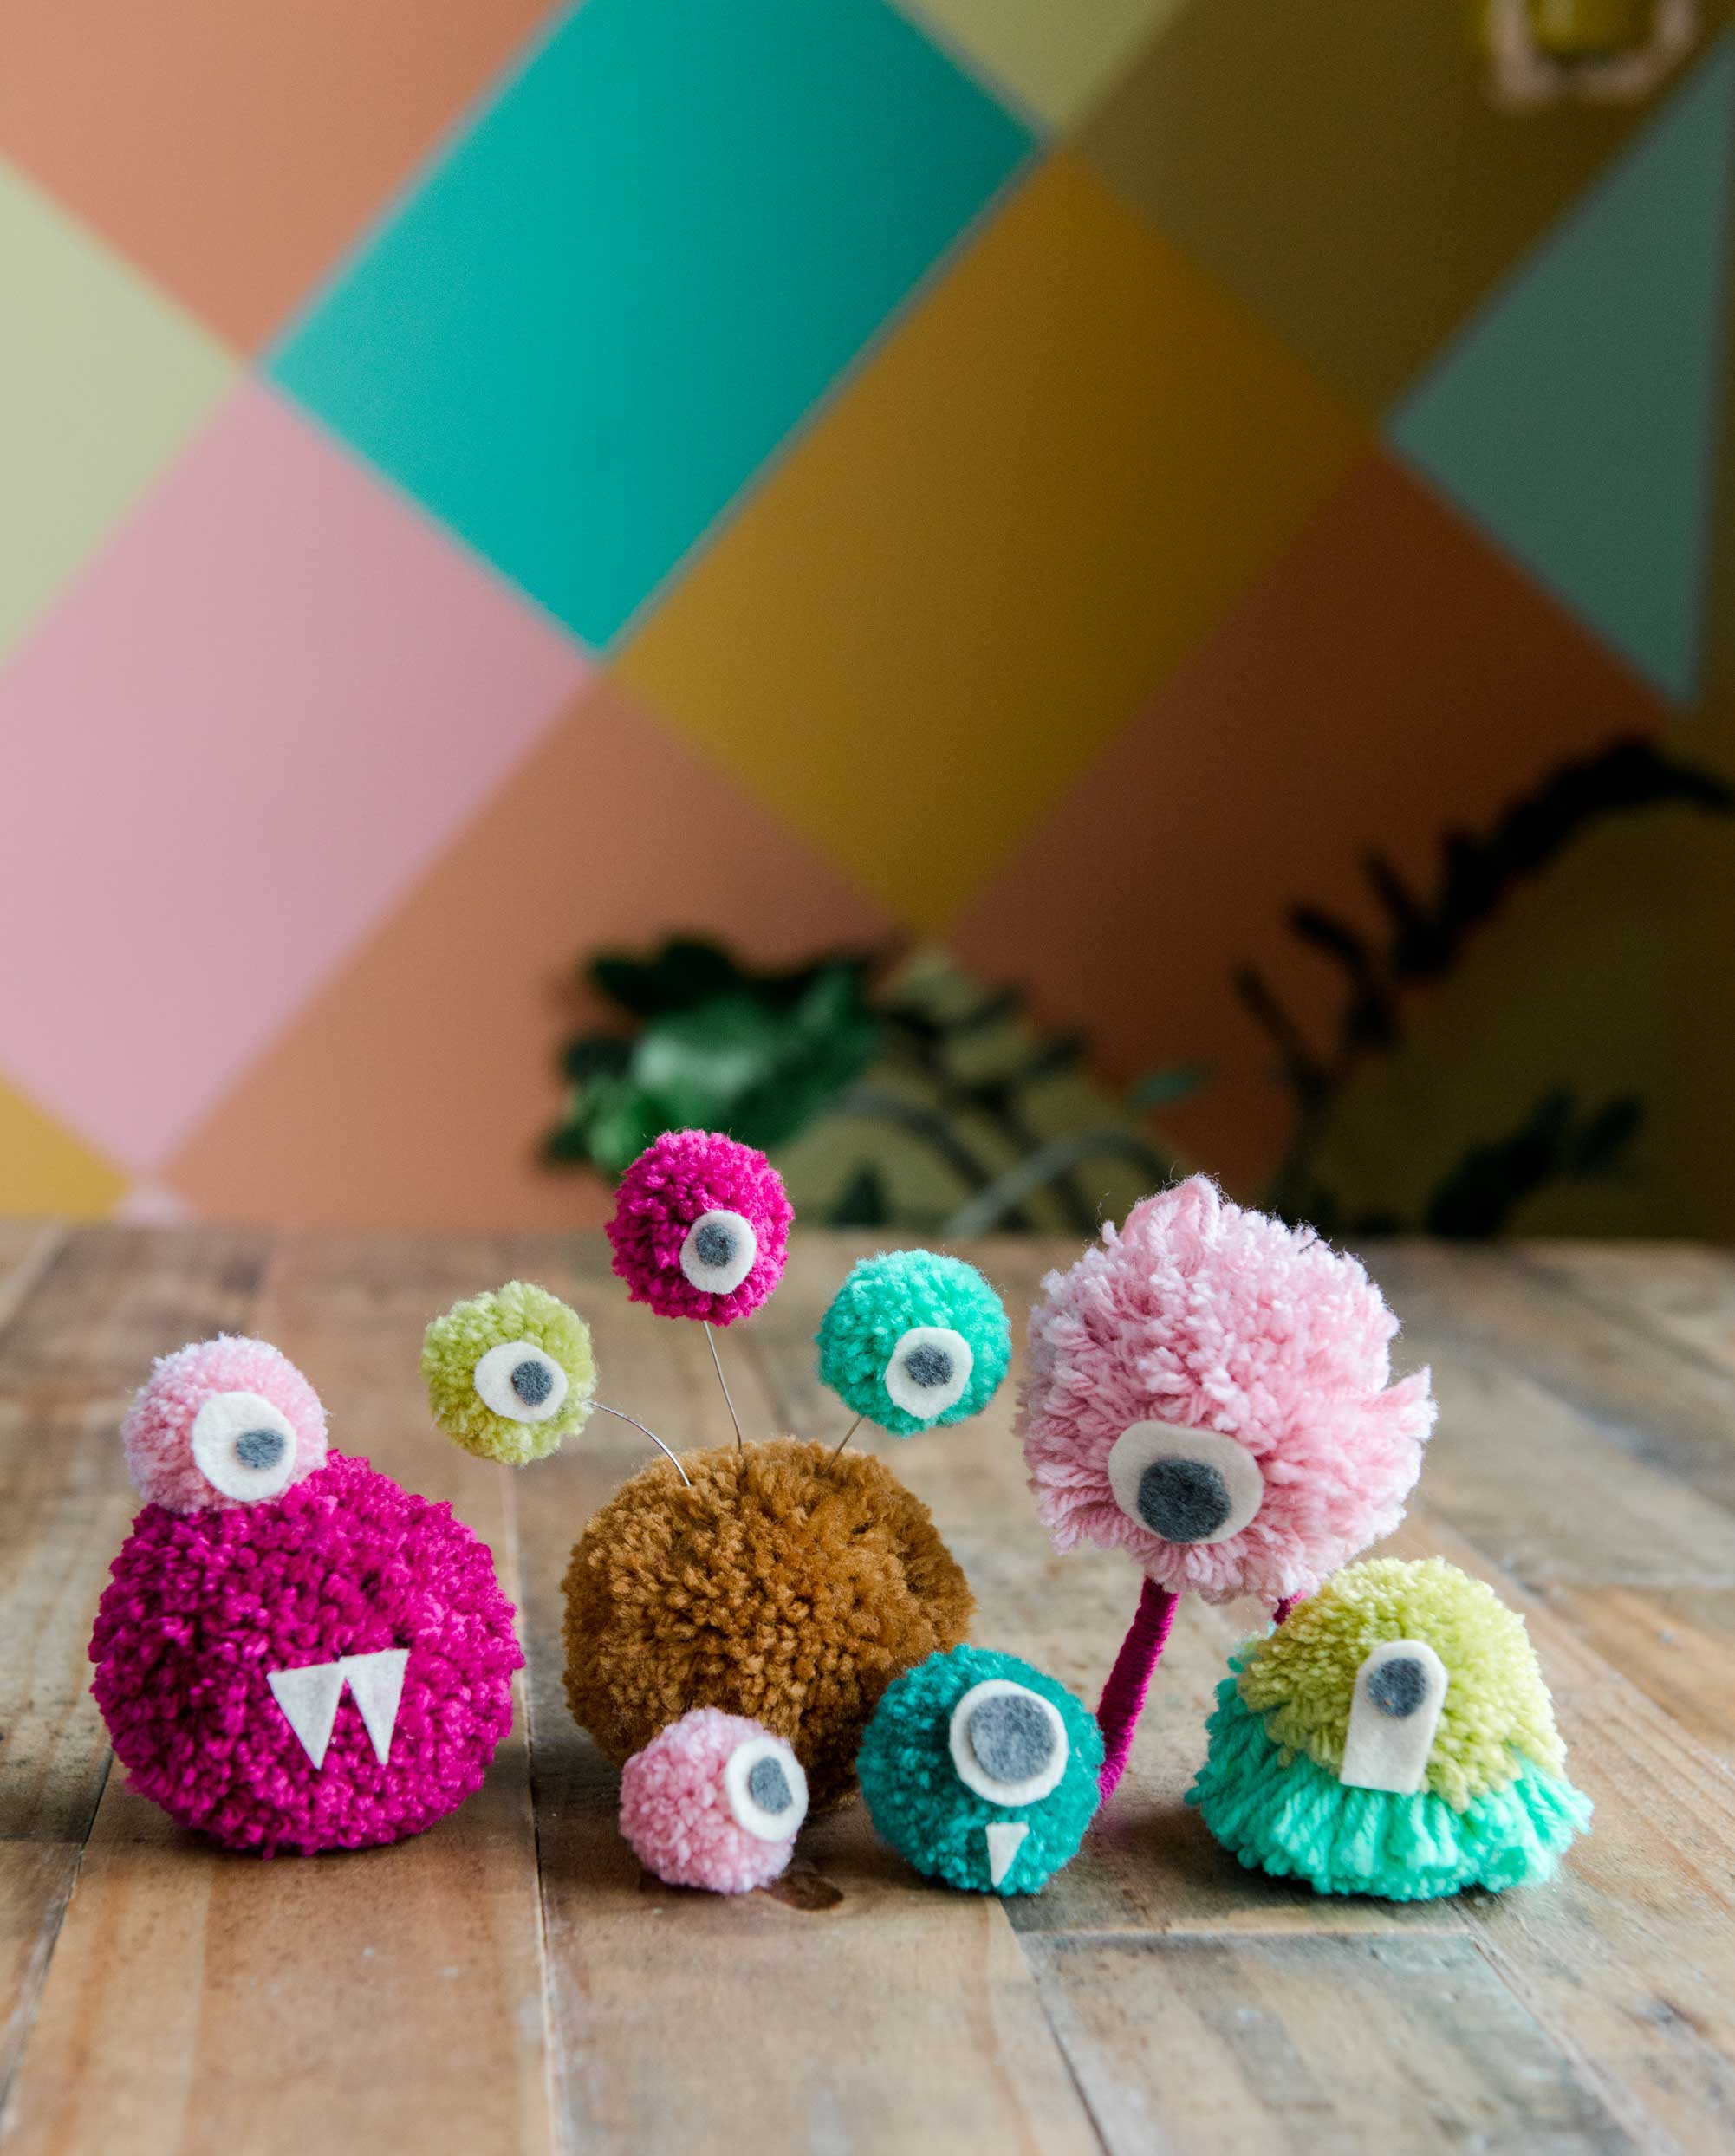
I get asked often about tips or tricks on how to make the prefect pom! WELL……TODAY I am sharing with you how to make the perfect Pom pom AND I am also going to give you a fun craft to get imagination flowing with your kids by turning that pom pom into a monster. 

how to make a perfect yarn pom pom, pom pom monsters, how to make a pom pom monster, crafting through corona, kids craft ideas, kids crafting, kids rainy day activities

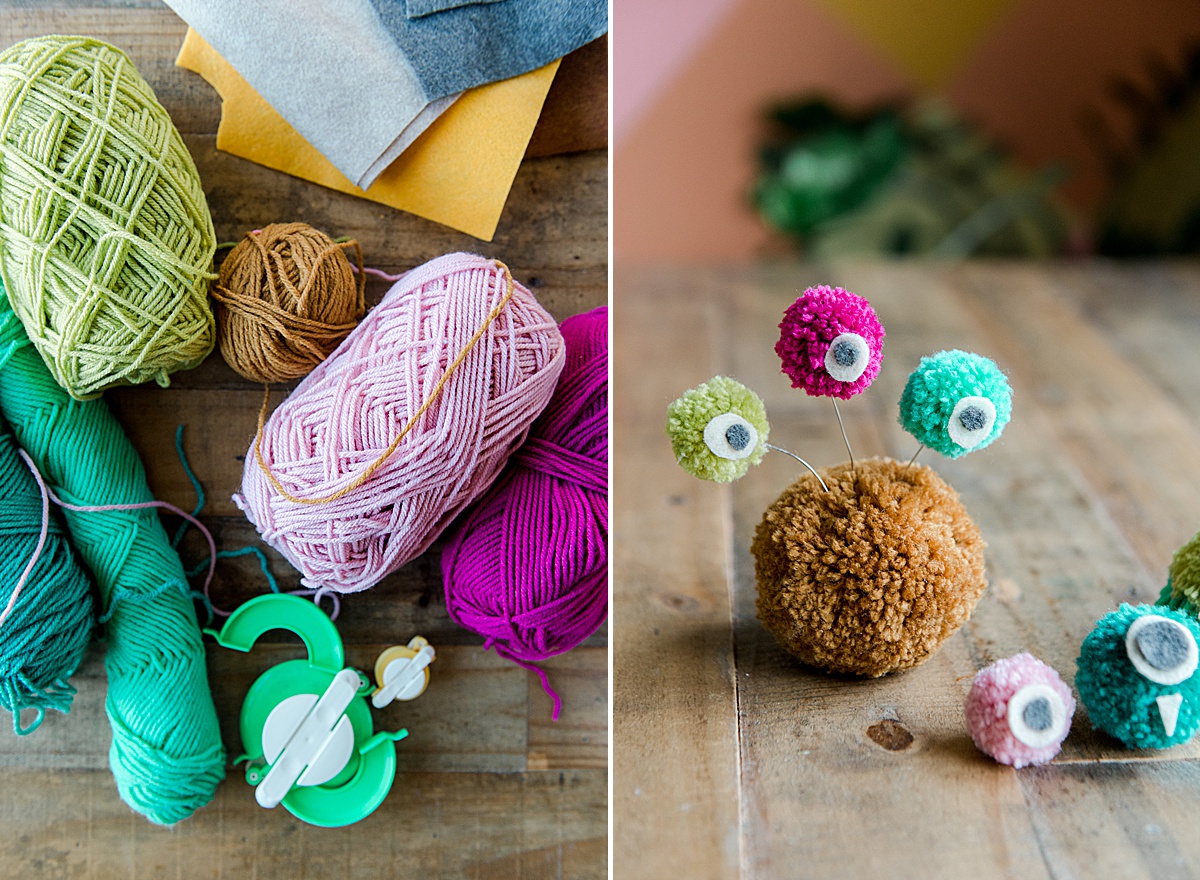
Supplies for the perfect Pom:

  • Pom pom maker (or piece of cardboard)
  • Yarn of choice
  • optional wax thread or embroidery floss (for tying)
  • Super sharp scissors (my fave HERE)
  • a scrap bowl for trimming

If you have pom makers, they are AMAZING and make life SO easy, but if you don’t I used to make poms on a fork as a kid and it worked totally fine! 🙂 

PERFECT POM MAKER POMS:

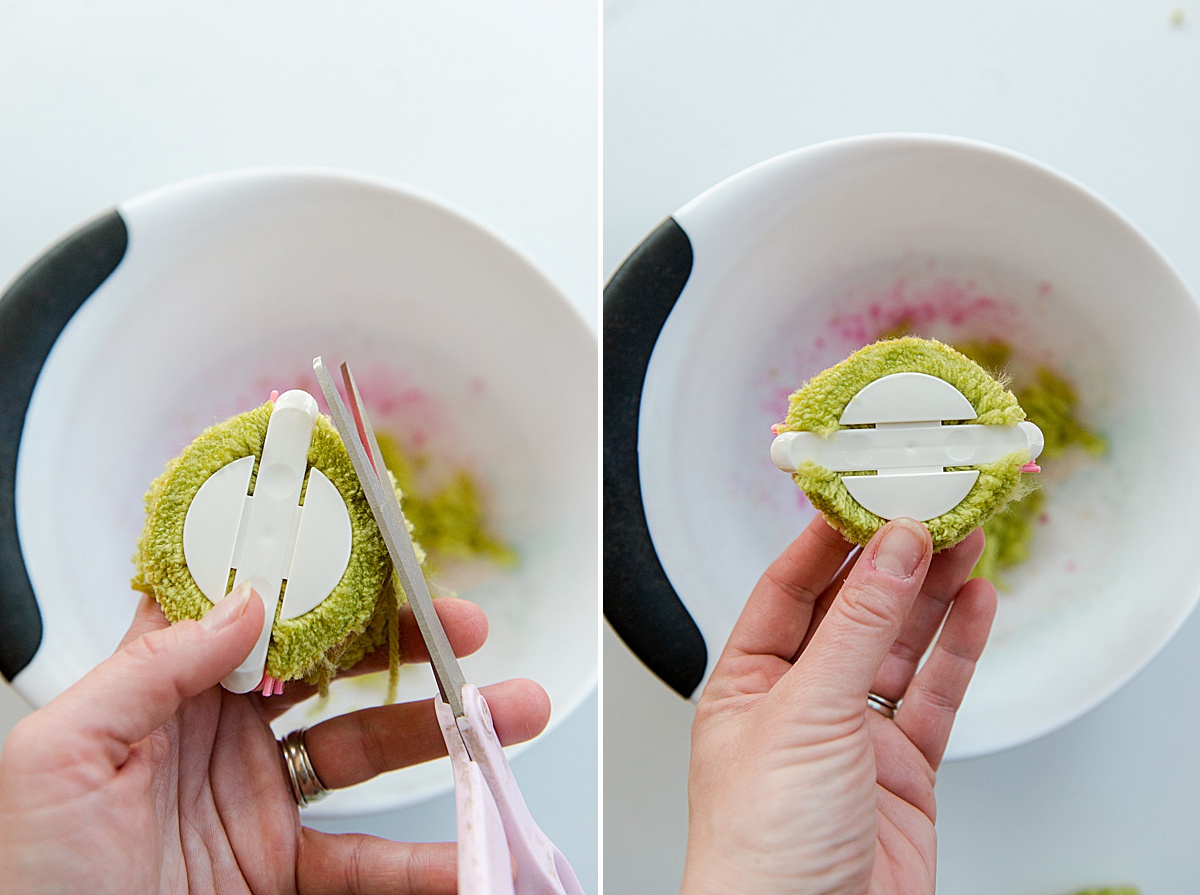
1.  Open your pom maker and “fill” each side of the circle with yarn (being careful not to go over the “nubs” of the ends). Fill them and then close them back into the circle. Cut the “gully” or the crease between the two sides with sharp scissors. 

how to make a perfect yarn pom pom, pom pom monsters, how to make a pom pom monster, crafting through corona, kids craft ideas, kids crafting, kids rainy day activities

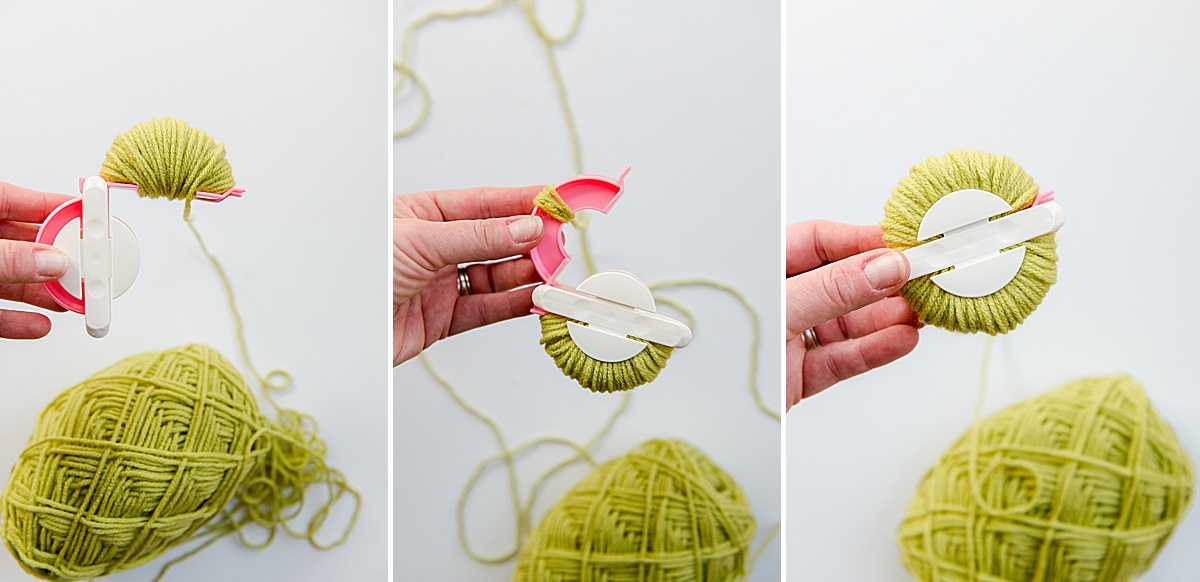
2. Tie your pom together by cutting a (larger-than-you-think-you-need) piece of string. Wrap the string around that gully you just cut and then tie it (pull tight, but not too tight that the string breaks). 
note: Some people swear by embroidery floss or wax thread because it’s “stronger” than yarn

how to make a perfect yarn pom pom, pom pom monsters, how to make a pom pom monster, crafting through corona, kids craft ideas, kids crafting, kids rainy day activities

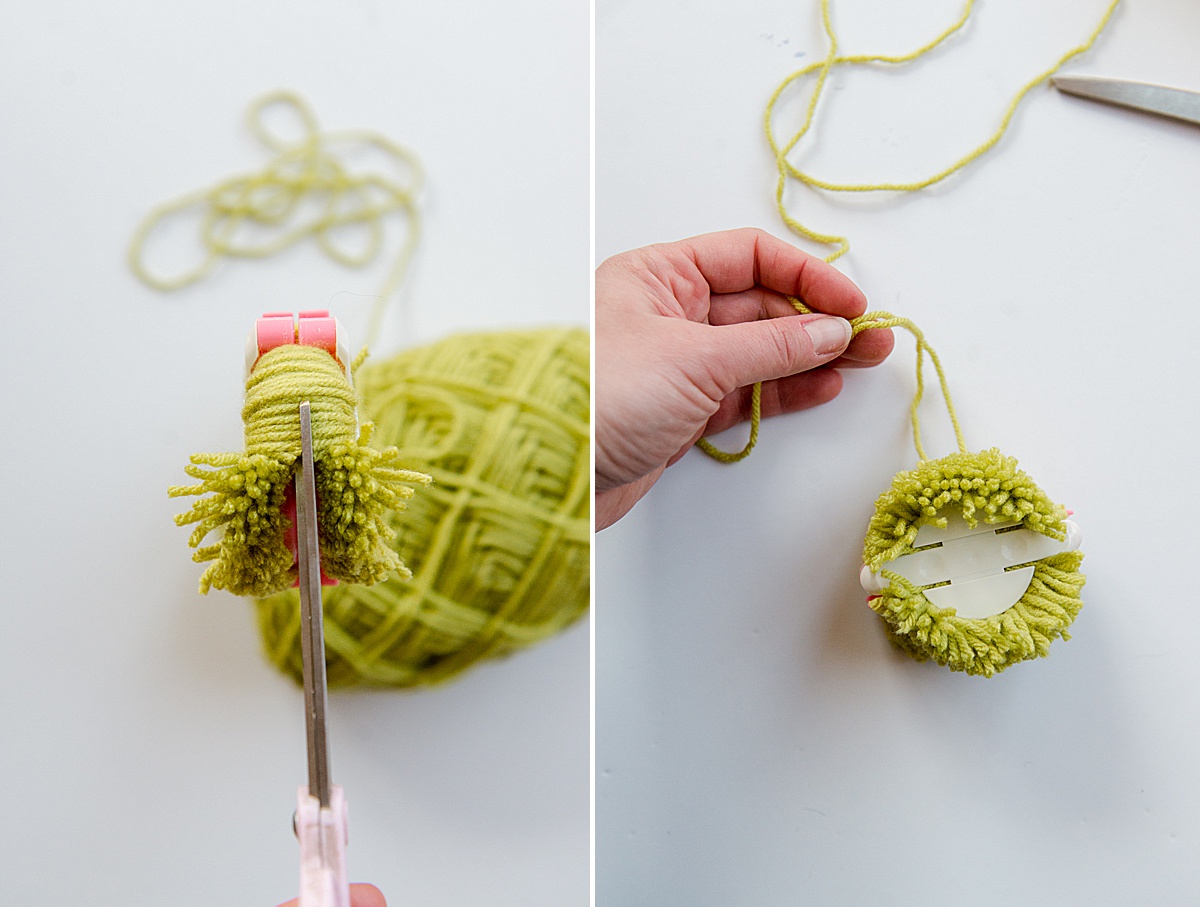
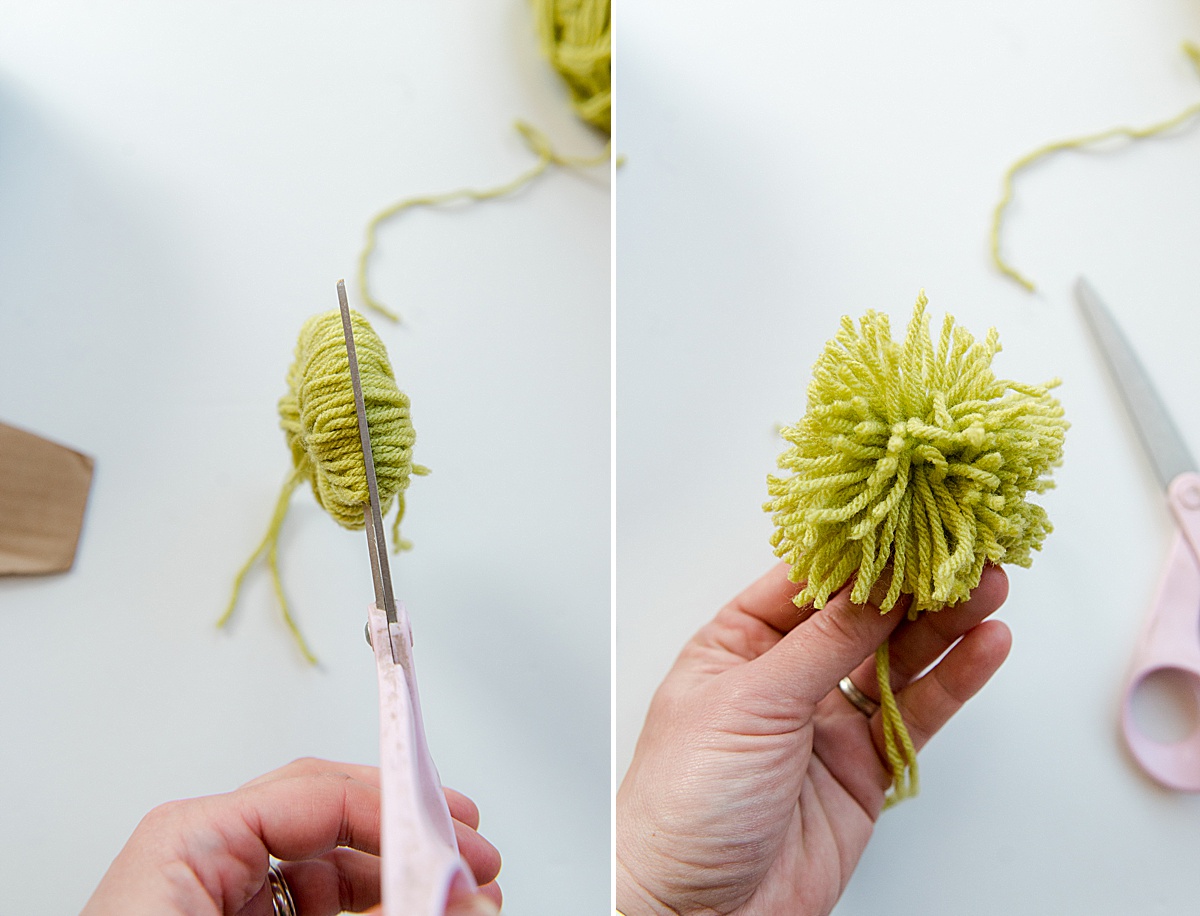
3. THE SECRET TO THE PERFECT POM: trimming
And I have an even bigger secret to share: if you trim your edges while still IN THE POM MAKER, this will give you a rounder ball to begin with and your trimming time will be cut in HALF (or more). So, before I pull the pom out of the pom maker, I use the scissors to trim the excess flush to the pom maker. (just do the best you can and get as much off to form a circle). I have found that if I don’t do this, the pom comes out more “square-ish” and it makes it harder to trim into a circle (because there is no “base form” to start from). Make sense? 

how to make a perfect yarn pom pom, pom pom monsters, how to make a pom pom monster, crafting through corona, kids craft ideas, kids crafting, kids rainy day activities

PERFECT POMS FROM CARDBOARD:

1. Grab a piece of cardboard (from a shipping box, cereal box or anything semi-sturdy). Cut a rectangle (the width of the rectangle will be the approx. the size of your pom….) Cut 2 edges of the rectangle at a bit of an angle (it makes it easier to slide the wrapped yarn off easier). 

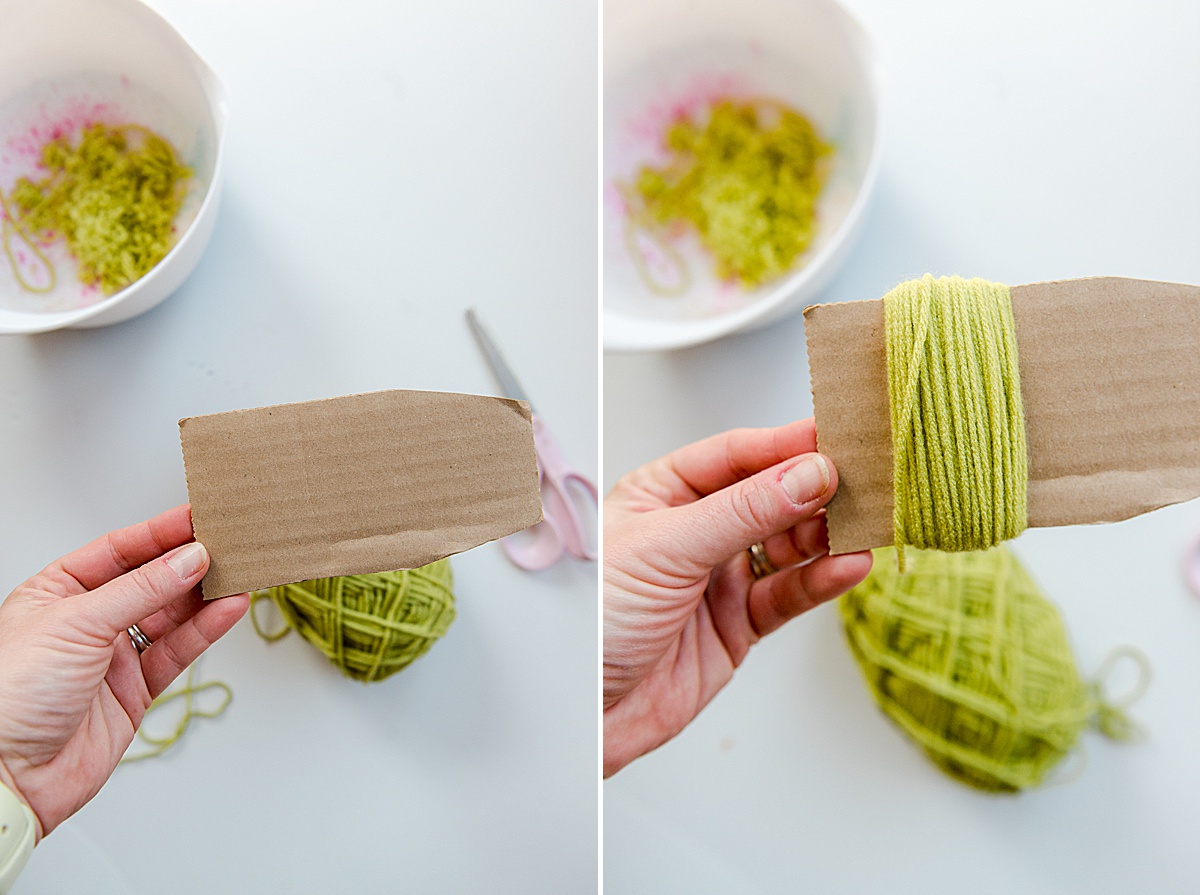
2. Begin wrapping the piece of cardboard making sure to wrap the yarn “on top of each other” keeping it away from the edge of the cardboard on both sides so that it doesn’t slide off. The more you wrap, the more full the pom-pom will be (within reason, you can wrap TOO much which would just make it too bulky to tie tightly). After your done wrapping, cut your yarn from the skein and then wiggle it down towards the edge of the cardboard. 

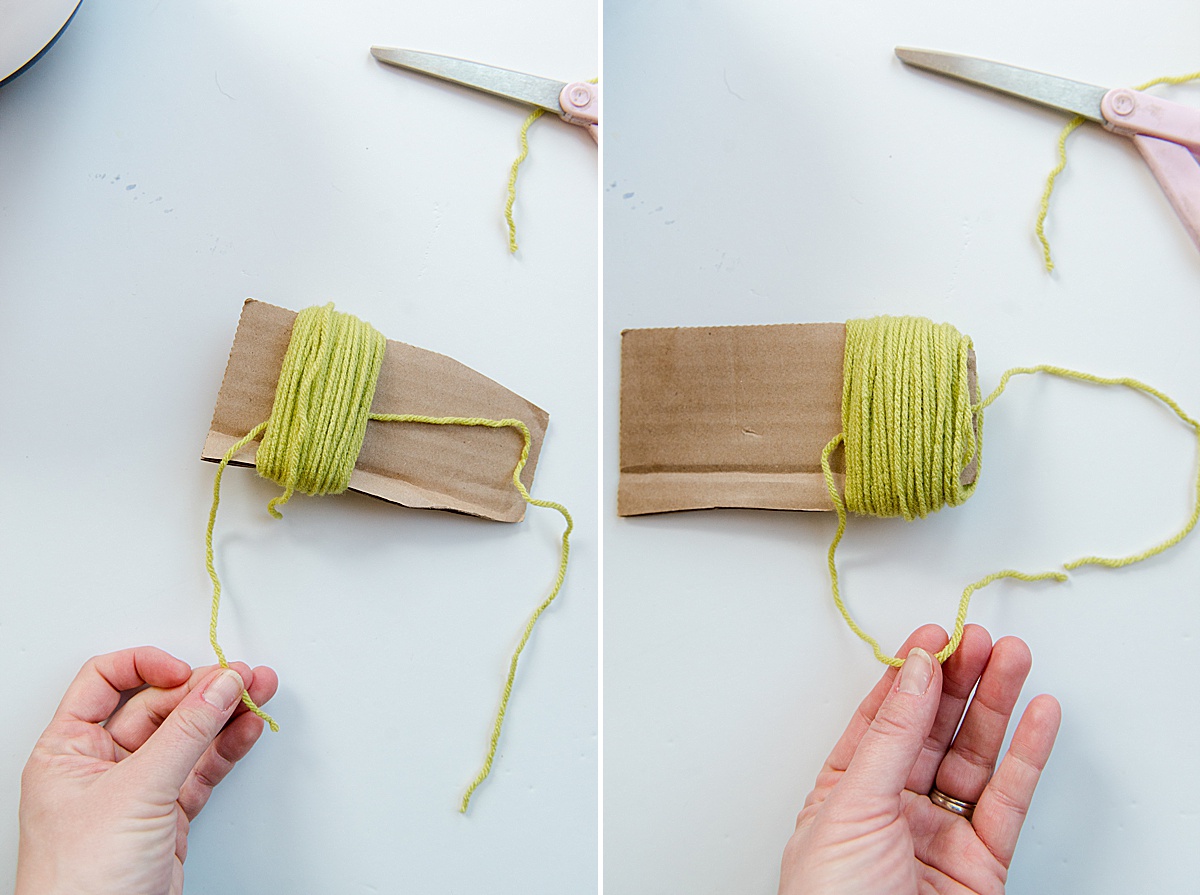
3. Cut a long piece of yarn to tie with and thread it through the center of the yarn so that it comes out each end. Tie a loose knot with the yarn and carefully wiggle the entire bundle of wrapped yarn off the piece of cardboard. Carefully, flip the pom bundle over and tie a knot as close to the center of the pom as possible: you will be making a flat “pom pancake” and you want the tied piece of yarn to be as centered as possible. Tie a knot, flip the pom over and tie another knot to continue to tighten this middle string. Do this 3-4 times until the pom is securely flat, and tied tightly.

how to make a perfect yarn pom pom, pom pom monsters, how to make a pom pom monster, crafting through corona, kids craft ideas, kids crafting, kids rainy day activities

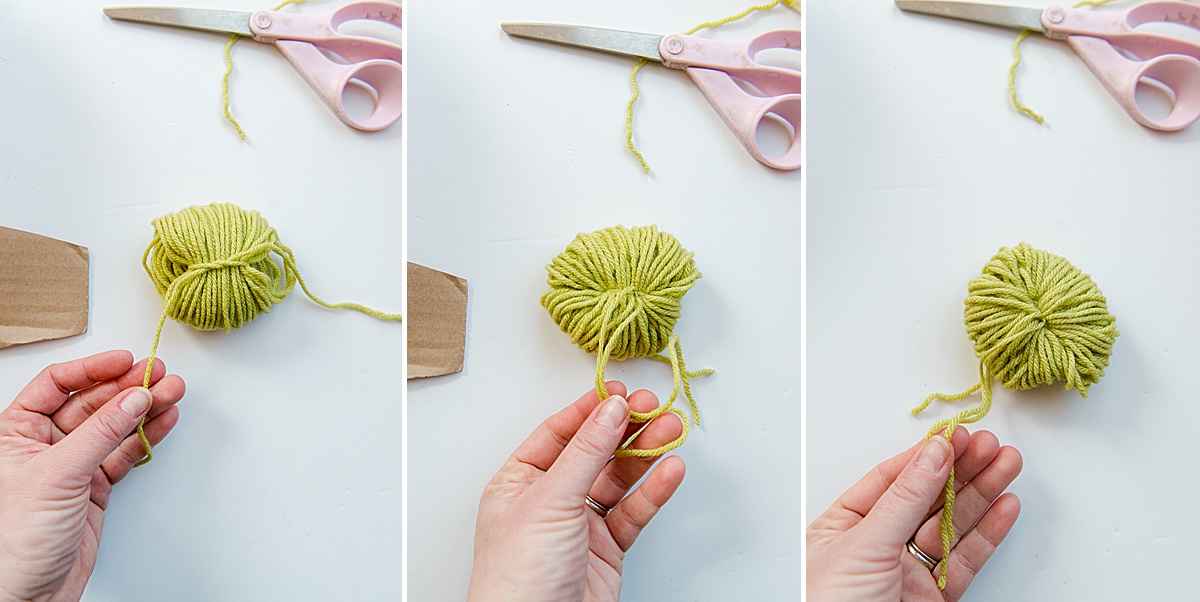
4. Cut the loops, and then trim the pom in a circle as best as possible. The more you trim, the more full the pom may seem as well. Keep fluffing and trimming the pom as necessary! 🙂 

how to make a perfect yarn pom pom, pom pom monsters, how to make a pom pom monster, crafting through corona, kids craft ideas, kids crafting, kids rainy day activities

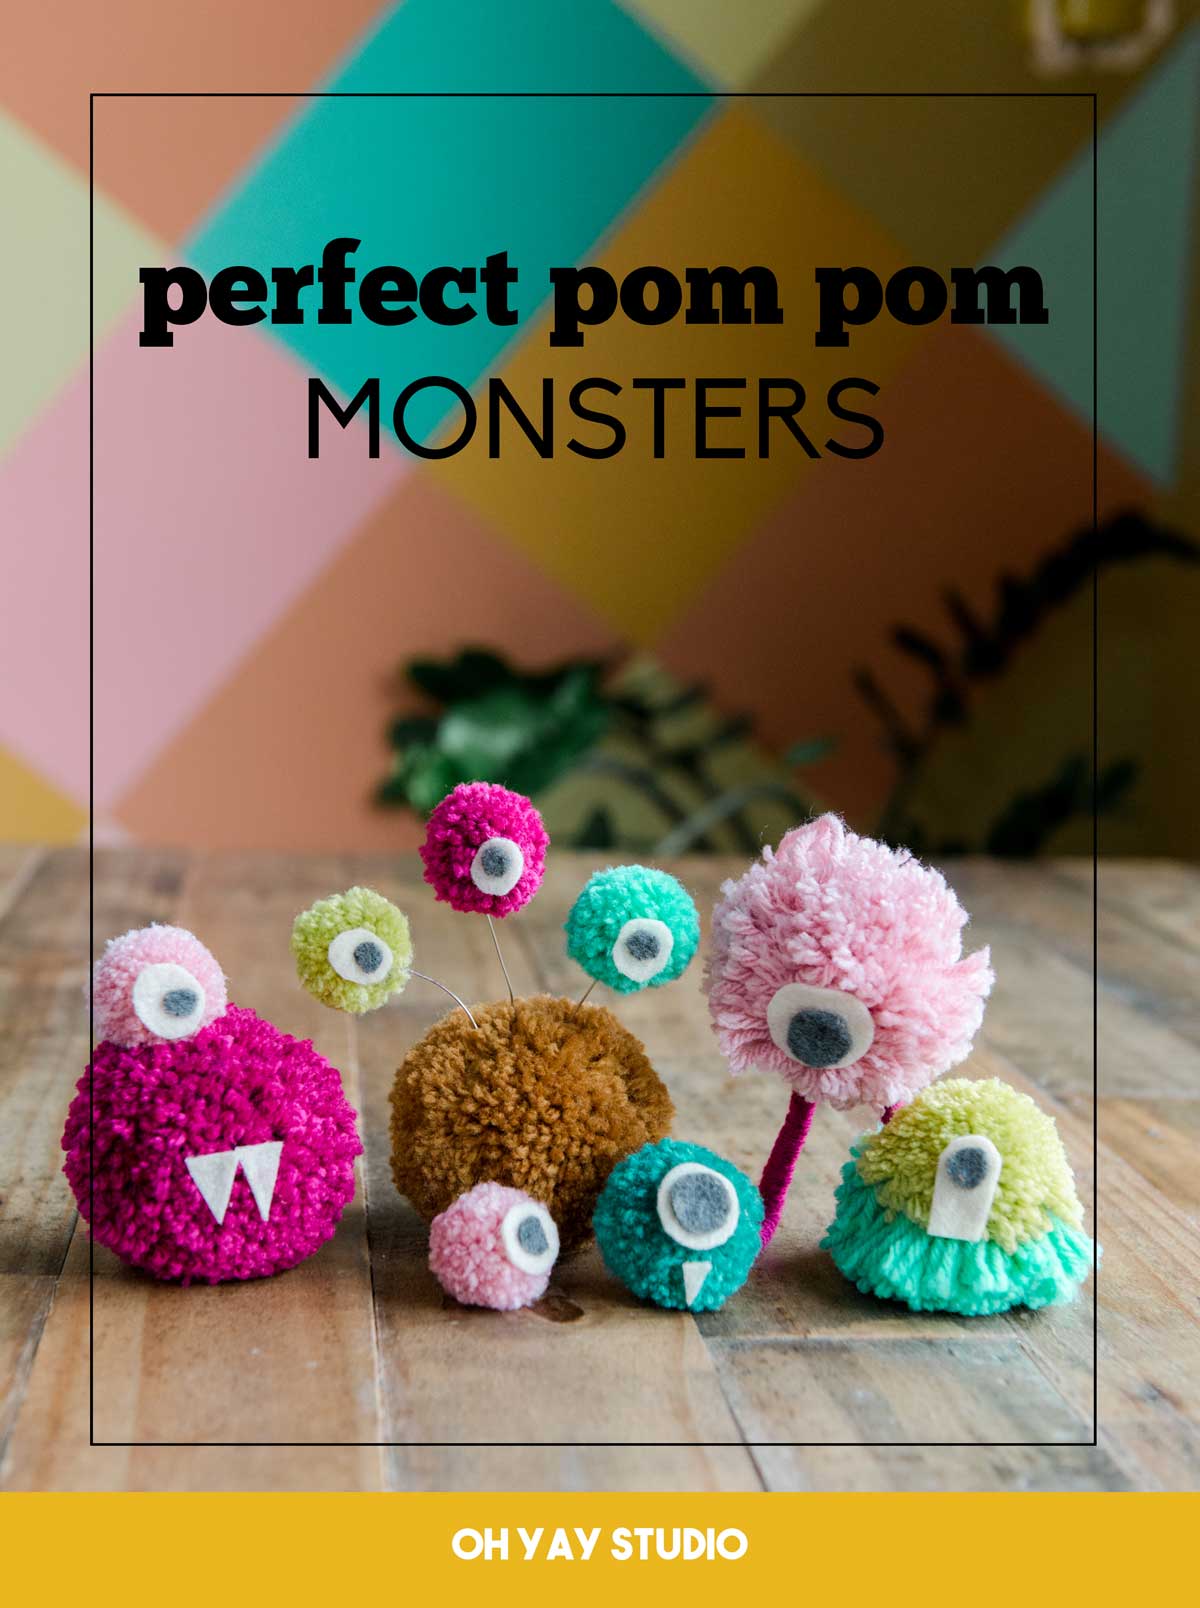
Once you are done with your PERFECT POM POMS, use your hot glue gun to add Monster embellishments. You can use cardstock OR felt for eyes, legs, bellies, teeth, tongues, or any other monster feature.

how to make a perfect yarn pom pom, pom pom monsters, how to make a pom pom monster, crafting through corona, kids craft ideas, kids crafting, kids rainy day activities
Pin4
Share
Tweet
4 Shares


1 Comment

  • Facebook
  • Instagram
  • Pinterest
  • Twitter
« Paper craft: everyday awards + Crafting through Corona!
Our curvy bathroom mural + using all the paint during social isolation! »

Comments

  1. Enza says

    April 6, 2020 at 11:11 am

    Lov the cardboard idea

    Reply

Leave a Reply Cancel reply

Your email address will not be published. Required fields are marked *

Recipe Rating


oh hi there, i’m Emily!

I am a believer, dreamer, photographer and maker! I use almond extract in all of my baking, have a problem hitting the snooze button and I truly believe that smiling can change the world!

Learn more about me HERE!

  • Facebook
  • Instagram
  • Pinterest
  • Twitter

Looking for something?

Popular posts!

DIY felt christmas garland, DIY Christmas bulb ornaments, DIY christmas bulb garland, how to make a felt christmas garland, DIY christmas garland ideas, christmas bulb DIY, christmas bulb decorating, colorful christmas garland, colorful christmas decor DIY

How to make a felt Christmas bulb garland (or ornaments)

Fruit slice wet bag pattern, watermelon pouch pattern, janome memory maker sewing machine, fruit pouch swimsuit bag, swimsuit wet bag pattern, free wet bag sewing pattern

How to make a fruit slice summer swimsuit wet bag + my first project as a Janome maker (!!!)

How to DIY a colorful wall mural, colorful wall mural, joyful wall mural, in home mural, how to make an easy colorful wall mural, dining room mural, house mural, how to paint a wall, diagonal grid on wall

Our colorful, diagonal grid dining room mural + my urge to paint more!

DIY costume, how to make a planner costume, Simplified planner costume, Emily ley planner costume, DIY halloween costume, easy DIY costume

A DIY planner costume + my creative endeavor for 2019!

Categories

  • All
  • Costumes
  • Cricut + SVG files
  • DIYs
  • Donuts
  • Holiday
  • Ice Cream
  • Kids
  • Life
  • Murals
  • Painting
  • Paper Crafts
  • phone backgrounds
  • Printables
  • Recipes
  • Sewing
  • Uncategorized
  • Yarn + Fibers
This spring weather calls for a springy color pale This spring weather calls for a springy color palette for a new mini-mural! 😍 All of these colors will be turned into happy florals for the amazingly wonderful @farmtofist fresh flower farm stand sign (I mean, a flower stand!?!!???? How does it get any better)! 🌷🌸🌼❤️🎉
And that watermelon color!? It’s just perfectly punchy isn’t it!?
Esther’s color-filled, floral mural is done but Esther’s color-filled, floral mural is done but I can’t promise that photos are back on the walls or laundry isn’t spewing out of the hampers behind me 🤷‍♀️ I guess it’s what we call balance. 
But yay for florals. I’m slightly in love with this wall and can’t wait to write up a blog post with details and more pics. 🌿❤️🌸
Adding color and life into every corner of this we Adding color and life into every corner of this weekend. Because today is ALLLLL about how love wins, evil is overcome and death is conquered. 🎉❤️
Also, I’m clearly still on this floral kick and I have no plans to stop. Three cheers for my @officialcricut that helped turn these doodles into egg stencils. 🎉🌿🥚
A few weeks ago I snuck into my amazing sister in A few weeks ago I snuck into my amazing sister in laws house and painted a beachy, wavy, tropical-esque, happy mural in their bedroom! If you know ANYTHING about @lanaesteffen then you know how much she loves the color turquoise, the @mnstatefair the Bachelor annnnd anything and everything beachy! (And I wasn’t going to paint every food on a stick from the state fair on her walls) 😂😂😂😂 
I just put up a big ‘ol blog post with how I painted this wave mural on their bedroom wall with 2 paint markers and 1 white paint sample all for under $7 🌊 🌴
Of course when I live with a 5 year old bunny enth Of course when I live with a 5 year old bunny enthusiast, my latest zipper pouch pattern hassssssss to be a carrot. Duh! Did you catch the live event on @therealcraftsy + @nationalsewing today!? (Don’t worry, if you missed it, the video will be up for a bit complete with the whole PDF pattern to download!) 🥕🥕
Zipper pouches are a *must* in this household to make sure all of these pre-schooler “collections” are gathered and kept together. 
And if you can’t tell, Esther is 100% pretending to nibble on the carrot in this photo! I’m telling you, BUNNY ENTHUSIAST 🥕😂🥰
Apparently Norman pug has taken the role of qualit Apparently Norman pug has taken the role of quality control supervisor while I start putting the finishing florals + details on Esther’s wall mural today. 😂 😂 apparently he’s not aware that I have tubs of paint instead of tubs of treats. 🤷‍♀️
Also, who knew I would love painting on a dark background so much!? I may have turned a new leaf with this “Russian Olive” color. It’s just the right amount of color with it’s dark and bold quality, I looovvveee! 🌿
I finallllly got a blog post together sharing the I finallllly got a blog post together sharing the full scoop of the color palette, some tips + tricks and allllll of the behind-the-scenes for this oversized floral mural in the playroom for @katiedfredrickson kiddos! :) And surprise, I used not just one but TWO colors of yellow in this mural! ⁣
Welp, I guess I'm predictable! :)
Doing my best to spread color and light these days Doing my best to spread color and light these days. And also following through with allll the painting requests of a certain 5 year old that I live with, including how I can incorporate a jumping bunny with glasses in the mural for her room (specifically a pink jumping bunny, obvi). 👓 🐰 🌸 🌼🌿
Follow Emily on Insta

Stay Connected

  • Facebook
  • Instagram
  • Pinterest
  • Twitter

all rights reserved © oh yay studio 2019

  • About
  • Contact
  • Disclosure
  • Terms
This spring weather calls for a springy color pale This spring weather calls for a springy color palette for a new mini-mural! 😍 All of these colors will be turned into happy florals for the amazingly wonderful @farmtofist fresh flower farm stand sign (I mean, a flower stand!?!!???? How does it get any better)! 🌷🌸🌼❤️🎉
And that watermelon color!? It’s just perfectly punchy isn’t it!?
Esther’s color-filled, floral mural is done but Esther’s color-filled, floral mural is done but I can’t promise that photos are back on the walls or laundry isn’t spewing out of the hampers behind me 🤷‍♀️ I guess it’s what we call balance. 
But yay for florals. I’m slightly in love with this wall and can’t wait to write up a blog post with details and more pics. 🌿❤️🌸
Adding color and life into every corner of this we Adding color and life into every corner of this weekend. Because today is ALLLLL about how love wins, evil is overcome and death is conquered. 🎉❤️
Also, I’m clearly still on this floral kick and I have no plans to stop. Three cheers for my @officialcricut that helped turn these doodles into egg stencils. 🎉🌿🥚
A few weeks ago I snuck into my amazing sister in A few weeks ago I snuck into my amazing sister in laws house and painted a beachy, wavy, tropical-esque, happy mural in their bedroom! If you know ANYTHING about @lanaesteffen then you know how much she loves the color turquoise, the @mnstatefair the Bachelor annnnd anything and everything beachy! (And I wasn’t going to paint every food on a stick from the state fair on her walls) 😂😂😂😂 
I just put up a big ‘ol blog post with how I painted this wave mural on their bedroom wall with 2 paint markers and 1 white paint sample all for under $7 🌊 🌴
Of course when I live with a 5 year old bunny enth Of course when I live with a 5 year old bunny enthusiast, my latest zipper pouch pattern hassssssss to be a carrot. Duh! Did you catch the live event on @therealcraftsy + @nationalsewing today!? (Don’t worry, if you missed it, the video will be up for a bit complete with the whole PDF pattern to download!) 🥕🥕
Zipper pouches are a *must* in this household to make sure all of these pre-schooler “collections” are gathered and kept together. 
And if you can’t tell, Esther is 100% pretending to nibble on the carrot in this photo! I’m telling you, BUNNY ENTHUSIAST 🥕😂🥰
Apparently Norman pug has taken the role of qualit Apparently Norman pug has taken the role of quality control supervisor while I start putting the finishing florals + details on Esther’s wall mural today. 😂 😂 apparently he’s not aware that I have tubs of paint instead of tubs of treats. 🤷‍♀️
Also, who knew I would love painting on a dark background so much!? I may have turned a new leaf with this “Russian Olive” color. It’s just the right amount of color with it’s dark and bold quality, I looovvveee! 🌿
I finallllly got a blog post together sharing the I finallllly got a blog post together sharing the full scoop of the color palette, some tips + tricks and allllll of the behind-the-scenes for this oversized floral mural in the playroom for @katiedfredrickson kiddos! :) And surprise, I used not just one but TWO colors of yellow in this mural! ⁣
Welp, I guess I'm predictable! :)
Doing my best to spread color and light these days Doing my best to spread color and light these days. And also following through with allll the painting requests of a certain 5 year old that I live with, including how I can incorporate a jumping bunny with glasses in the mural for her room (specifically a pink jumping bunny, obvi). 👓 🐰 🌸 🌼🌿
Follow Emily on Insta

Copyright © 2021 · Divine theme by Restored 316

Copyright © 2021 · Divine Theme on Genesis Framework · WordPress · Log in