• Murals
  • Paper Crafts
  • Cricut + SVG files
  • Sewing
  • doodled coloring pages
    • Facebook
    • Instagram
    • Pinterest
    • Twitter

oh yay studio - Making + baking + everyday celebrating

Celebrating Holidays + everydays through making + DIYs + Murals + costumes + a creative monthly subscription

  • Home
  • About
  • Categories
    • DIYs
      • Painting
      • Cricut + SVG files
      • Paper Crafts
      • Sewing
      • Yarn + Fibers
      • Tie Dye
    • Printables
    • Murals
    • Recipes
    • Holiday
    • Costumes
    • Life
    • Uncategorized
  • Contact
  • SHOP!

All DIYs Kids Tie Dye

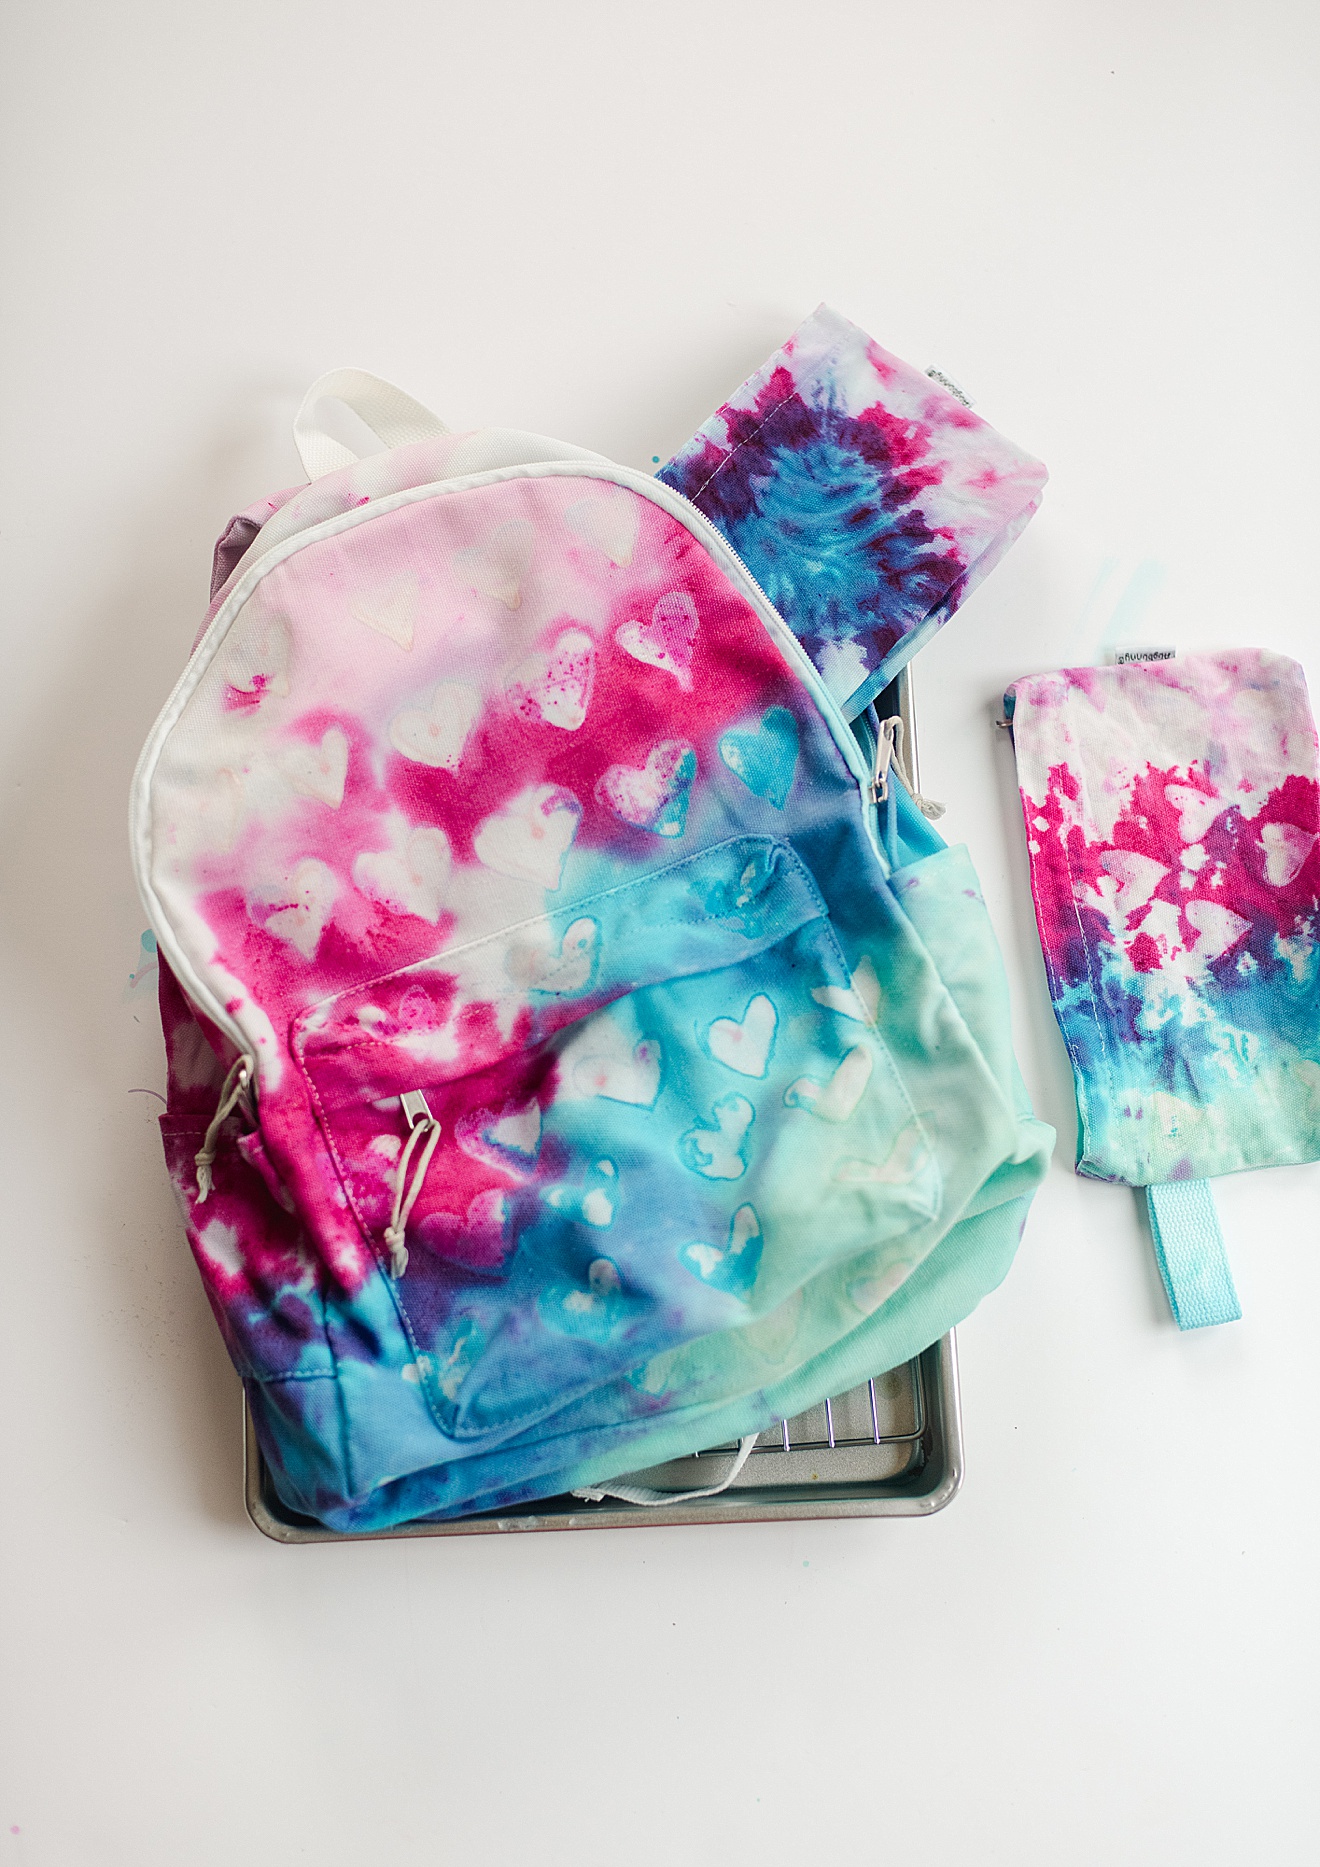
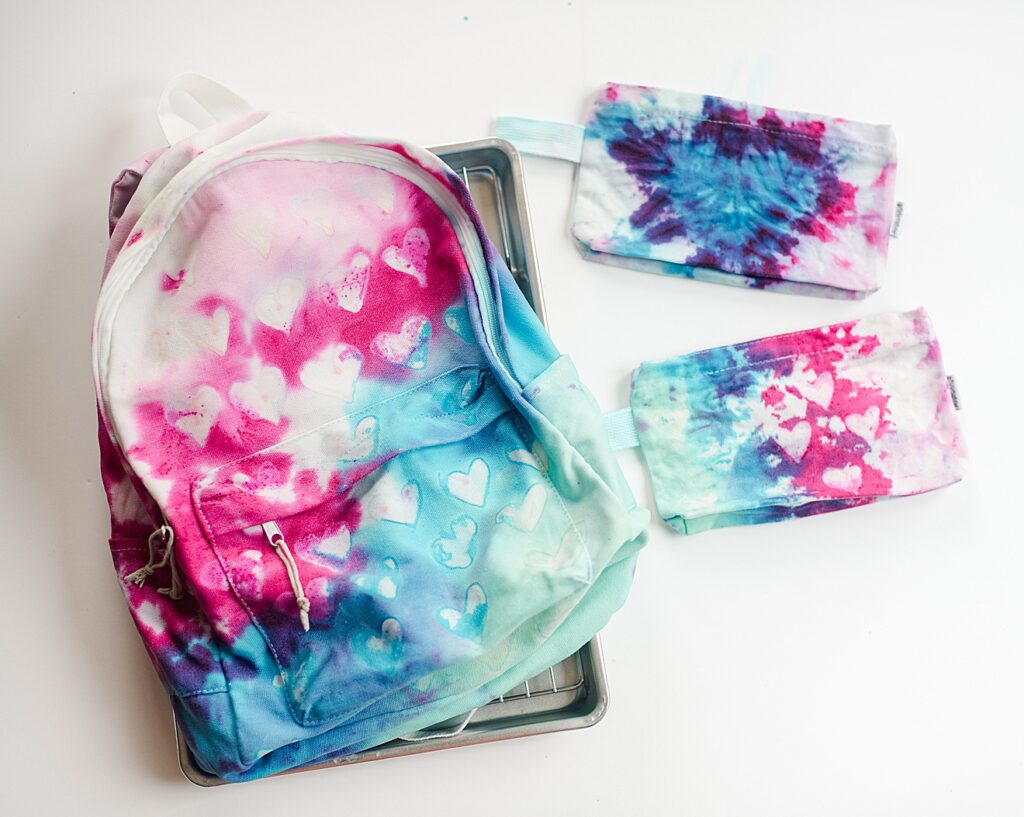
Heart Tie Dye back to school backpack + matching pencil pouch

**Created in partnership with Tulip tie dye products purchased at Walmart

Heart Tie Dye DIY, DIY how to, How to do one-step tie dye, Tie Dye glue resist

If you haven’t noticed, I am 100% in on the tie dye train these days! šŸ™‚ I mean, if you haven’t tried Tie Dying recently this one-step Tie Dye from Tulip is like 93847% easier and brighter and funner than the dunking kind of tie dye that I did as a kid! Like SOOOOO much easier and brighter! šŸ™‚
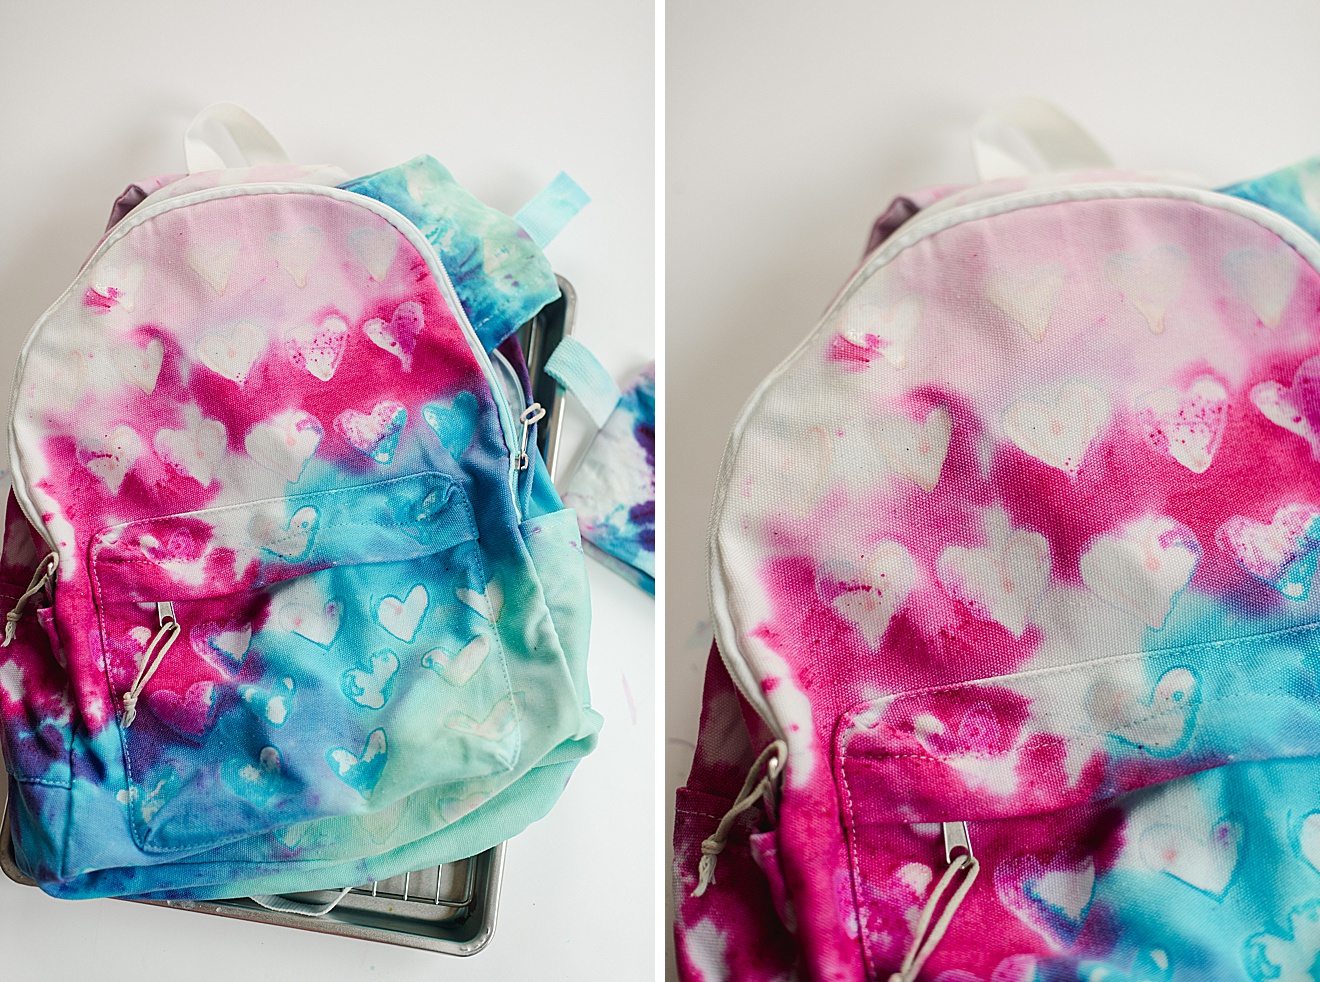
ANNND today I am showing you how I made a heart Tie Dye backpack and matching pencil case for the new school year šŸ™‚

Heart Tie Dye DIY, DIY how to, How to do one-step tie dye, Tie Dye glue resist

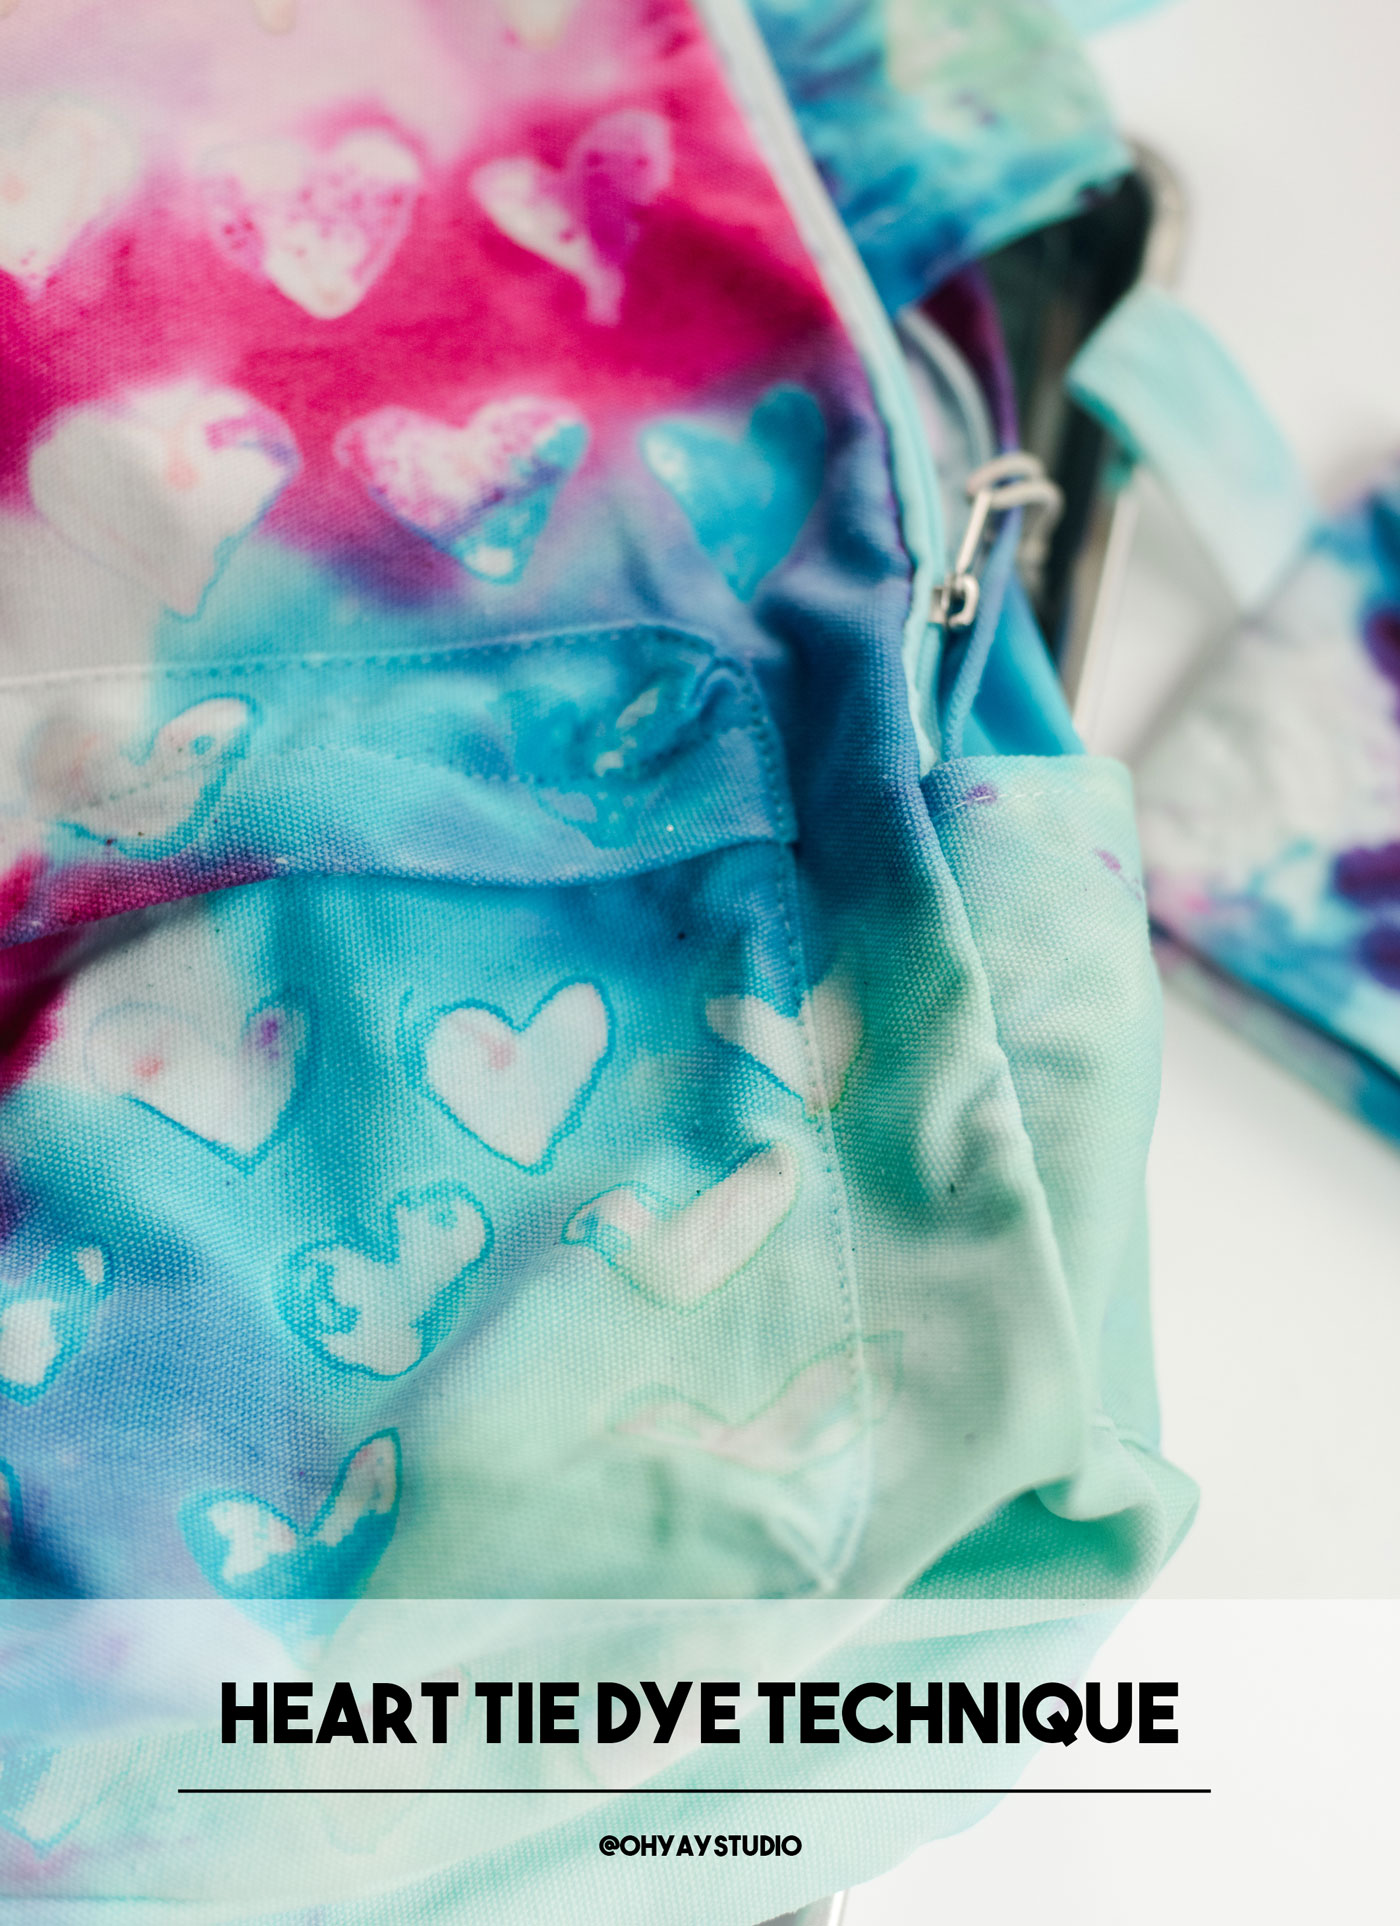
Remember when I figured out that glue can resist tie dye?? Well, I’ve been obsessed with this idea ever since, drawing all over things with glue to see which sub-straights work best for the glue to resist (and let me tell you that the canvas tote and this backpack have worked out the absolute best….the thicker the fabric, the better IMO)!

MATERIALS:

  • *Tulip One Step ā€œHeartā€ Tie Dye Kit šŸ™‚ – this includes the washable pen to help with those heart shapes šŸ™‚Ā 
  • *100% Canvas backpack + pencil pouch
  • *A bottle of Aleene’s Tacky glue (PVA washable glue)
  • *A cookie rack and tub (or tray) that is safe to lay the tie dyed product on (ie, don’t re-use this with food at a future date)
  • *Iron
  • *plastic wrap or plastic bags

INSTRUCTIONS FOR BACKPACK: 

1. Iron your backpack to make sure that all of the wrinkles and creases are out. This is important so that the glue dries flat and doesn’t run down the backpack. 

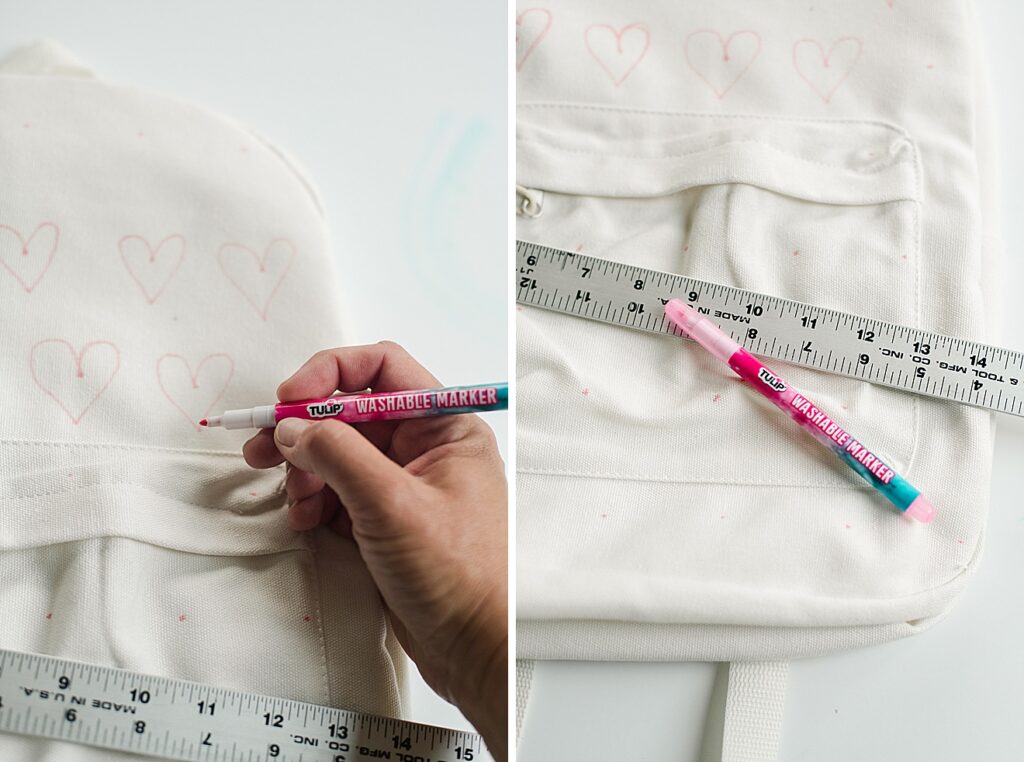
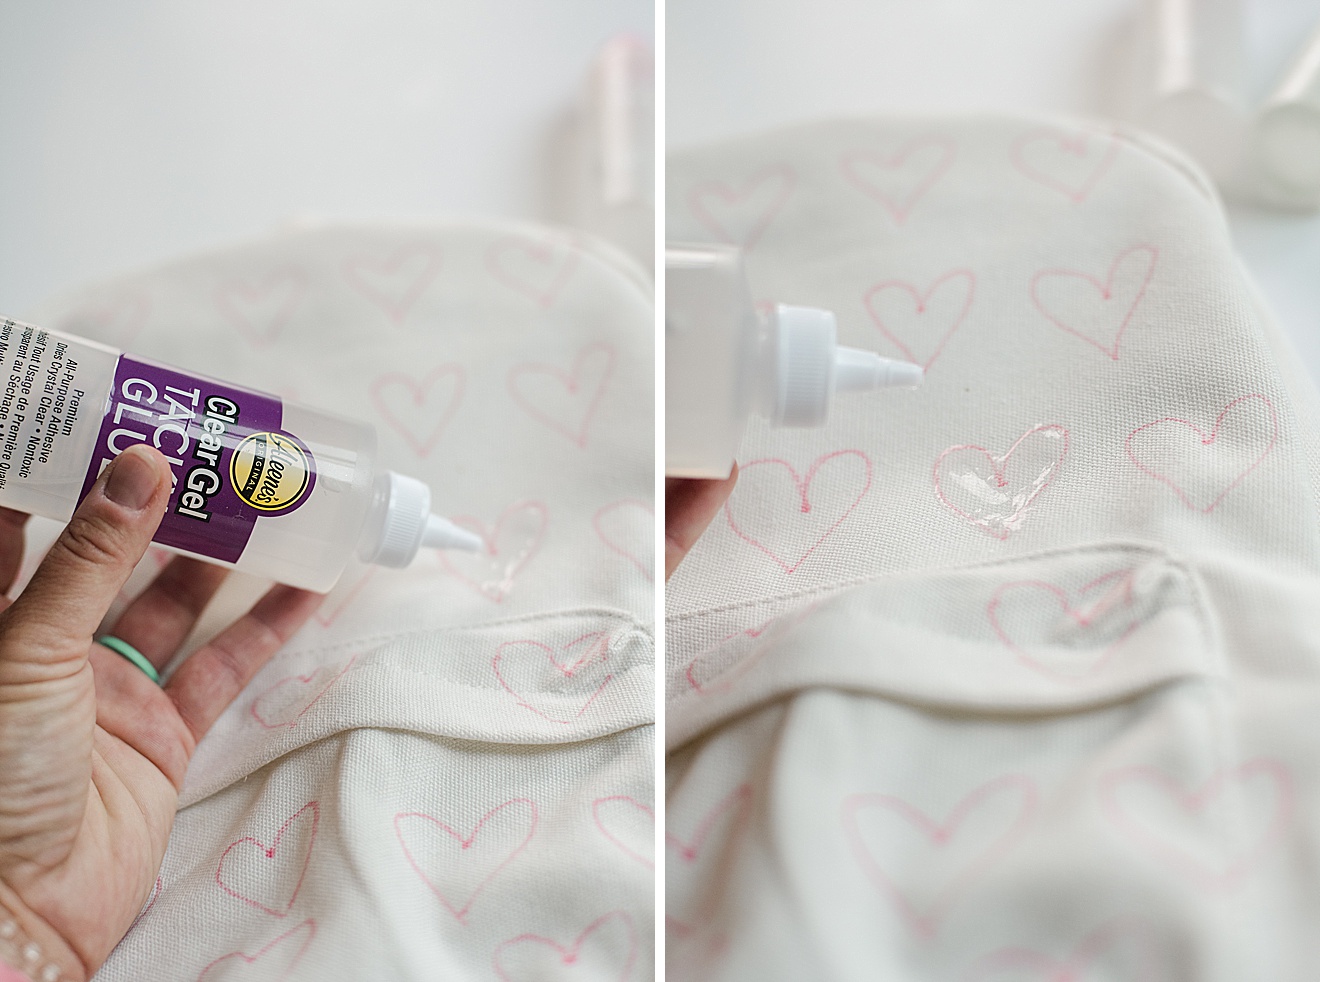
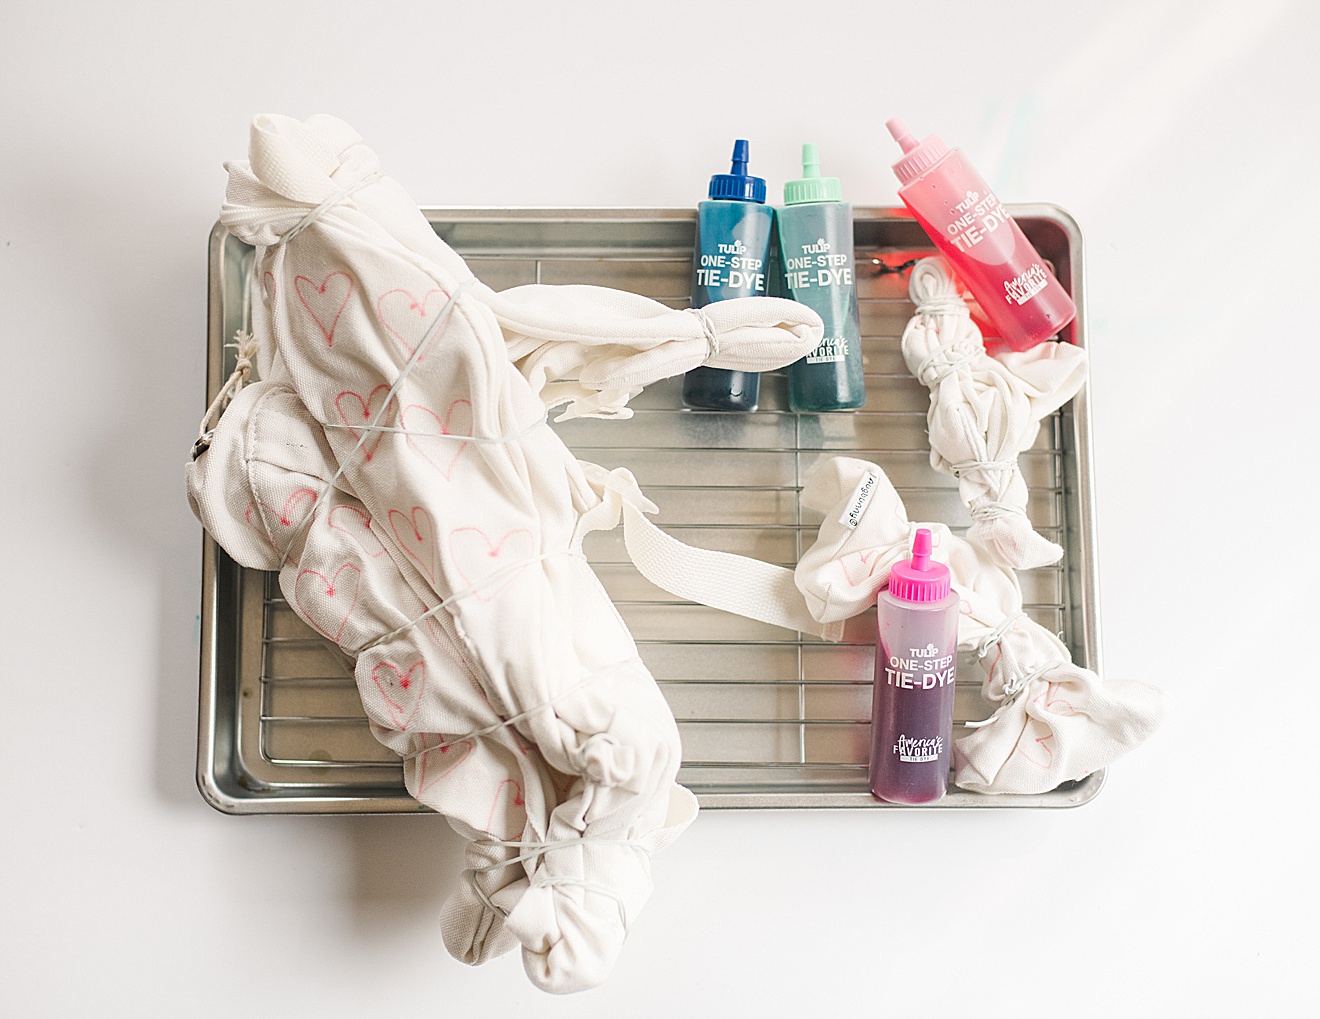
2. With the washable marker that is included in the Heart Tie Dye kit, begin marking up your backpack. You can choose to use a ruler to mark out the spaces evenly OR you can just go for it and begin to make heart shapes all over your backpack. Then generously (but without too much ā€œpoolingā€) fill in each heart with glue. Begin by testing your ā€œlineā€ on a piece of paper to make sure that you have the right consistency of ā€œsqueezeā€ to cover the hearts. 

*tip : look at various angles, specifically at table height to the backpack, to be sure that you’ve covered the areas completely with enough glue to resist the dye. You will want the glue to be ā€œcomplete and fullā€ in the areas you’ve applied, but not pooling too much that’s its dribbling outside of the heart shape

Heart Tie Dye DIY, DIY how to, How to do one-step tie dye, Tie Dye glue resist

3. Once you’ve covered all of your hearts, set aside to dry COMPLETELY šŸ™‚ 

4.Ā  Now, begin scrunching up your backpack and using the included rubber bands (in the kit) to ā€œsecureā€ it together in a scrunch.

Heart Tie Dye DIY, DIY how to, How to do one-step tie dye, Tie Dye glue resist

A few tips as you scrunch and before you dye: 

*CLOSE YOUR BACKPACK! Be sure not to have any zippers open….if the dye goes through and saturates the inside of the pack the same as the outside, it is possible that the glue won’t resist as well because the dye will just seep up from underneath the glue and still saturate the canvas

*Do your best to scrunch up the sides (don’t forget the straps too) and scrunch up the areas that aren’t covered in hearts/glue. Leave some of the front (areas that are full of glue rests) ā€œopenā€ā€¦.essentially the glue is the resist and you don’t want too many folds on the front because you want to be able to see the heart shapes over the scrunched up shapes šŸ™‚ 

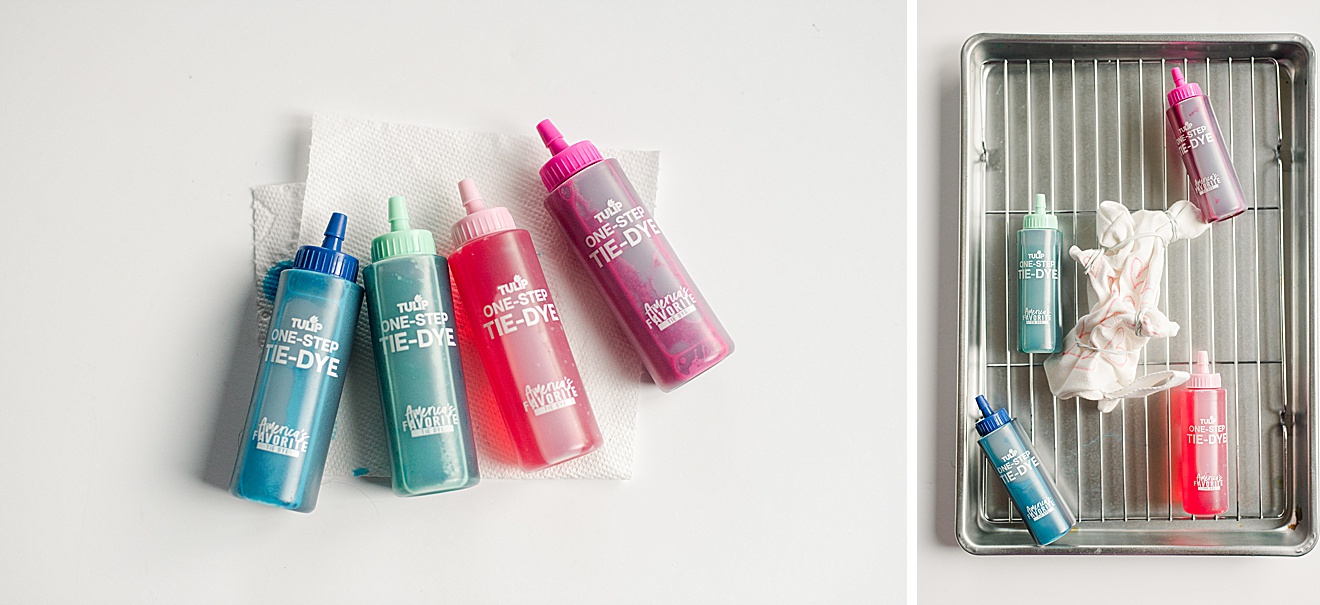
4. Prep your dye by removing the bottles from the Heart tie dye kit and filling all 4 colors to the fill line instructed on the bottle! Carefully shake the bottles to make sure all of the dye is mixed

**tip: cover the top of the bottle with a paper towel while you shake to be sure no dye squirts out while mixing.Ā 

Heart Tie Dye DIY, DIY how to, How to do one-step tie dye, Tie Dye glue resist

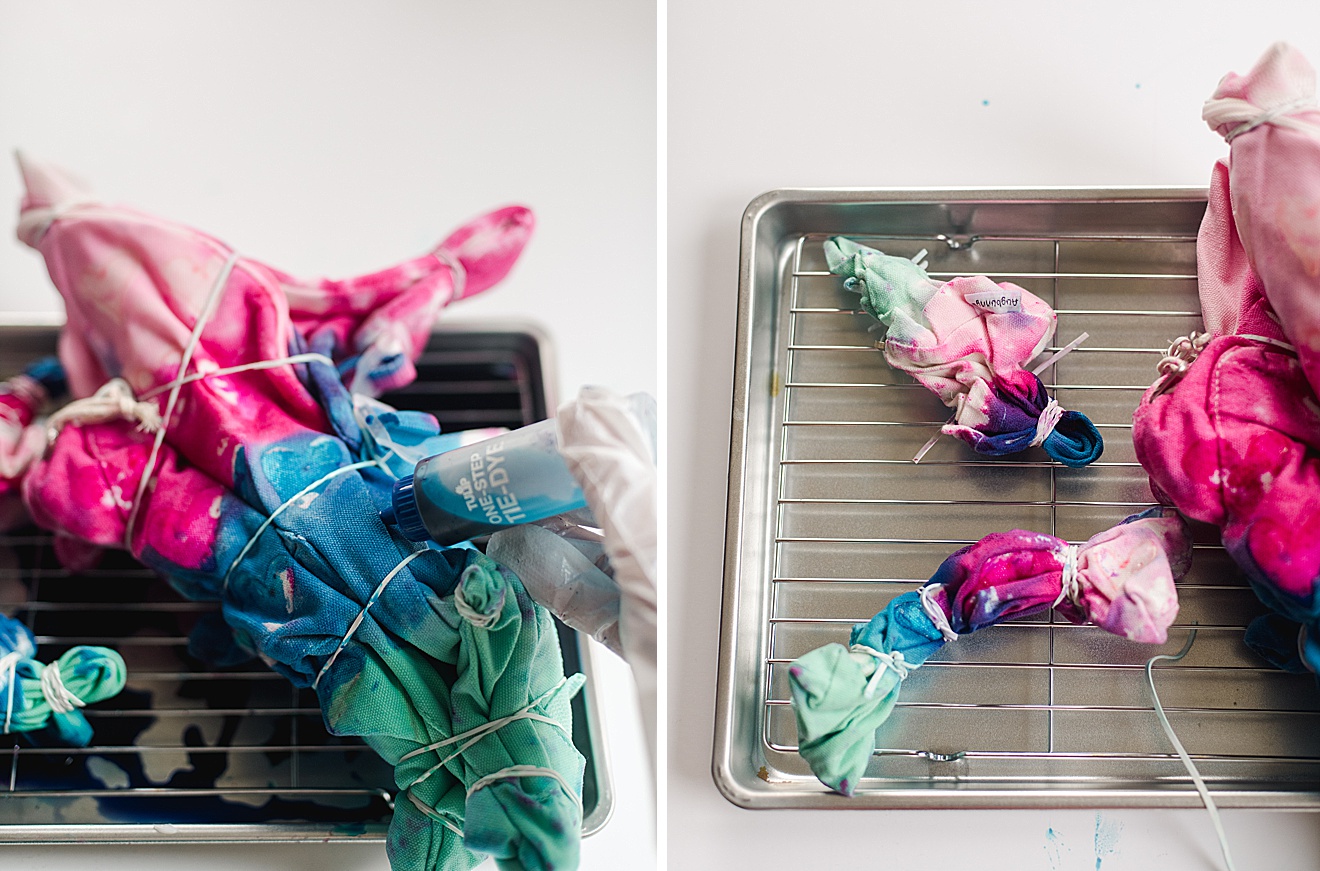
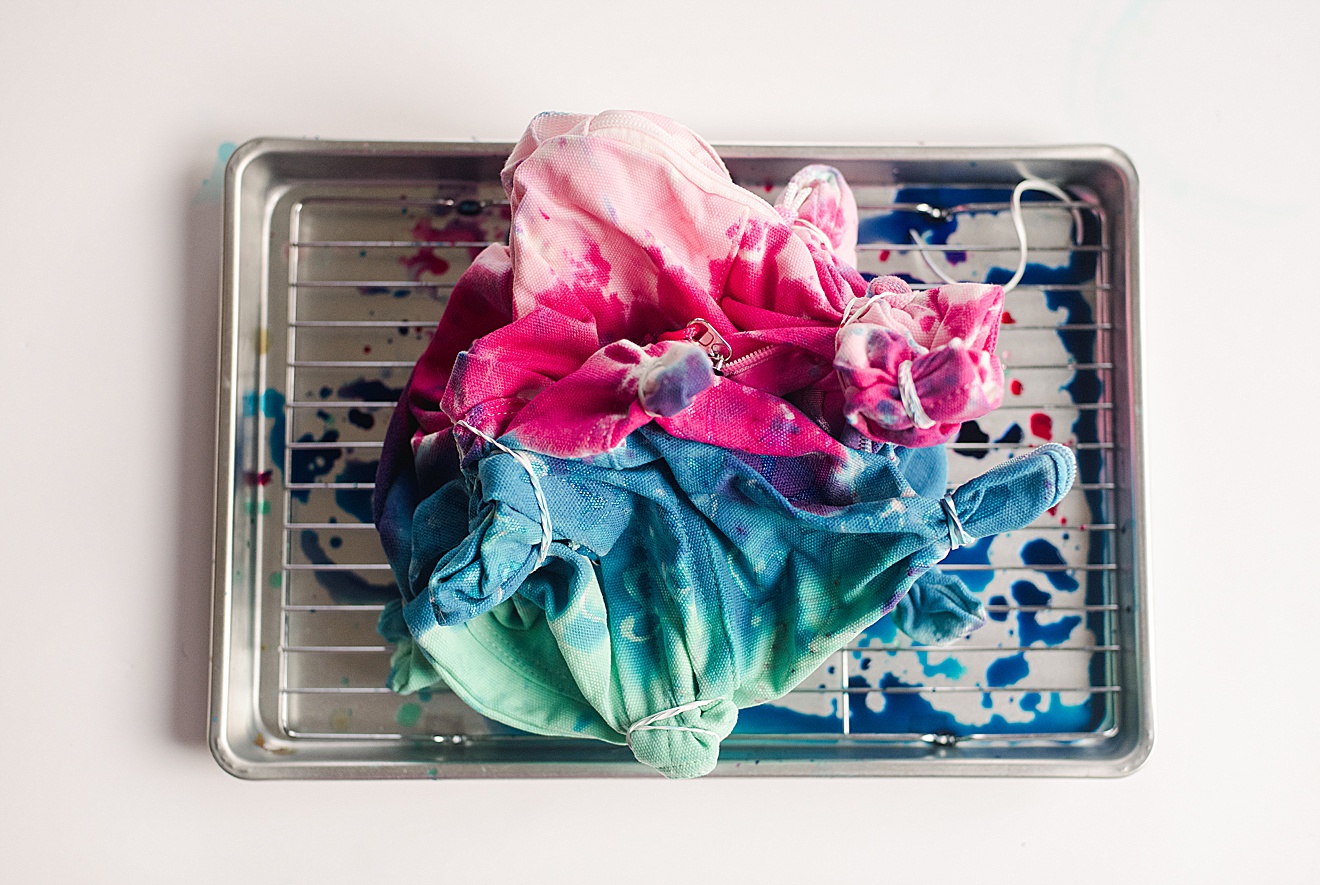
5. Put your gloves on and get ready to dye! šŸ™‚ Place your scrunched up backpack onto the cookie rack inside the tray (this will catch the excess dye AND make sure your backpack isn’t ā€œsitting in dyeā€ while it cures overnight). Then with one color of dye, begin to squirt the backpack, making sure to fill every crease, crevice, hole and space as best as you can. Be patient while covering in dye…sometimes the dye takes a bit to soak in, so you can choose to use your hands to press the dye into the backpack as you are squirting it on.Ā 

Heart Tie Dye DIY, DIY how to, How to do one-step tie dye, Tie Dye glue resist

6. Once every area of your backpack is covered it’s time to let it sit. Either cover your tray with plastic wrap or remove the tote and place it gently into a reusable plastic bag. Allow to sit overnight (I suggest at least 6 hours)……the longer you let it sit, the more vibrant the colors šŸ™‚ The key here is to seal the tote so that tit doesn’t dry out while you let it sit.Ā 

Heart Tie Dye DIY, DIY how to, How to do one-step tie dye, Tie Dye glue resist

7. After you’ve removed any rubber bands, rinse off any excess dye. Then fill a non-porous sink with enough (preferably warm) water to cover the backpack lying flat. Place your backpack in the standing water for about 30 minutes….this will allow the glue to begin to soften and lift off. After a few minutes, you can use your fingers to begin to scrape off the glue (you will feel it kinda slimy as it is coming off the canvas…ewww). 

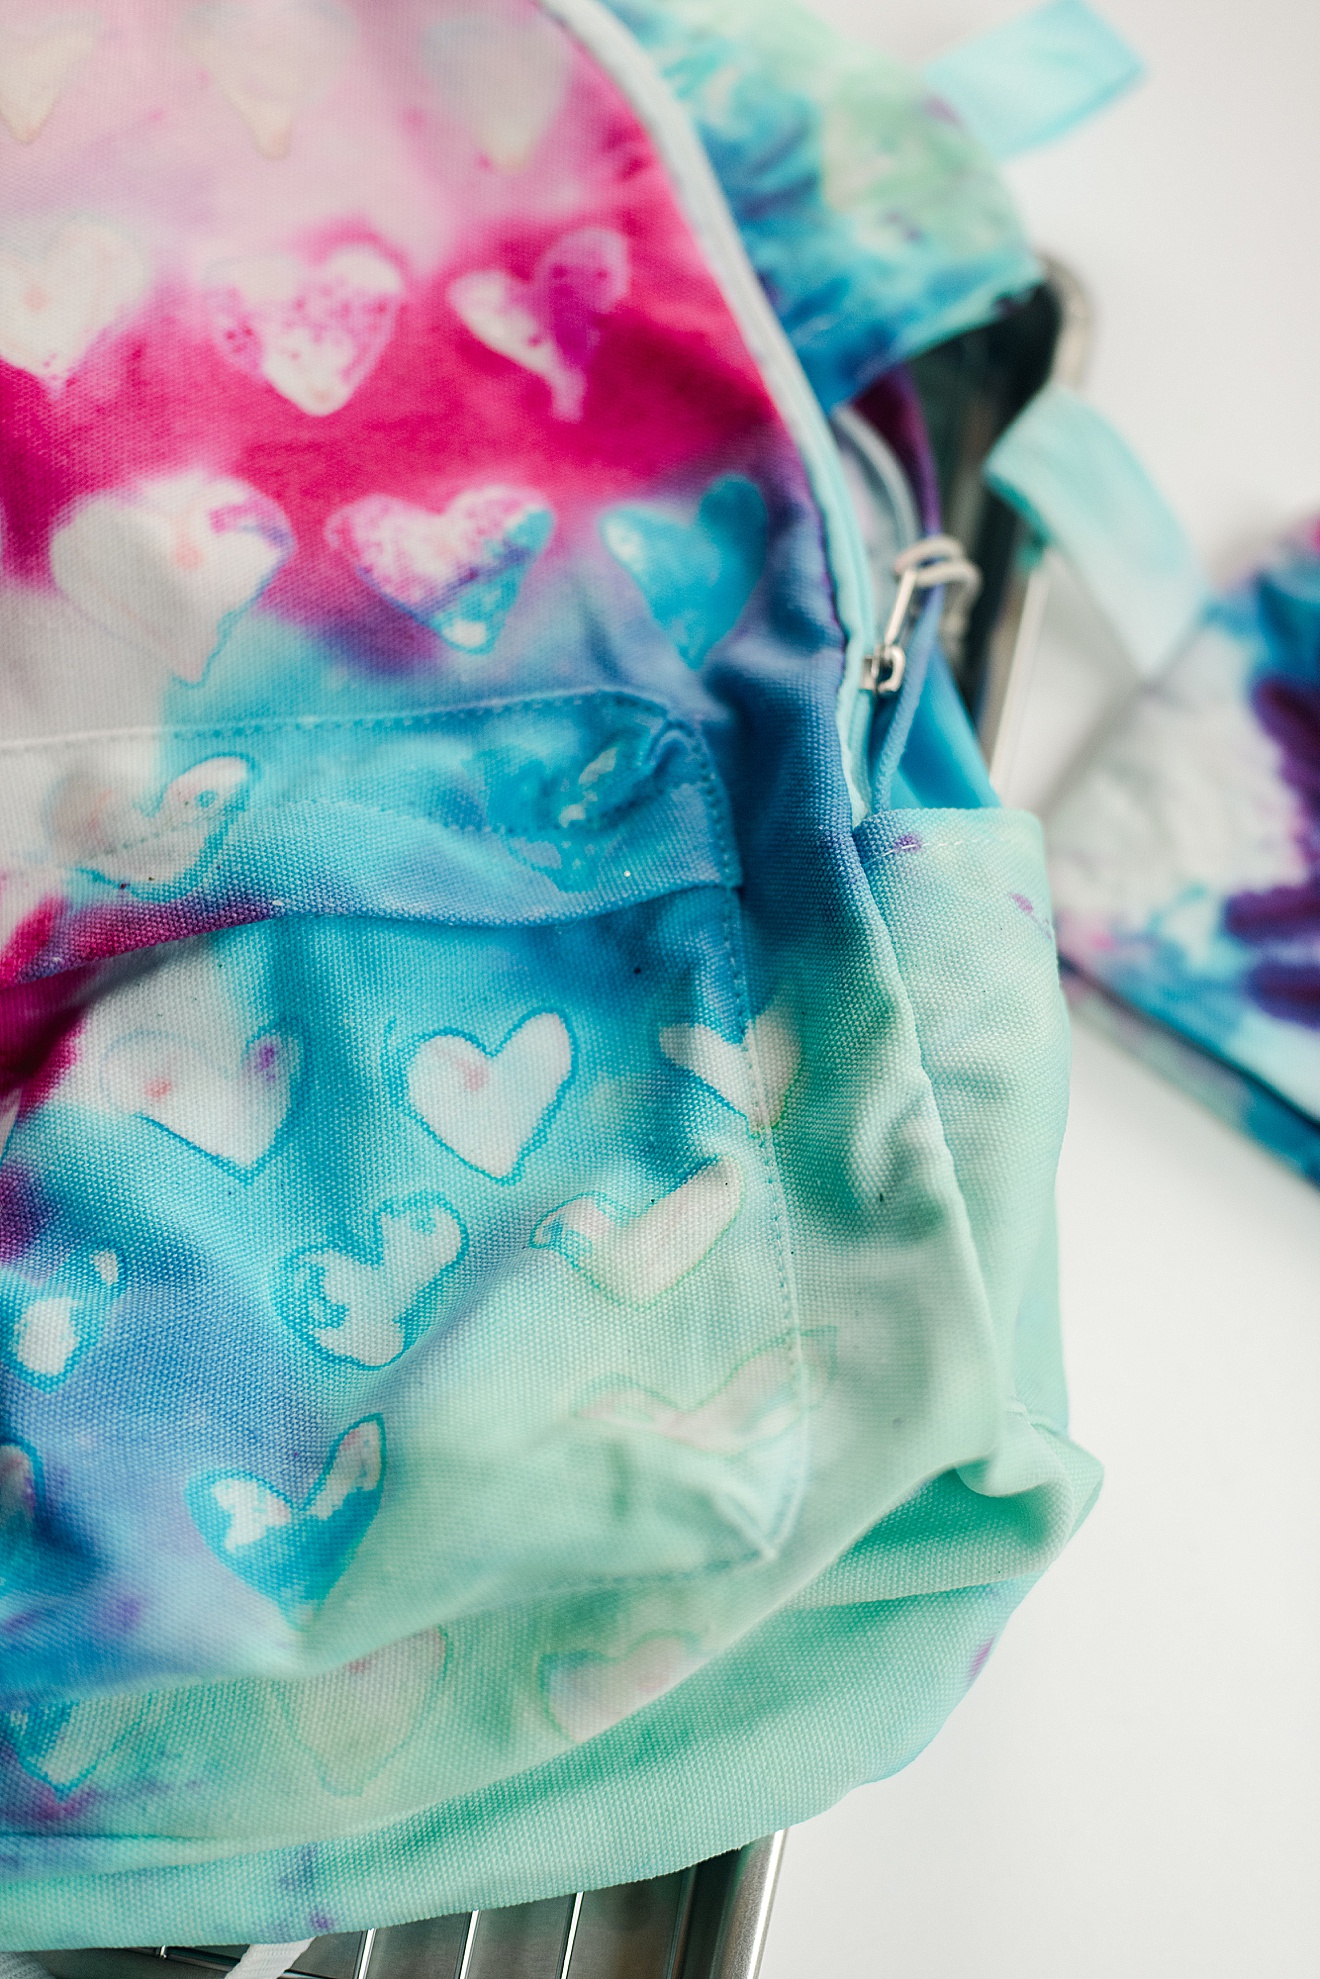
Don’t be alarmed if you don’t see your design right away……sometimes the dye sits on top of the glue and once the glue is removed the design is revealed more šŸ™‚ 

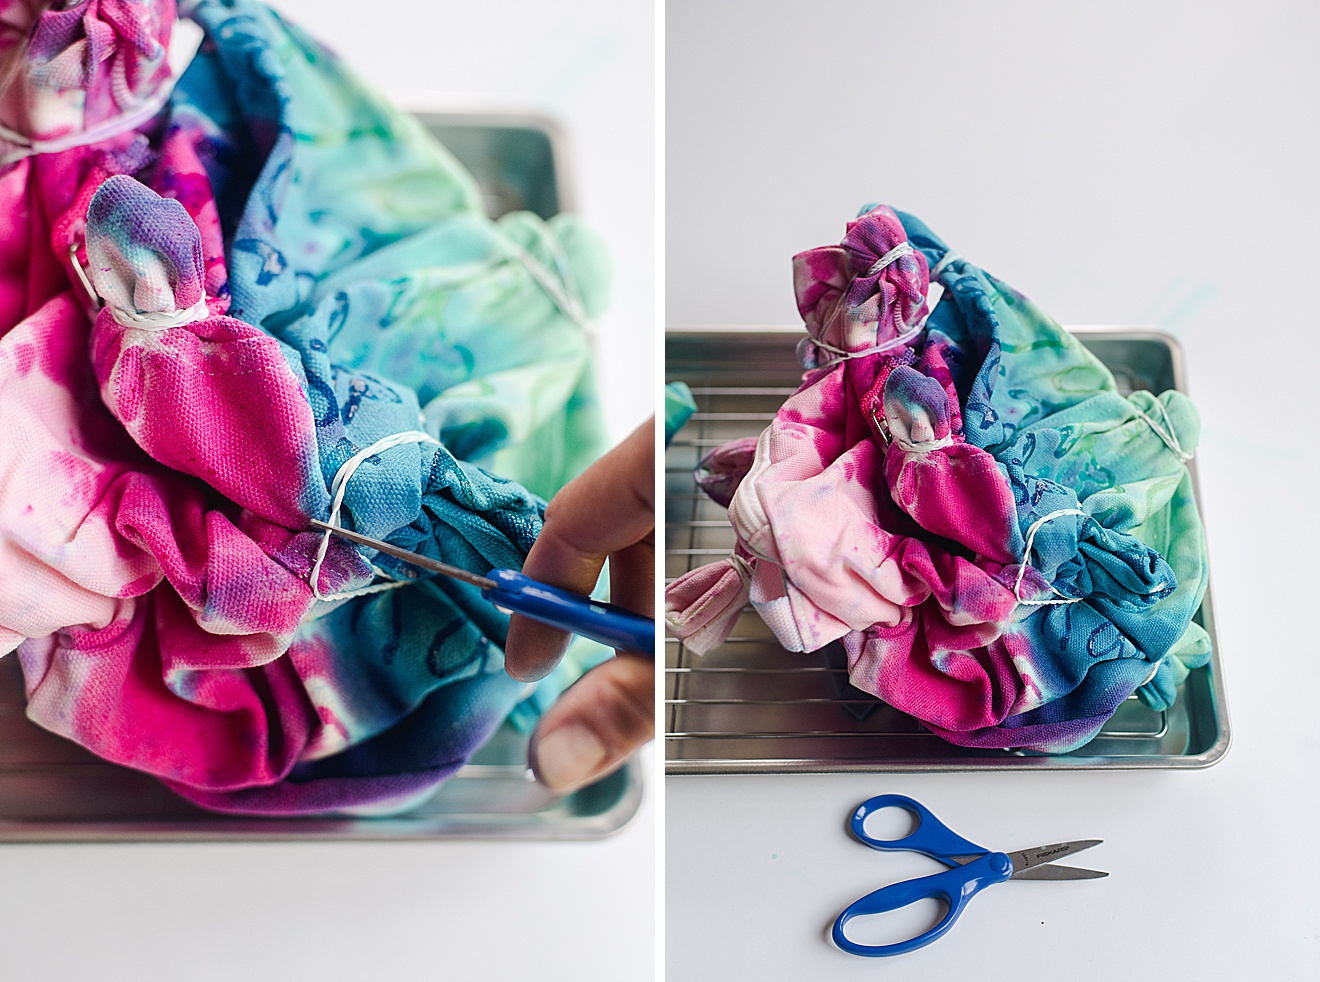
8. Repeat step 7 as many times as necessary until the water runs clear and all glue is removed šŸ™‚Ā 

Heart Tie Dye DIY, DIY how to, How to do one-step tie dye, Tie Dye glue resist

9. Dry your backpack (separately than other clothing if you choose to use your machine dryer) then fill it with ANY and ALLLLL school supplies!Ā 

Heart Tie Dye DIY, DIY how to, How to do one-step tie dye, Tie Dye glue resist

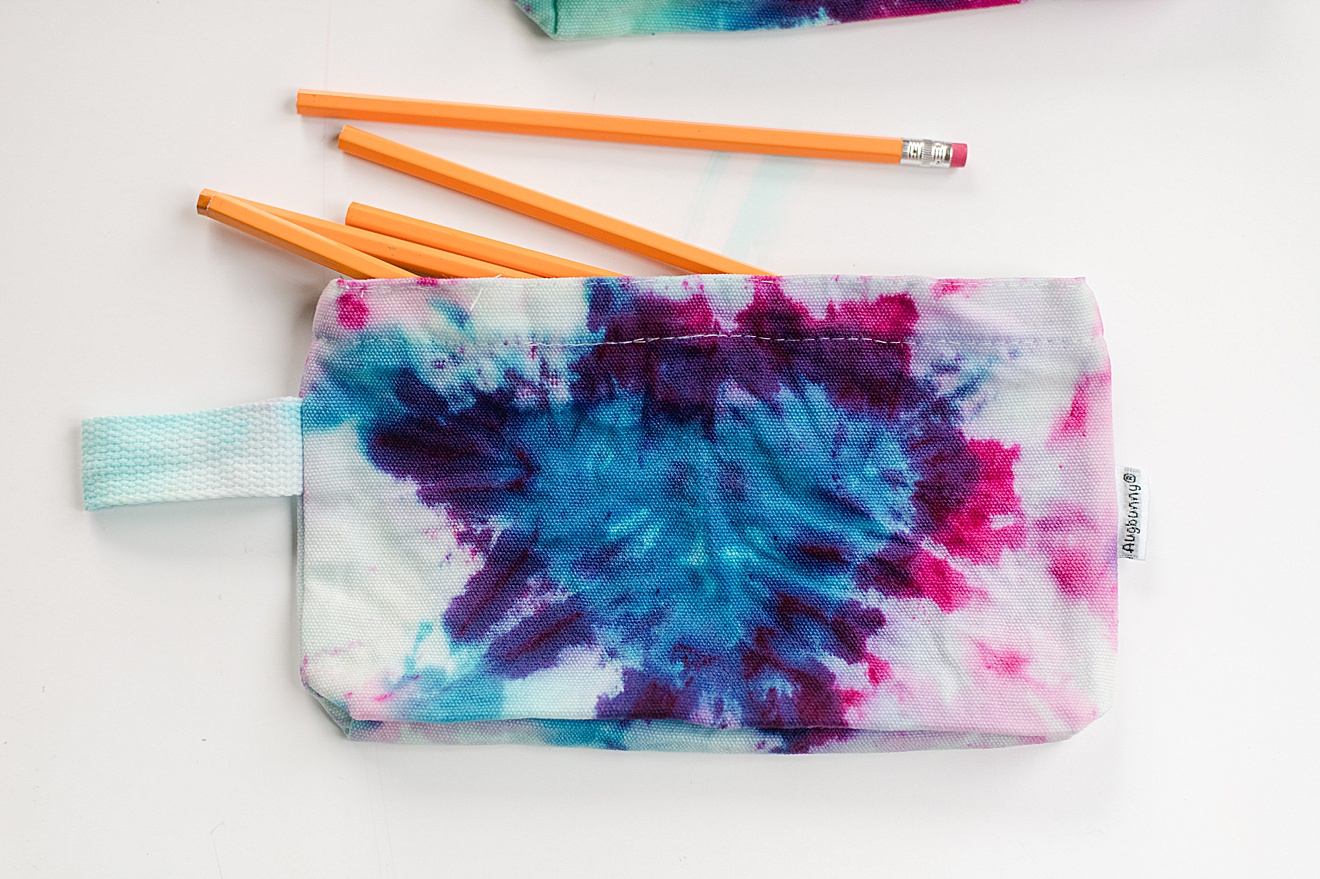
INSTRUCTIONS FOR HEART PENCIL POUCH: 

1. Prep your pouch by unzipping it and opening it up to figure out where the best place is to make your heart. Ideally you want to choose the most flexible part of the pouch that is clear of creases, zippers or pulls šŸ™‚Ā 

Heart Tie Dye DIY, DIY how to, How to do one-step tie dye, Tie Dye glue resist

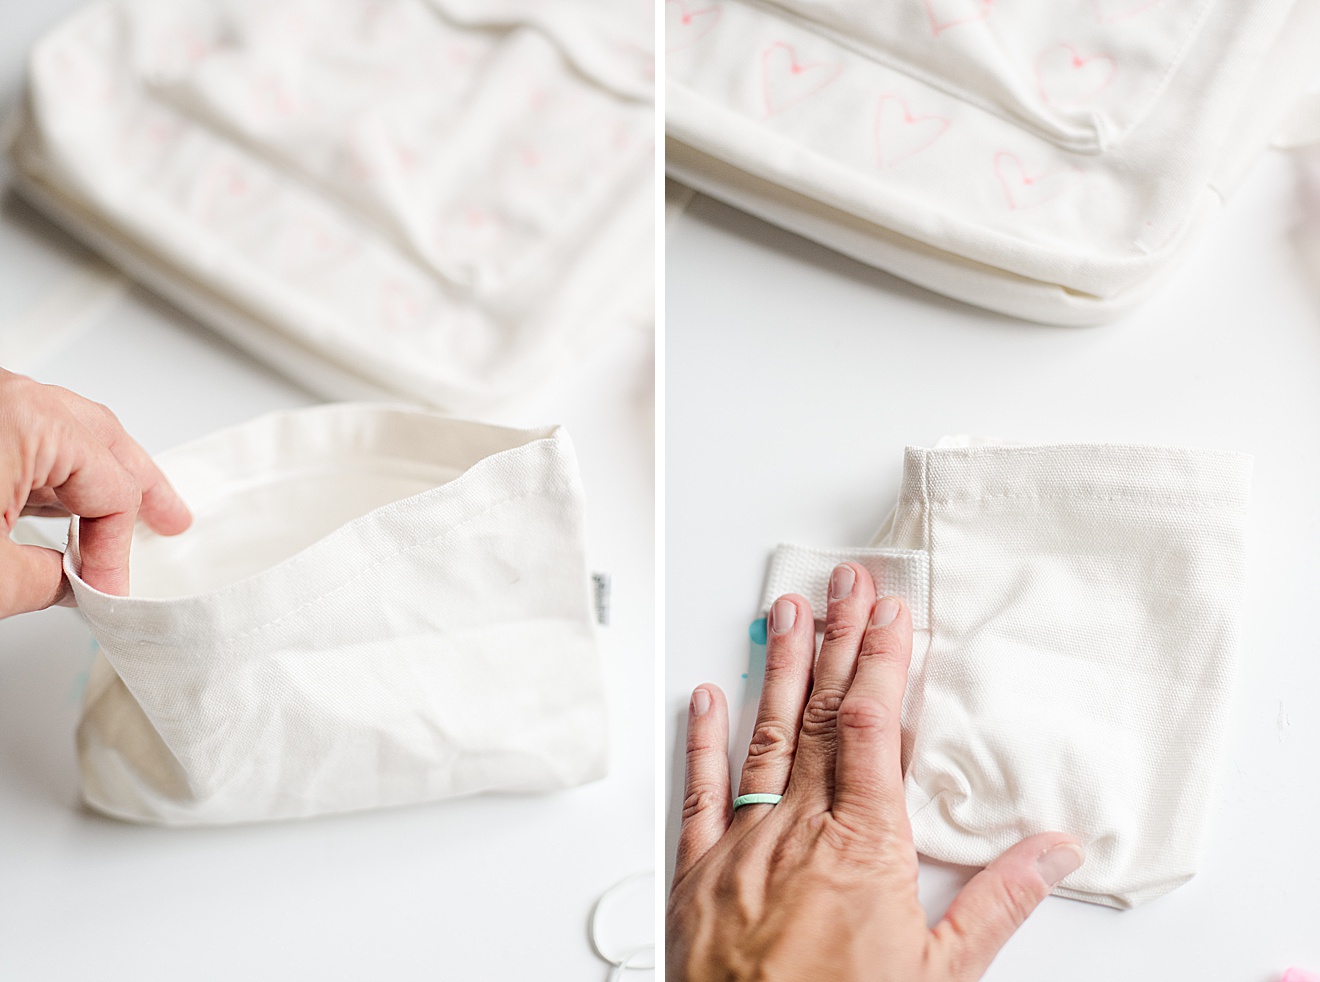
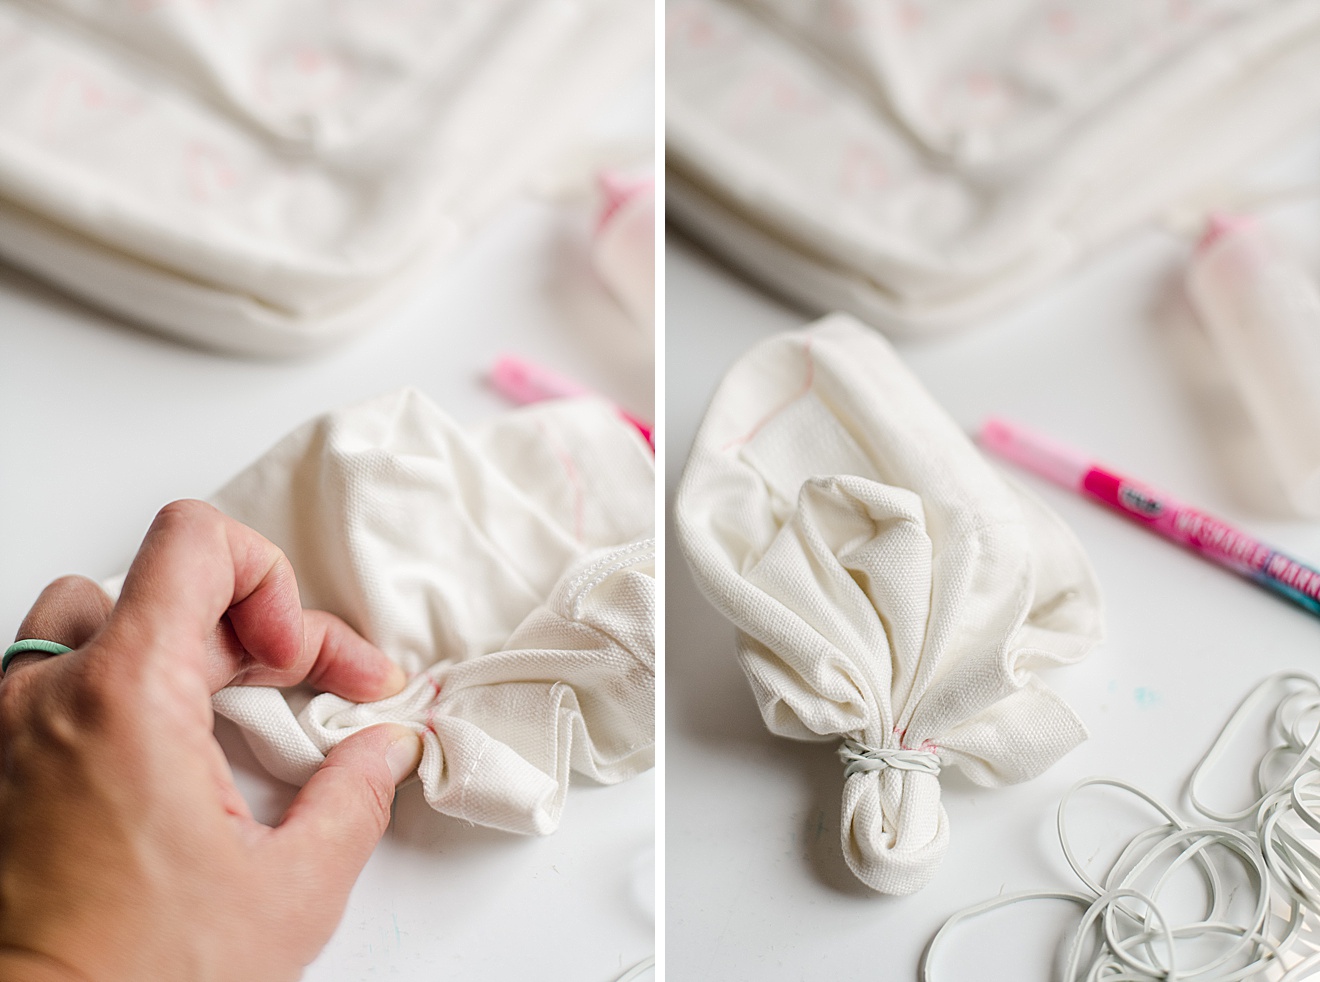
2. You can reference the included instructions that come with your Heart tie dye kit for the folding/dying. Essentially you will fold the area of your pouch in 1/2 and draw a 1/2 heart along the folded edge. Then, with small scrunches, follow the 1/2 heart line to scrunch up your pouch and TIGHLY add a rubber band to the line. Then scrunch up the rest of your pouch in any way you’d like and add more rubber bands to keep it together.Ā 

Heart Tie Dye DIY, DIY how to, How to do one-step tie dye, Tie Dye glue resist

3. Put on your gloves and with the dye that you’ve already mixed from your backpack, begin adding dye to your pencil pouch šŸ™‚ 

**if you haven’t already mixed your die, refer to the included instructions or step 4 of the Backpack instruction from this blog post

4. Package up your dyed pouch into a sealed bag to let it sit and cure overnight (at least 6 hours) šŸ™‚ 

5. Cut the rubber bands off of the pouch and rinse the extra dye from the canvas. Run your pencil pouch under cold water until all of the excess dye is out and the water runs clear. Set your pouch aside to dry (or put in the machine dryer) and once dry fill it with all of your fave pencils or pens for school! šŸ™‚Ā 

Heart Tie Dye DIY, DIY how to, How to do one-step tie dye, Tie Dye glue resist
Pin
Share
Tweet
0 Shares


1 Comment

  • Facebook
  • Instagram
  • Pinterest
  • Twitter
« Mermaid Zipper pouch PDF + free SVG file! :)
Tangerine LaCroix costume DIY »

Trackbacks

  1. 10 DIY Tie Dye Backpacks - DIYS Craftsy says:
    April 1, 2022 at 2:52 am

    […] ohyaystudio […]

    Reply

Leave a Reply Cancel reply

Your email address will not be published. Required fields are marked *

Recipe Rating


oh hi there, i’m Emily!

I am a believer, dreamer, photographer and maker! I use almond extract in all of my baking, have a problem hitting the snooze button and I truly believe that smiling can change the world!

Learn more about me HERE!

  • Facebook
  • Instagram
  • Pinterest
  • Twitter

Looking for something?

Popular posts!

DIY felt christmas garland, DIY Christmas bulb ornaments, DIY christmas bulb garland, how to make a felt christmas garland, DIY christmas garland ideas, christmas bulb DIY, christmas bulb decorating, colorful christmas garland, colorful christmas decor DIY

How to make a felt Christmas bulb garland (or ornaments)

Fruit slice wet bag pattern, watermelon pouch pattern, janome memory maker sewing machine, fruit pouch swimsuit bag, swimsuit wet bag pattern, free wet bag sewing pattern

How to make a fruit slice summer swimsuit wet bag + my first project as a Janome maker (!!!)

How to DIY a colorful wall mural, colorful wall mural, joyful wall mural, in home mural, how to make an easy colorful wall mural, dining room mural, house mural, how to paint a wall, diagonal grid on wall

Our colorful, diagonal grid dining room mural + my urge to paint more!

DIY costume, how to make a planner costume, Simplified planner costume, Emily ley planner costume, DIY halloween costume, easy DIY costume

A DIY planner costume + my creative endeavor for 2019!

Categories

  • All
  • Costumes
  • Cricut + SVG files
  • DIYs
  • Donuts
  • Holiday
  • Ice Cream
  • Kids
  • Life
  • Murals
  • Painting
  • Paper Crafts
  • phone backgrounds
  • Printables
  • Recipes
  • Sewing
  • Tie Dye
  • Uncategorized
  • Yarn + Fibers
Adding color and lots of little personalities and Adding color and lots of little personalities and faces to our weekend. Because love wins and death is conquered….so yes, this is for sure how we celebratešŸŽ‰ 
Also, every time I cracked an egg this weekend, I squealed in the sound or noise that I thought the personality of the egg would sound šŸ˜‚šŸ˜‚šŸ˜‚ obvi.
I would PICKle you as my Valentine over and over i I would PICKle you as my Valentine over and over if I could! šŸ˜‚
Also, yes, this is clearly a @claussenpicklesofficial because duh, they are the best! ā¤ļø

The alternate caption could also be ā€œyup…..it’s a Valentine pickle. Because my kids are obsessed with vinegar soaked veggies. Just swipe for the Halloween pickle proof šŸ„’ ā€œ
For the record, I got approximately zero adulting For the record, I got approximately zero adulting things done while constructing this cardboard @encantomovie Casita of my daughters dreams. Except of course inserting many phrases in place of the ā€œwe don’t talk about Brunoā€ song…..ya know, ā€œwe don’t talk about dishes no no nooooo. We don’t talk about laundryyyyyy.ā€ šŸ  šŸŽØ šŸ’› 
Also, the minute the hot glue was dry, Esther picked up the Casita, hugged it and ran it to the living room where she played most of the afternoon. A moment of Mom win to warm my heart šŸ˜­ā¤ļø
ā€œMay you find the light that guides you homeā€ ā€œMay you find the light that guides you homeā€ 
One of my fave song + fave yearly progression that makes me allll happy and sappy. Merry Christmas šŸŽ„ I hope you’re finding light this holiday season!
If I’ve said it once and I’ll say it 3 squllio If I’ve said it once and I’ll say it 3 squllion more times: I LOVE PAINNNTTTTT! Here’s the thing……paint is always, 100% paint-overable. If you paint something, step back, live with it for while but just doesn’t feel right…..simply paint over it. Like really that simple. 
I’ve done this a handful of times in our own home….bathrooms, bedrooms, hallways (like so many times in the hallways šŸ˜‚)! 
Painting to me is a slight reflection of life: nothing is perfect, and even when mistakes or missteps feel overwhelming they are always worth fixing and usually fixable annnnnd it’s amazing how much a  small moment can bring big joy…..or in this case a big moment on a biiigggg wall šŸŽ‰šŸŽØ
I am doing my last restock of these little nutcrac I am doing my last restock of these little nutcracker buddies tonight at 7pm (central time)! So if you’ve had your eyes on them, especially after seeing them in @hgtvmagazine (gahhhhhhh, still can’t get over this), then be sure to find yourself in my shop tonight at 7pm central!
Even thought I had alllll the intentions of postin Even thought I had alllll the intentions of posting this sooner, I make no apologies because I don’t like living in the land of the ā€œshoulddasā€. Especially during this season of intentional slowing down and anticipating the arrival of Christmas. 
Download this coloring advent village and take a few min away to color each house and talk about the season and the way you can shine light! 
PS, download the file on my blog amongst the other holiday themed doodles coloring sheets…..AND we printed our village in gargantuan size from Staples….(their engineer print) and I am not one but mad about the fact that it will take up nearly half a wall! šŸ˜‚ ā¤ļøšŸŽ„
Tis the season for my crafting fingers to be full Tis the season for my crafting fingers to be full of hot glue burns and can honestly say it makes me happy. Like so thankful and happy! 
Okkayyy well maybe not the burns themselves but the fact that I’m over here, in my little studio space in Wisconsin crafting my heart out and you’re sending the love right back to me with all the support! Support for the doodles and painting and costumes and sewing and other colorful things that I’m eager to share! 
SO thankful. Like I’d really love to give you all a humongous big hug right now. 

And for all the online shoppers this weekend, use code YAYcreatives for 20% off everything in my shop through Monday night. Including these happy Colorful felt trees! (I meannnnn, look at their personality šŸ˜‚šŸ˜)
Follow Emily on Insta

Stay Connected

  • Facebook
  • Instagram
  • Pinterest
  • Twitter

all rights reserved Ā© oh yay studio 2019

  • About
  • Contact
  • Disclosure
  • Terms
Adding color and lots of little personalities and Adding color and lots of little personalities and faces to our weekend. Because love wins and death is conquered….so yes, this is for sure how we celebratešŸŽ‰ 
Also, every time I cracked an egg this weekend, I squealed in the sound or noise that I thought the personality of the egg would sound šŸ˜‚šŸ˜‚šŸ˜‚ obvi.
I would PICKle you as my Valentine over and over i I would PICKle you as my Valentine over and over if I could! šŸ˜‚
Also, yes, this is clearly a @claussenpicklesofficial because duh, they are the best! ā¤ļø

The alternate caption could also be ā€œyup…..it’s a Valentine pickle. Because my kids are obsessed with vinegar soaked veggies. Just swipe for the Halloween pickle proof šŸ„’ ā€œ
For the record, I got approximately zero adulting For the record, I got approximately zero adulting things done while constructing this cardboard @encantomovie Casita of my daughters dreams. Except of course inserting many phrases in place of the ā€œwe don’t talk about Brunoā€ song…..ya know, ā€œwe don’t talk about dishes no no nooooo. We don’t talk about laundryyyyyy.ā€ šŸ  šŸŽØ šŸ’› 
Also, the minute the hot glue was dry, Esther picked up the Casita, hugged it and ran it to the living room where she played most of the afternoon. A moment of Mom win to warm my heart šŸ˜­ā¤ļø
ā€œMay you find the light that guides you homeā€ ā€œMay you find the light that guides you homeā€ 
One of my fave song + fave yearly progression that makes me allll happy and sappy. Merry Christmas šŸŽ„ I hope you’re finding light this holiday season!
If I’ve said it once and I’ll say it 3 squllio If I’ve said it once and I’ll say it 3 squllion more times: I LOVE PAINNNTTTTT! Here’s the thing……paint is always, 100% paint-overable. If you paint something, step back, live with it for while but just doesn’t feel right…..simply paint over it. Like really that simple. 
I’ve done this a handful of times in our own home….bathrooms, bedrooms, hallways (like so many times in the hallways šŸ˜‚)! 
Painting to me is a slight reflection of life: nothing is perfect, and even when mistakes or missteps feel overwhelming they are always worth fixing and usually fixable annnnnd it’s amazing how much a  small moment can bring big joy…..or in this case a big moment on a biiigggg wall šŸŽ‰šŸŽØ
I am doing my last restock of these little nutcrac I am doing my last restock of these little nutcracker buddies tonight at 7pm (central time)! So if you’ve had your eyes on them, especially after seeing them in @hgtvmagazine (gahhhhhhh, still can’t get over this), then be sure to find yourself in my shop tonight at 7pm central!
Even thought I had alllll the intentions of postin Even thought I had alllll the intentions of posting this sooner, I make no apologies because I don’t like living in the land of the ā€œshoulddasā€. Especially during this season of intentional slowing down and anticipating the arrival of Christmas. 
Download this coloring advent village and take a few min away to color each house and talk about the season and the way you can shine light! 
PS, download the file on my blog amongst the other holiday themed doodles coloring sheets…..AND we printed our village in gargantuan size from Staples….(their engineer print) and I am not one but mad about the fact that it will take up nearly half a wall! šŸ˜‚ ā¤ļøšŸŽ„
Tis the season for my crafting fingers to be full Tis the season for my crafting fingers to be full of hot glue burns and can honestly say it makes me happy. Like so thankful and happy! 
Okkayyy well maybe not the burns themselves but the fact that I’m over here, in my little studio space in Wisconsin crafting my heart out and you’re sending the love right back to me with all the support! Support for the doodles and painting and costumes and sewing and other colorful things that I’m eager to share! 
SO thankful. Like I’d really love to give you all a humongous big hug right now. 

And for all the online shoppers this weekend, use code YAYcreatives for 20% off everything in my shop through Monday night. Including these happy Colorful felt trees! (I meannnnn, look at their personality šŸ˜‚šŸ˜)
Follow Emily on Insta

Copyright © 2022 · Divine theme by Restored 316

Copyright © 2022 Ā· Divine Theme on Genesis Framework Ā· WordPress Ā· Log in